The World’s Greatest Hikes:
Leaving only footprints but taking home incredible memories, there’s something beyond magical about hiking — from the peaks of the Himalayas to the depths of Volcanic Iceland, the paths on the planet are enough to make you leave home behind as you set off to explore the incredible dense jungles, mountain passes and ancient trails that have not only been walked for centuries — but which continue to inspire and evoke some of the greatest feelings on earth.
Whether you’re seeking a multi-day wilderness expedition to rediscover or find yourself, or one of the best days of your life on a leisurely scenic one-day hike, we’ve rounded out what we believe to be the top 30 hikes on the planet that will not only push you to your limits, but deliver stunning scenery and experiences that can be truly life-changing. So, with your hiking boots ready, get ready to tramp across the planet on one of the world’s greatest hikes:
1.) The Inca Trail, Peru: A Legendary Trek to Machu Picchu

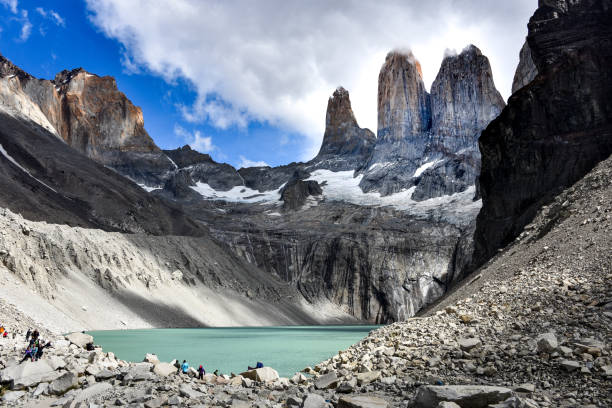
Overview: The Inca Trail is one of the most iconic hiking routes in the world, taking adventurers through lush cloud forests, ancient ruins, and breathtaking mountain landscapes before culminating at the legendary Machu Picchu. This 26-mile (42 km) trail follows the footsteps of the ancient Incas, passing through a series of well-preserved archaeological sites, offering a rare glimpse into the past. The hike is challenging yet rewarding, with steep ascents, high-altitude passes, and unpredictable weather conditions.
Every year, thousands of trekkers embark on this journey, seeking the thrill of conquering the infamous Dead Woman’s Pass at 13,828 feet (4,215 meters) and the satisfaction of arriving at the Sun Gate for their first panoramic view of Machu Picchu. Along the way, hikers experience diverse ecosystems, from high-altitude Andean landscapes to dense, misty jungles teeming with wildlife and exotic plants.
Completing the Inca Trail is not just about the physical challenge—it’s about immersing yourself in history, culture, and natural beauty. The trail is strictly regulated to preserve its fragile ecosystem, requiring permits that often sell out months in advance. But for those who plan ahead and make the journey, the experience is nothing short of life-changing.
Duration: The traditional Inca Trail trek takes four days and three nights, covering approximately 26 miles (42 km). However, alternative routes, including a shorter two-day trek, are available for those with less time or experience.
Location: The Inca Trail is located in the Cusco region of Peru, winding through the Andes Mountains and culminating at Machu Picchu.
How to Get There: Fly into Alejandro Velasco Astete International Airport (CUZ) in Cusco, Peru. From Cusco, travelers must take a train or bus to Ollantaytambo, followed by a short transfer to the starting point of the trek at Kilometer 82. Most trekkers join guided tours that include transportation and permits.
Accommodation: While trekking the Inca Trail, accommodation is typically provided by the tour operators and is included in the guided trek packages. Along the trail, hikers stay in designated campsites, where tents are set up for the group, and porters handle the setup and take-down. These campsites vary in terms of comfort, but most offer basic amenities such as shared washrooms and a communal dining tent for meals. Expect a cozy, yet rustic camping experience with stunning mountain views, where you’ll have the chance to meet fellow trekkers and share stories.
For those staying in Cusco before and after the trek, the city offers a wide range of accommodation options. Budget travelers can opt for hostels, which typically cost between $10 and $30 per night, while mid-range hotels and guesthouses range from $40 to $100 per night. For those seeking luxury, Cusco boasts upscale hotels that offer modern amenities, costing $150 or more per night.
After the trek, many hikers choose to stay in Aguas Calientes, the town near Machu Picchu, as it provides easy access to the ruins for a second visit. Aguas Calientes has a variety of accommodations, from simple hostels to more comfortable hotels, typically ranging from $30 to $150 per night.
Budget Estimate: A guided Inca Trail trek typically costs between $600 and $1,200 per person, depending on the tour operator, group size, and included amenities. Additional costs include:
- Flights to Cusco: $300 – $1,000 (depending on departure location)
- Hotel in Cusco (before & after trek): $30 – $150 per night
- Tips for guides and porters: $50 – $100 total
- Souvenirs and extra expenses: $50 – $200
Best View Spot: The Sun Gate (Inti Punku) offers the most breathtaking first glimpse of Machu Picchu, especially at sunrise. For an even more stunning perspective, hikers can climb Huayna Picchu after reaching Machu Picchu.
Photography Tips:
- Bring a lightweight DSLR or high-quality smartphone with extra batteries.
- Capture the morning light at the Sun Gate for magical views of Machu Picchu.
- Use a wide-angle lens to frame panoramic shots of the ruins and surrounding peaks.
- Take close-ups of ancient stone carvings and the diverse flora along the trail.
Best Time to Go: The best time to hike the Inca Trail is during the dry season, from May to September, when rainfall is minimal, and the views are clearest. Avoid the wet season (November to March), as heavy rains can make the trail slippery and dangerous.
Tip: For a more intimate experience, book your accommodation well in advance, especially during the high season (May – September), when availability can be limited.
Expected Weather:
- Dry Season (May – September): Cool mornings (5–10°C/41–50°F), warm afternoons (15–20°C/59–68°F), and cold nights (0–5°C/32–41°F).
- Rainy Season (November – March): Warmer temperatures but frequent heavy rains and muddy trails.
Recommended Gear:
- Sturdy, waterproof hiking boots
- Lightweight, moisture-wicking clothing
- Warm layers for cold nights
- A rain jacket and poncho
- Trekking poles for steep sections
- A good-quality backpack with a hydration system
- Sunscreen, hat, and sunglasses
- Headlamp and extra batteries
- Portable power bank for electronics
Top Tips for Completing the Hike:
- Book your permit early – Only 500 permits are issued per day, and they sell out months in advance.
- Acclimate to the altitude – Spend at least 2–3 days in Cusco before the hike to prevent altitude sickness.
- Train beforehand – Cardio, leg strength, and endurance training will make the trek more manageable.
- Pack light – Only bring essentials; porters have weight limits.
- Stay hydrated and eat well – Dehydration and lack of energy can make high-altitude hiking much harder.
- Respect the trail – Leave no trace and follow guidelines to preserve this historic route.
2.) Everest Base Camp Trek, Nepal: A Journey to the Foot of the World’s Tallest Peak


6) Kilimanjaro Trek, Tanzania: Conquering the Roof of Africa

Overview: Mount Kilimanjaro, the tallest mountain in Africa, stands proudly at 19,341 feet (5,895 meters) above sea level, making it one of the world’s most sought-after trekking destinations. The Kilimanjaro Trek takes hikers through diverse ecosystems, from tropical rainforests to alpine deserts, culminating at the summit, Uhuru Peak. The trek is known for its non-technical nature, allowing those with a good level of fitness to reach the top without requiring advanced mountaineering skills. However, the altitude and challenging conditions make it a physically demanding adventure that requires preparation and perseverance.
The trek typically follows one of several routes to the summit, including the Marangu, Machame, and Lemosho routes, each offering unique experiences and views. Kilimanjaro’s landscapes vary dramatically, ranging from dense jungles teeming with wildlife to barren, rocky summits where the high-altitude environment becomes harsher. Reaching the summit of Kilimanjaro is a dream for many, and for those who succeed, it’s an incredibly rewarding achievement.
Duration: The Kilimanjaro Trek usually takes 5 to 9 days, depending on the route and pace. The Marangu Route is the quickest (5–6 days), while routes like Lemosho and Machame offer more gradual acclimatization and take 7–9 days.
Location: Mount Kilimanjaro is located in the Kilimanjaro Region of Tanzania, East Africa, near the town of Moshi. The trek takes you through different climates and ecosystems before reaching the summit at Uhuru Peak.
How to Get There: Fly into Kilimanjaro International Airport (JRO), which is located about 45 minutes from Moshi. From there, it’s a short drive to the starting points of various routes. Most trekkers arrive in Moshi a day or two before their trek to prepare, check in with guides, and gather any necessary gear.
Routes: There are five main routes to reach the summit of Mount Kilimanjario:
1. Marangu Route (Coca-Cola Route): The Marangu Route is the most popular and oldest route, often referred to as the “Coca-Cola Route” due to its relatively easier, gradual ascent. It is the only route that offers hut accommodation (rather than camping) along the way. The trek typically takes 5–6 days and is known for being straightforward, with a less strenuous ascent compared to others. However, its lower acclimatization time (due to the direct ascent) makes altitude sickness more of a risk. The route offers scenic views, but it is often considered less diverse in terms of terrain.
2. Machame Route (Whiskey Route): The Machame Route is one of the most popular and scenic routes on Kilimanjaro, taking around 6–7 days to complete. It’s known for its challenging and steep ascent, earning it the nickname “Whiskey Route.” This route offers camping at higher altitudes, which helps with acclimatization. The Machame Route is favored for its incredible views, varied landscapes, and higher chances of summiting due to its longer duration and better acclimatization opportunities.
3. Lemosho Route: The Lemosho Route is a newer and longer route, taking 7–8 days to complete. It is considered one of the most scenic, passing through diverse ecosystems like rainforests, moorlands, and alpine deserts. The extended duration allows for better acclimatization and higher success rates. The Lemosho Route joins the Machame Route on the third day, making it a great choice for those seeking a quieter and more beautiful trek with fewer crowds.
4. Rongai Route: The Rongai Route is one of the less crowded routes, making it ideal for trekkers looking for a quieter experience. It starts from the northern side of Kilimanjaro, near the Kenyan border, and is often completed in 6–7 days. The route offers a more gradual ascent compared to others, which can make it easier on the body. While the scenery is less diverse than on the southern routes, the Rongai Route provides stunning views and a more peaceful trekking experience.
5. Umbwe Route: The Umbwe Route is the shortest and steepest route, taking 5–6 days to summit. It is recommended only for experienced trekkers due to its demanding nature and challenging terrain. The route has a very direct ascent, which can increase the risk of altitude sickness due to insufficient acclimatization time. The Umbwe Route offers incredible, rugged landscapes but is best suited for those looking for a more difficult challenge.
Accommodation: Accommodation for Kilimanjaro trekkers is largely based on the route chosen. Most trekkers stay in camping tents during the trek, and meals are prepared by porters and cooks along the way.
Camping: Most Kilimanjaro routes involve camping, with pre-set up campsites at various points on the mountain. The camps are usually equipped with basic facilities such as toilets and shared sleeping areas. Each campsite is strategically located to allow trekkers proper acclimatization to the altitude.
Marangu Route: Known as the “Coca-Cola” route, the Marangu Route is the only one that offers hut accommodation (basic dorm-style huts with beds) on the mountain. While huts are more comfortable than camping, they are basic and often crowded, with limited amenities. The Marangu route is the most popular route due to its relatively easier path and hut accommodation.
Machame, Lemosho, and Other Routes: These routes are more demanding and involve camping, but they provide a more immersive wilderness experience. Porters carry the camping gear, including tents, sleeping mats, and meals, making the trek a bit more comfortable than carrying your own equipment.
Before and after the trek, many trekkers stay in hotels or lodges in Moshi or Arusha. These accommodations range from budget guesthouses to luxurious lodges, offering comfortable rest and relaxation after the trek. Lodge options include Kilimanjaro Mountain Resort, Panorama Safari Camp, and Arusha Coffee Lodge, where trekkers can unwind before and after their adventure.
Budget Estimate:
- Flights to Kilimanjaro (from the US): $700 – $1,500 (depending on departure location)
- Kilimanjaro Trek (guided): $1,500 – $3,000 (for 6–8 day treks, including permits, guides, and porters)
- Accommodation (before/after the trek): $30 – $200 per night (depending on comfort level)
- Meals and snacks: $10 – $20 per day
- Visa (for Tanzania): $50
- Travel Insurance: $50 – $200
- Total estimated cost: $2,500 – $5,000
Best View Spot: The best view on Kilimanjaro comes from the summit at Uhuru Peak, especially at sunrise, when the golden light illuminates the glaciers and the surrounding landscape. Another fantastic spot is Barafu Camp, where trekkers get their first real glimpse of the peak on clear days.
Photography Tips:
- Use a wide-angle lens to capture the expansive landscapes, particularly at lower elevations.
- Golden hour (sunrise and sunset) at higher altitudes can create dramatic lighting on the glaciers and mountain ridges.
- Take close-up shots of the unique flora and fauna at lower altitudes, such as giant groundsels and endemic species.
- Cameras with strong low-light capabilities are useful for capturing the summit during early morning hours.
Best Time to Go: The best times to trek Kilimanjaro are during the dry season, which lasts from late June to October and from January to March. During these months, the weather is clearer and more predictable. Avoid trekking during the rainy season (April to May), as heavy rainfall can make the trail slippery and challenging.
Expected Weather:
- Lower Elevations (2,000 — 3,000 meters): Warm and humid, with temperatures ranging from 15–25°C (59–77°F) during the day and cooler evenings.
- Mid Elevations (3,000 — 4,500 meters): Temperatures drop significantly, with daytime highs of 10–15°C (50–59°F) and colder nights.
- Higher Elevations (4,500 — 5,800 meters): Daytime temperatures range from 0–10°C (32–50°F), and nights can dip below freezing.
- Summit (Uhuru Peak, 5,895 meters): Freezing temperatures, with wind chill making it feel even colder. Snow and ice are possible at the summit year-round.
Recommended Gear:
- Sturdy, waterproof hiking boots – Crucial for the muddy and rocky paths.
- Warm, layered clothing – Temperatures drop significantly at higher elevations.
- Rain gear – Essential, as Kilimanjaro’s weather can change quickly.
- Daypack – For carrying essentials on summit day.
- Headlamp – For early morning summit attempts.
- Trekking poles – Useful for stability on steep ascents and descents.
- Sunscreen, sunglasses, and a hat – Protection from the sun, especially at high altitudes.
- Sleeping bag – Rated for temperatures as low as ‑10°C (14°F) for summit night.
Top Tips for Completing the Hike:
- Acclimate properly – Spend at least 2–3 days at higher altitudes before starting the trek to reduce the risk of altitude sickness.
- Choose the right route – Consider longer routes like Lemosho or Machame for better acclimatization. The Marangu route is faster but offers less time to adjust to altitude.
- Start the summit ascent early – To catch the sunrise and avoid afternoon storms, most trekkers start their summit attempt around midnight.
- Stay hydrated and nourished – Drink plenty of water and eat regularly to maintain energy and avoid altitude sickness.
- Hire a reputable guide and porter – Kilimanjaro is a strenuous trek, and professional guides and porters will assist with navigation, safety, and carrying equipment.
7) Milford Track, New Zealand: The Finest Walk in the World
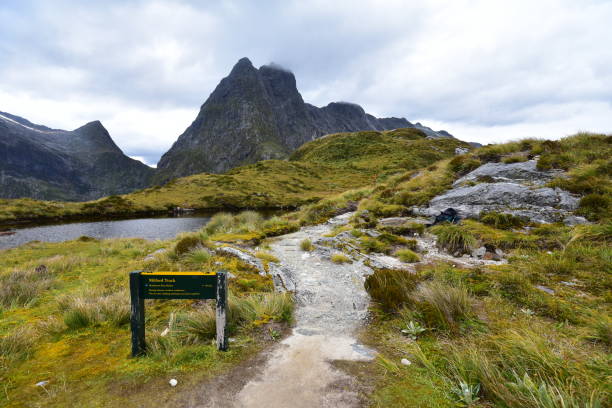
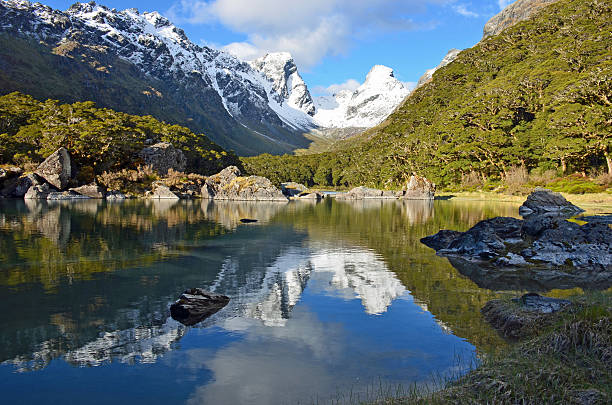
Overview: The Milford Track is renowned as one of the most beautiful multi-day hikes in the world, often referred to as the “finest walk in the world.” Located on the South Island of New Zealand, this 53.5 km (33.2 miles) trail takes trekkers through pristine rainforests, past spectacular waterfalls, and along the edges of serene lakes, all with the majestic Mount Cook and Mount Aspiring as the backdrop. The track ends at Milford Sound, one of the most famous and scenic fjords in the world.
The Milford Track is a challenging trek, but it’s accessible to anyone with a reasonable level of fitness. Hikers will experience New Zealand’s stunning and varied landscapes, including alpine meadows, ancient forests, and rocky river valleys. The trek is well-maintained and well-marked, and along the way, you’ll be treated to natural wonders like the Mackinnon Pass and the Clinton River.
For many, the Milford Track represents the pinnacle of New Zealand’s Great Walks, offering an unforgettable wilderness experience in one of the world’s most beautiful environments.
Duration: The Milford Track usually takes 4 days to complete, with each day averaging between 12 to 17 km (7.5 to 10.5 miles) of hiking. It is recommended to take your time and soak in the scenery along the way, as the terrain can be quite rugged.
Location: The track is located in the Fiordland National Park on the South Island of New Zealand. It spans from Lake Te Anau to Milford Sound, passing through the Mackinnon Pass and several valleys along the way.
How to Get There: Fly into Queenstown Airport (ZQN) or Invercargill Airport (IVC). From there, take a bus or drive to Te Anau, the gateway to the Milford Track. The track starts at the Glade Wharf, accessible by boat from Te Anau Downs (approx. 1.5 hours). Once you’ve completed the track, there are buses and scenic cruises available to transport you from Milford Sound back to Te Anau or Queenstown.
Accommodation: Accommodation along the Milford Track is mostly provided in Department of Conservation (DOC) huts and campsites. There is a strict hut booking system, as the track is a popular destination. Bookings must be made well in advance to secure a spot.
DOC Huts: There are four main huts along the route – Glade House, Pompolona Hut, Mackinnon Pass Hut, and Sandfly Point. These huts are equipped with basic facilities such as bunk beds, toilets, and communal cooking areas. These huts offer a cozy and communal atmosphere, with the opportunity to meet fellow trekkers after a long day on the trail. There is no electricity, so bring a headlamp and extra batteries.
Camping: While most trekkers stay in huts, there are also designated camping areas for those who wish to camp along the track. However, camping is not recommended during the wet months, as weather conditions can be challenging.
Before and after the trek, you’ll find plenty of options in Te Anau, including comfortable lodges, motels, and campsites. Milford Sound offers limited accommodation options, ranging from backpacker hostels to more luxurious lodge-style accommodations such as the Mitre Peak Hotel.
Budget Estimate:
Flights to Queenstown: $700 – $1,500 (depending on departure location)
Milford Track Hut Fees: $90 – $100 per night (4 nights total, including meals)
Accommodation (before/after the trek): $80 – $200 per night (in Te Anau or Milford Sound)
Meals and snacks: $15 – $30 per day
Transport (buses, cruises): $100 – $150 round trip
Total estimated cost: $2,000 – $4,000
Best View Spot: The Mackinnon Pass offers the most dramatic panoramic view of the entire trek. From this high point, you’ll be treated to sweeping views of the valley below, surrounded by towering peaks and lush rainforest. This spot is especially striking in the early morning or late afternoon, when the light casts beautiful shadows on the landscape.
Photography Tips:
- Use a wide-angle lens to capture the expansive vistas from Mackinnon Pass and other elevated points along the track.
- Golden hour is the best time for photographs, especially near Lake Te Anau, Lake Mackinnon, and the surrounding peaks.
- The waterfalls along the trail provide excellent opportunities for long-exposure shots, particularly after rain.
- Tripod and polarizing filter are useful tools to enhance your landscape photography and minimize reflections.
Best Time to Go: The best time to hike the Milford Track is during the New Zealand summer months from November to April, when the weather is milder and the track is open. December to February offers the most stable weather and the best conditions for hiking.
Expected Weather:
- Summer (December – February): Daytime temperatures range from 10–20°C (50–68°F), with cooler evenings. This is the most popular time to hike, with moderate rainfall and occasional storms.
- Autumn (March – May): Cooler temperatures and fewer crowds. Daytime highs range from 5–15°C (41–59°F).
- Winter (June – August): The track is closed during the winter months due to snow and hazardous conditions, although some lower-altitude routes may still be accessible.
- Spring (September – November): Similar to autumn, with cool temperatures and an increase in rainfall.
Recommended Gear:
- Waterproof hiking boots – Essential for wet and muddy conditions.
- Layered clothing – Temperatures can vary, so be prepared for both warm days and chilly evenings.
- Waterproof jacket and pants – The Milford Track is known for frequent rain, so having waterproof gear is crucial.
- Trekking poles – Helpful for stability on steep or slippery sections of the track.
- Sleeping bag liner – For use in the DOC huts.
- Headlamp – For use in the huts and when hiking early in the morning or at dusk.
- Camera – For capturing the stunning landscapes and wildlife.
- Sunscreen, hat, and sunglasses – Even though it rains often, the sun can be strong at times.
Top Tips for Completing the Hike:
- Book huts early – The Milford Track is one of New Zealand’s most popular Great Walks, and spaces in the huts can fill up quickly. Make sure to book your huts at least 6 months in advance.
- Be prepared for rain – The track is located in one of the wettest regions in New Zealand, so pack waterproof gear and clothing.
- Train for elevation – While the trek is not technically difficult, you will gain significant elevation, especially at Mackinnon Pass, so it’s important to train for the uphill sections.
- Start early each day – To avoid afternoon storms and maximize daylight hours, start your hike early in the morning.
- Take your time – Don’t rush through the trail. Take breaks to appreciate the scenery, listen to the sounds of the forest, and immerse yourself in the beauty of the environment.
8.) Appalachian Trail, USA: A Legendary American Trek

Overview: The Appalachian Trail (AT) is one of the longest and most famous continuous footpaths in the world, stretching for 2,190 miles (3,530 km) from Georgia in the south to Maine in the north. This iconic trail winds through the Appalachian Mountains, crossing 14 states and offering hikers an immersive experience in the diverse landscapes of eastern North America. From dense forests and rolling hills to rugged ridgelines and cascading waterfalls, the AT is a journey through the heart of the American wilderness.
While many hikers choose to complete the entire trail over several months, others opt for section hikes, tackling the trail in shorter segments. The Appalachian Trail is famous for its accessibility, with well-marked paths, shelters, and established trail towns offering opportunities to rest, resupply, and socialize with fellow trekkers. Whether you’re aiming to thru-hike or just experience a portion of the trail, the AT is a world-class adventure with a rich history and vibrant community.
Duration: The full Appalachian Trail takes most thru-hikers 5 to 7 months to complete, although some complete it faster or slower depending on their pace and the conditions. For section hikes, individual sections can range from a few days to several weeks, depending on the area chosen.
Location: The AT spans from Springer Mountain, Georgia, to Mount Katahdin, Maine, passing through 14 states, including North Carolina, Tennessee, Virginia, West Virginia, Maryland, Pennsylvania, New Jersey, New York, Connecticut, Massachusetts, Vermont, New Hampshire, and Maine.
How to Get There: To begin the Appalachian Trail in Georgia, fly into Atlanta (ATL) and take a shuttle or drive to Springer Mountain, the southern terminus of the AT. To start in Maine, fly into Bangor (BGR) or Portland (PWM) and take a bus or shuttle to Mount Katahdin, the northern terminus.
For those starting from popular access points along the trail, such as Hot Springs, North Carolina, or Harper’s Ferry, West Virginia, there are regional buses or trains available, with the opportunity to rent a car or take local shuttles to the trailhead.
Accommodation: Accommodation along the Appalachian Trail is varied, with options ranging from backcountry shelters to nearby hostels and campgrounds.
Backcountry Shelters: There are over 250 shelters along the trail, spaced about 8 to 12 miles apart, providing hikers with a place to rest and sleep. These shelters are often simple wooden structures with a roof and three sides, offering limited protection from the elements. Most are first-come, first-served, though there are some popular shelters that fill up quickly, especially during peak season (spring and fall).
Camping: Many hikers prefer to camp at designated campsites along the trail, which offer more privacy than shelters. You’ll need a backcountry permit for camping in certain sections, especially in Great Smoky Mountains National Park and other protected areas. Be sure to check local regulations for specific rules about camping.
Hostels & Trail Towns: Numerous trail towns, such as Harpers Ferry (WV), Hot Springs (NC), and Damascus (VA), offer a variety of accommodations for hikers, ranging from budget-friendly hostels to charming B&Bs and motels. These towns cater to hikers with laundry facilities, food, and places to relax after long days on the trail.
Camping Gear: Many hikers opt to carry lightweight tents or hammocks, particularly in areas where shelters are scarce. Stealth camping (camping off-trail) is generally discouraged, as most of the AT is in protected areas.
Budget Estimate:
- Flights to Atlanta (or Bangor): $300 – $800 (depending on departure location)
- Accommodation (shelters, hostels): $0 – $25 per night (shelters are free, but hostels/motels may cost $40 – $100)
- Food & Resupply: $10 – $20 per day (depends on whether you’re eating in trail towns or relying on dehydrated meals)
- Gear and Equipment: $1,000 – $2,500 (for high-quality gear if you’re doing a thru-hike)
- Transport: $0 – $300 (shuttles between trailheads, public transportation, etc.)
- Total estimated cost: $3,000 – $7,000 (for thru-hike), or $50 – $200 per week (for section hikes)
Best View Spot: One of the most iconic and stunning viewpoints on the Appalachian Trail is from McAfee Knob in Virginia. From here, you’ll get a panoramic view of the Catawba Valley, with steep ridgelines and forested hills stretching out before you. The view is particularly breathtaking at sunrise or sunset when the light casts dramatic shadows on the landscape.
Photography Tips:
- Golden hour is the best time for capturing the soft light over the ridgelines and valleys.
- Use a wide-angle lens to capture the sweeping views of the Appalachian range.
- Zoom lenses are ideal for photographing wildlife, such as deer and birds, that you might encounter along the way.
- Don’t forget to document the details of the trail—moss-covered trees, winding streams, and rustic trail signs make for great close-up shots.
- A tripod can be helpful for evening and sunrise photography, particularly in areas with low light.
Best Time to Go: The best time to hike the Appalachian Trail is typically in the spring (April – June) and fall (September – November) when the weather is more moderate. Summer months (July and August) can be very hot and humid, particularly in the southern sections, while the spring and fall months offer cooler temperatures and less severe weather. Winter hiking is possible in southern sections but requires advanced skills due to potential snow and ice.
Expected Weather:
- Spring (April – June): Temperatures range from 40–70°F (4–21°C) with moderate rainfall. Expect unpredictable weather, especially in the mountains.
- Summer (July – August): Daytime highs range from 70–90°F (21–32°C) in the south, with humidity levels that can make it feel hotter. The northern sections are cooler.
- Fall (September – November): Fall offers cooler weather, with daytime temperatures from 50–70°F (10–21°C). Fall foliage, especially in the northern states, offers breathtaking views.
- Winter (December – March): Temperatures can drop below freezing in higher elevations, and snow is common, especially in the northern sections of the trail.
Recommended Gear:
- Lightweight, durable backpack with hydration system.
- Waterproof hiking boots with excellent grip (the trail can be muddy and rocky).
- Layered clothing to adapt to varying temperatures.
- Rain gear (jacket and pants), as the weather is unpredictable.
- Sleeping bag and sleeping pad for comfort in shelters or tents.
- Water filter or purification tablets to ensure safe drinking water from streams.
- First aid kit (including blister treatment, pain relievers, and a few days of extra medication).
- Trekking poles to reduce strain on the knees during steep sections.
- Portable charger for electronics, as some shelters may have limited or no electricity.
- Headlamp or flashlight for early mornings or evening hiking.
Top Tips for Completing the Hike:
- Train before the hike – The Appalachian Trail requires long days of hiking with significant elevation gain, so cardio and leg strength training will help you tackle the terrain.
- Start early – Many thru-hikers begin in March or April to avoid harsh winter conditions and complete the trail before the summer heat.
- Resupply regularly – Plan your food resupplies through towns or outfitters along the trail. Some sections, especially in the northern part of the trail, have fewer towns, so stock up accordingly.
- Pace yourself – Don’t try to rush the hike. It’s better to set a steady pace and enjoy the beauty of the trail than to burn yourself out.
- Leave no trace – Follow the Leave No Trace principles to protect the trail’s fragile ecosystem and maintain its beauty for future hikers.
9.) Laugavegur Trail, Iceland: A Scenic Trek Through Iceland’s Breathtaking Landscapes

Overview: The Laugavegur Trail is one of Iceland’s most iconic and popular multi-day treks, offering hikers a stunning journey through some of the country’s most diverse and dramatic landscapes. Stretching 55 km (34 miles) from Landmannalaugar to Thorsmork, this trail takes trekkers through geothermal hot springs, volcanic landscapes, lava fields, glaciers, and emerald green valleys. The hike offers an opportunity to experience Iceland’s rugged beauty and natural contrasts, from the warmth of hot springs to the icy winds of glaciers.
The Laugavegur Trail is famous for its ever-changing terrain, where no two days on the trail are the same. Hikers will encounter everything from steaming sulfur vents and colorful rhyolite mountains to rivers, moss-covered lava fields, and expansive glaciers. The trek is moderate to challenging, with some steep ascents and river crossings, but it is accessible for fit and prepared hikers. It’s a bucket-list hike for nature lovers and adventurers alike.
Duration: The Laugavegur Trail typically takes 4 to 6 days to complete, depending on your pace and the number of rest days you take. Some hikers combine it with the Fimmvorduhals Trail to extend the adventure, which adds an additional 25 km (15 miles) and a few more days to the trek.
Location: The Laugavegur Trail is located in the Southern Highlands of Iceland, beginning at Landmannalaugar and ending at Thorsmork, a stunning valley located between two glaciers, Eyjafjallajökull and Myrdalsjökull.
How to Get There: To begin the Laugavegur Trail, fly into Reykjavik (KEF), Iceland’s capital, which serves as the main international gateway. From Reykjavik, you can take a bus to Landmannalaugar, the starting point of the trail. Several bus companies offer regular services to Landmannalaugar during the summer months (June to September), making it a convenient option for trekkers. Alternatively, if you prefer more flexibility, you can rent a car and drive to Landmannalaugar, though it’s important to note that the roads leading to the trailhead are rough and require a 4x4 vehicle. At the end of the trek, you can take a bus from Thorsmork, the finishing point, back to Reykjavik, or continue your travels within Iceland.
Accommodation: Along the Laugavegur Trail, hikers will find a range of mountain huts, campgrounds, and hostels, providing convenient places to stay overnight.
- Mountain Huts: The trail is well-equipped with huts that offer basic accommodations. These huts are managed by the Icelandic Touring Association (Ferðafélag Íslands) and are spaced at regular intervals along the trail. They provide a bed in shared dormitories, a communal kitchen, and restrooms. Booking these huts in advance is essential during the summer months, as they fill up quickly.
- Camping: For those who prefer a more rugged experience, camping is permitted at designated campsites along the trail. Some huts have camping areas nearby, allowing hikers to pitch tents. Be prepared for cold temperatures even in summer and bring appropriate camping gear, including a good-quality tent, sleeping bag, and stove.
- Hotels & Hostels: In Thorsmork and nearby towns, there are a few hostels and guesthouses that offer more comfort if you prefer not to camp or stay in mountain huts.
- Tip: The mountain huts along the Laugavegur Trail are basic, so bring your own sleeping bag (unless you’re booking a premium bed option). It’s also wise to pack a lightweight cooking system, as most huts only provide a kitchen with shared equipment, and you’ll need to prepare your own meals.
Budget Estimate:
- Flights to Reykjavik: $300 – $1,000 (depending on departure location)
- Accommodation (huts/camping): $40 – $90 per night (for mountain huts), or $10 – $30 per night (for camping)
- Meals and snacks: $10 – $20 per day (you can buy food at huts or bring your own)
- Transport (bus to/from trailhead): $50 – $100 each way
- Total estimated cost: $600 – $1,500 (for a 4–6 day trek)
Best View Spot: The Fimmvörðuháls pass, which is at the end of the Laugavegur Trail, offers an incredible vantage point over the surrounding glaciers, valleys, and waterfalls. The view is particularly stunning when the weather is clear, offering a panoramic view of the landscape. Another breathtaking view can be seen from the Alftavatn Lake, where you can capture the dramatic scenery of the nearby mountains reflecting in the water.
Photography Tips:
- Golden hour (early morning or late evening) will provide the best lighting for the colorful rhyolite mountains and volcanic landscapes.
- Use a wide-angle lens to capture the vastness of the Icelandic scenery, especially for expansive landscapes and glaciers.
- A polarizer can help enhance the contrast of the sky and the vibrant colors of the terrain, especially in cloudy conditions.
- Capture the iconic landscapes: the steaming geothermal areas, glaciers, and moss-covered lava fields make for stunning photos.
- Waterproof gear is a must for both your camera and yourself, as the weather can change suddenly.
Best Time to Go: The best time to hike the Laugavegur Trail is during the summer months (June – September), when the trail is free of snow, the huts are open, and the weather is relatively mild. However, expect some rain, as Iceland is known for its unpredictable weather. The trail is often closed during the winter months due to snow and hazardous conditions.
Expected Weather:
- Summer (June – September): Temperatures range from 5–15°C (41–59°F), though it can be colder at higher elevations. Rain is common, and winds can be strong.
- Autumn (September – October): Temperatures begin to drop, and snow can begin to fall at higher elevations. It’s still a great time to hike if you’re prepared for colder conditions and fewer crowds.
- Winter (November – March): The trail is often covered in snow and inaccessible due to harsh weather conditions.
Recommended Gear:
- Waterproof hiking boots with good traction for wet and rocky terrain.
- Layered clothing to adjust to Iceland’s unpredictable weather. Include warm, moisture-wicking base layers.
- Rain gear (jacket and pants) to protect against frequent rain showers.
- Headlamp for shorter days, as the daylight hours in Iceland are limited during early spring and late fall.
- Sleeping bag and pad (for hut and camping stays).
- Stove or cook system for preparing meals on the trail.
- Water purifier or purification tablets to treat water from rivers and streams.
- Trekking poles for extra stability on uneven terrain and river crossings.
- Camera gear (with waterproof bags) to capture the stunning scenery.
Top Tips for Completing the Hike:
- Book your accommodation early, especially during peak season (July – August), as the huts fill up quickly.
- Pack light, but make sure you bring enough warm clothing and waterproof gear. The weather can change quickly.
- Stay hydrated and fueled, as food is limited along the trail. Bring energy-dense snacks for the hike.
- Check trail conditions before departing, as snow or storms can make certain sections impassable early or late in the season.
- Be prepared for river crossings—during spring melt or after heavy rains, river levels can rise, so always check conditions at huts and ask locals for advice.
10.) Snowman Trek, Bhutan: The Ultimate Himalayan Adventure

Overview: The Snowman Trek in Bhutan is one of the most challenging and rewarding high-altitude hikes in the world. Spanning approximately 200 miles (321 km) and taking 24 to 30 days to complete, this legendary trek traverses the remote Lunana region, crossing 11 mountain passes over 16,400 feet (5,000 meters). Known for its rugged beauty, breathtaking glaciers, and untouched Himalayan landscapes, the trek provides a rare glimpse into Bhutan’s most secluded villages and ancient Buddhist monasteries.
Often considered the hardest trek on Earth, the Snowman Trek is only attempted by experienced hikers due to its extreme altitude, unpredictable weather, and logistical challenges. However, for those who embark on this journey, the rewards are unparalleled—dramatic mountain scenery, encounters with Bhutan’s unique culture, and the satisfaction of completing one of the world’s last true wilderness expeditions.
Duration: The trek typically takes 24 to 30 days, depending on the chosen route and weather conditions. Some variations extend even longer for acclimatization and exploration of additional valleys.
Location: The Snowman Trek begins in Paro or Punakha, Bhutan, and winds through the Lunana region before concluding in Sephu or Bumthang. It crosses multiple mountain ranges, offering stunning views of peaks like Jomolhari (7,326 m) and Gangkar Puensum (7,570 m)—the world’s highest unclimbed mountain.
How to Get There & Route Options: To begin the Snowman Trek, fly into Paro International Airport (PBH), Bhutan’s only international airport, which connects via Bangkok, Delhi, Kathmandu, and Singapore. From Paro, trekkers travel to the starting point—either Shana (via Paro) or Gasa (via Punakha)—depending on the chosen route.
The classic route follows the Druk Path and Laya-Gasa Trek, gradually ascending through forests and remote villages before reaching the high-altitude passes of the Lunana region. The trek typically ends in Sephu, from where travelers drive to Trongsa or Bumthang, then fly or drive back to Paro.
Accommodation: Accommodation along the Snowman Trek consists of tent camping in designated campsites, as there are no lodges or guesthouses along the route. Campsites are located in breathtaking valleys, beside glacial rivers, and near remote Bhutanese villages. Most organized treks provide fully supported camping, including tents, sleeping bags, meals, and porter services.
Budget Estimate: Due to Bhutan’s strict tourism policies, the Snowman Trek must be done with a licensed guide, making it a premium adventure. Estimated costs include:
- Government-set daily tariff: $250 – $350 per person (includes accommodation, meals, and guide)
- Guided trek package: $7,000 – $12,000 per person
- International flights to Bhutan: $600 – $1,500
- Additional expenses (gear, tips, souvenirs): $300 – $700
Best View Spot: One of the most spectacular viewpoints is from Gangla Karchung La Pass (5,120 m), offering breathtaking panoramas of Gangkar Puensum and the surrounding peaks. The views from Sinche La Pass (5,005 m) are equally stunning, showcasing vast glacial landscapes.
Photography Tips:
- Capture the golden hues of sunrise over snow-capped peaks for dramatic contrast.
- Use a telephoto lens to zoom in on distant mountain summits and Buddhist monasteries.
- Take wide-angle shots of prayer flags fluttering against the towering Himalayas.
- Bring extra batteries and a solar charger, as electricity is unavailable on the trek.
Best Time to Go: The best time to hike the Snowman Trek is during the dry seasons:
- Autumn (September – October): Clear skies, crisp air, and breathtaking mountain views.
- Spring (April – May): Blooming rhododendrons and lush green valleys, though slightly more unpredictable weather.
The trek is not possible in winter due to heavy snowfall and impassable mountain passes.
Expected Weather:
- Daytime: 5°C to 15°C (41°F – 59°F) in lower elevations, but much colder in high passes.
- Nighttime: ‑10°C to ‑25°C (14°F to ‑13°F) at higher altitudes.
- Weather conditions: Highly unpredictable, with the possibility of snow, rain, and high winds.
Recommended Gear:
— High-quality 4‑season tent and sleeping bag (rated for ‑20°C/-4°F)
- Insulated, waterproof hiking boots
- Layered clothing (base layers, fleece, down jacket, waterproof shell)
- Gloves, hat, and gaiters for extreme cold
- Trekking poles for steep ascents and descents
- Water purification system (filter or tablets)
- Portable solar charger for electronic devices
Top Tips for Completing the Hike:
- Train well in advance—Cardio, endurance, and high-altitude hiking preparation are essential.
- Acclimate properly—Spend a few days in Paro or Thimphu before starting to reduce the risk of altitude sickness.
- Hire an experienced guide—Navigation is difficult, and weather can change rapidly.
- Pack light but efficiently—Every extra pound counts when trekking at high altitudes.
- Respect Bhutanese culture—Dress modestly and follow local customs in villages and monasteries.
- Be mentally prepared—The trek is long, remote, and physically demanding, but the rewards are worth it.
11.) The Narrows, USA: A Slot Canyon Adventure in Zion National Park
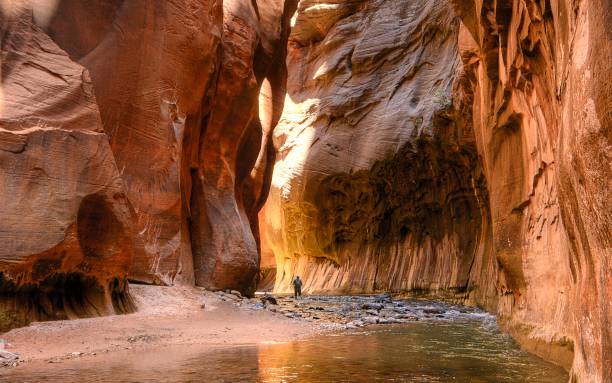
Overview: The Narrows in Zion National Park is one of the most iconic slot canyon hikes in the world. This breathtaking trek takes adventurers through the Virgin River, where towering sandstone walls rise up to 1,000 feet (305 meters) above, creating a surreal and otherworldly landscape. Unlike traditional trails, much of the hike requires wading and even swimming through the river, making it a truly unique experience.
The hike can be done as a one-day out-and-back trek from the Temple of Sinawava or as a 16-mile (26 km) top-down journey from Chamberlain’s Ranch, which requires a permit. Whichever route you choose, you’ll be immersed in the stunning beauty of Zion’s slot canyons, with shimmering reflections, lush hanging gardens, and narrow, winding passages that make every turn feel like a discovery.
Duration:
- Bottom-up (No Permit Required): 6 to 10 miles (9.6 – 16 km) round-trip; 4 to 8 hours.
- Top-down (Permit Required): 16 miles (26 km); 10 to 14 hours (one-day) or overnight with camping.
Location: The Narrows is located in Zion National Park, Utah, USA, following the path of the Virgin River through a deep sandstone gorge. The hike starts at the Temple of Sinawava, the last stop on the Zion Canyon Shuttle.
How to Get There & Route Options: Fly into Las Vegas McCarran International Airport (LAS) (2.5‑hour drive) or Salt Lake City International Airport (SLC) (4.5‑hour drive). From there, rent a car and drive to Springdale, Utah, the gateway town to Zion National Park. Once in Zion, take the Zion Canyon Shuttle (mandatory in peak season) to Temple of Sinawava, where the hike begins via the Riverside Walk.
Route Options:
1.) Bottom-Up Route (No Permit Required)
- Start at the Temple of Sinawava and hike upstream into the canyon.
- Choose how far you want to go before turning around.
- Popular turnaround points include Orderville Canyon (4.5 miles) and Big Springs (10 miles round-trip, the farthest allowed without a permit).
2.) Top-Down Route (Permit Required)
- Starts at Chamberlain’s Ranch and covers 16 miles to Temple of Sinawava.
- Can be done as a grueling one-day hike (10–14 hours) or a more relaxed overnight trek with camping at designated sites.
- Requires a permit and proper planning due to the remote nature and deep water crossings.
Accommodation: Springdale, Utah, offers hotels, lodges, and campgrounds near the park entrance, ranging from budget-friendly motels ($80–$150 per night) to luxurious resorts ($250+ per night). Within Zion National Park, the only in-park lodging is Zion Lodge, which books up quickly.
For campers, Watchman Campground and South Campground provide scenic stays inside the park. For those doing the top-down overnight trek, camping is only allowed at designated wilderness sites, which must be booked in advance.
Budget Estimate:
- Park Entrance Fee: $35 per vehicle (valid for 7 days)
- Hotel in Springdale: $80 – $300 per night
- Camping in Zion: $20 – $40 per night
- Permit for Top-Down Route: $15 – $25 per person
- Gear Rental (Canyoneering shoes, dry pants, walking stick): $25 – $50 per day
- Total Cost (Per Person): $200 – $800, depending on accommodations and gear rentals.
Best View Spot: The Wall Street section is the most dramatic and awe-inspiring part of The Narrows, where the canyon walls squeeze down to just 20 feet (6 meters) apart while towering nearly 1,000 feet (305 meters) overhead.
Photography Tips:
- Use a waterproof camera or case—your gear will get wet!
- A wide-angle lens captures the towering slot canyon walls.
- Shoot during mid-morning or late afternoon when sunlight filters through, creating incredible golden reflections.
- Bring a tripod for long-exposure shots of the moving river (only if doing a slower-paced hike).
Best Time to Go:
- Summer (June – August): Warm water, but high flash flood risk.
- Fall (September – October): Best time! Cooler temperatures, lower water levels, and reduced crowds.
- Spring (April – May): Snowmelt raises water levels, sometimes making the hike dangerous or even closed.
- Winter (November – March): Cold water and air temperatures; requires dry suits.
Expected Weather:
- Summer: 80–100°F (27–38°C) outside, 60–70°F (15–21°C) in the water.
- Fall & Spring: 50–80°F (10–27°C) outside, 40–60°F (4–16°C) in the water.
- Winter: 30–50°F (-1 to 10°C) outside, near freezing water temperatures.
Recommended Gear:
- Canyoneering shoes & neoprene socks (for grip and warmth)
- Trekking pole or walking stick (essential for balance in the river)
- Dry bag (to keep valuables safe)
- Quick-drying clothes (avoid cotton!)
- Light waterproof jacket (canyon can be chilly, even in summer)
- Dry suit/wetsuit (for cold-weather hikes)
- Water filter or purification tablets (river water is not drinkable)
Top Tips for Completing the Hike:
- Check the weather forecast—Flash floods are extremely dangerous and can occur without warning. If rain is forecasted, do not enter the canyon.
- Start early to avoid crowds, especially in peak season.
- Rent proper gear (canyoneering shoes, walking stick, and dry gear) from outfitters in Springdale.
- Use dry bags to protect electronics and valuables from water.
- Be prepared to wade and even swim in sections where water levels are deep.
- Turn back if needed—There’s no shame in stopping if conditions get tough.
12.) Routeburn Track, New Zealand: A Scenic Alpine Journey
Overview: The Routeburn Track is one of New Zealand’s Great Walks, offering an unforgettable journey through Fiordland and Mount Aspiring National Parks. This 33-km (20.5‑mile) trek takes hikers through an incredible variety of landscapes, including alpine meadows, pristine lakes, lush rainforests, and panoramic mountain ridges.
With dramatic views of snow-capped peaks, cascading waterfalls, and deep valleys, the Routeburn Track is perfect for those looking for a short yet rewarding multi-day adventure. The trail can be hiked in either direction, from Routeburn Shelter (near Glenorchy) to The Divide (near Milford Sound), with well-equipped huts and campsites along the way.
Duration: 2 to 4 days (most hikers complete it in 3 days).
Location: The Routeburn Track spans Fiordland and Mount Aspiring National Parks, connecting Routeburn Shelter (near Queenstown) and The Divide (near Milford Sound) on New Zealand’s South Island.
How to Get There & Route Options: Fly into Queenstown Airport (ZQN), the closest major airport. From Queenstown, it’s a 1‑hour drive to Routeburn Shelter or a 4‑hour drive to The Divide. Most hikers book a shuttle service to transport them between the start and end points, as the trail does not loop back.
Route Options:
1.) Routeburn Shelter to The Divide (Most Popular Direction)
- Starts near Queenstown, finishing near Milford Sound.
- Offers gradual elevation gain and best scenic progression.
- Easier access to transportation from Milford Sound back to Queenstown.
2.) The Divide to Routeburn Shelter
- Starts near Milford Sound, finishing near Queenstown.
- Steeper ascent on the first day but rewarding views early in the hike.
- Less crowded than the more popular direction.
Accommodation: The Department of Conservation (DOC) maintains three backcountry huts along the Routeburn Track:
- Routeburn Falls Hut
- Lake Mackenzie Hut
- Lake Howden Hut
These huts provide bunk beds, communal cooking areas, toilets, and drinking water but no showers or heating. Bookings are required well in advance, especially during peak season (October–April). Hut prices range from $68 NZD per night.
For campers, designated campsites are available along the track. Camping costs around $21 NZD per night.
For those preferring comfort, luxury lodges like Routeburn Falls Lodge and Mackenzie Lodge offer private rooms with meals and hot showers (prices start at $800+ NZD per night).
Budget Estimate:
- Flights to Queenstown: $500 – $1,500
- Hut accommodation: $68 NZD per night
- Campsites: $21 NZD per night
- Private lodges: $800+ NZD per night
- Shuttle transport: $50 – $150 NZD
- Food & supplies: $50 – $150 NZD
- Total estimated cost: $250 – $2,000, depending on accommodations.
Best View Spot: The Harris Saddle viewpoint offers a breathtaking panoramic view of Lake Harris and the surrounding peaks, making it one of the most spectacular moments on the trail.
Photography Tips:
- Early morning and late afternoon lighting enhances mountain landscapes.
- Capture the mirror-like reflections on Lake Mackenzie.
- Use a wide-angle lens to showcase the vast alpine scenery.
- Bring a lightweight tripod for waterfall shots, especially at Earland Falls (174m/570ft high).
Best Time to Go:
- Peak season: October to April (summer, best weather).
- Off-season: May to September (winter, risk of avalanches and snow-covered trails).
Expected Weather:
- Summer (Oct–Apr): 5–25°C (41–77°F), mostly stable but occasional rain.
- Winter (May–Sep): ‑5 to 10°C (23–50°F), potential snow and strong winds.
- Rain is common year-round, so always be prepared for wet conditions.
Recommended Gear:
- Waterproof hiking boots – Essential for wet conditions.
- Warm, layered clothing – Weather changes quickly in the mountains.
- Rain jacket & waterproof pack cover – The track is known for unpredictable rain.
- Trekking poles – Useful for steep and uneven sections.
- Headlamp – Essential for huts and early morning starts.
- Plenty of snacks & a stove – Huts do not provide food.
Top Tips for Completing the Hike:
- Book huts early – They fill up months in advance during peak season.
- Start early each day – To avoid crowds and enjoy quieter trails.
- Check the weather – Sudden rain and wind are common in Fiordland.
- Pack light but smart – Essentials only, as you’ll be carrying everything.
- Arrange transportation – The start and end points are far apart.
- Take your time – Enjoy the incredible scenery and don’t rush through the experience.
13.) Annapurna Circuit, Nepal: The Ultimate Himalayan Adventure

Overview: The Annapurna Circuit is one of the world’s most legendary treks, taking hikers through a breathtaking range of landscapes, from lush subtropical forests to high-altitude deserts and towering Himalayan peaks. Spanning 160–230 km (100–145 miles) depending on route variations, this epic trek circles the Annapurna Massif, reaching its highest point at Thorong La Pass (5,416m / 17,769ft).
The circuit offers an incredible cultural experience, passing through traditional Nepali villages, Buddhist monasteries, and Tibetan-influenced settlements. Along the way, trekkers will encounter diverse flora and fauna, cross dramatic suspension bridges, and witness some of the most spectacular mountain scenery on Earth, including Annapurna I (8,091m / 26,545ft), Dhaulagiri (8,167m / 26,795ft), and Machapuchare (6,993m / 22,943ft).
While the construction of roads has shortened the classic trek, the Annapurna Circuit remains a challenging and rewarding adventure for those seeking an immersive Himalayan journey.
Duration: 12 to 21 days, depending on route and acclimatization days.
Location: The circuit loops through Nepal’s Annapurna Conservation Area, starting in Besisahar and finishing in Jomsom or Nayapul, with variations available.
How to Get There & Route Options: Fly into Tribhuvan International Airport (KTM) in Kathmandu. From Kathmandu, take a bus or private jeep to Besisahar (approx. 7 hours), the traditional starting point. Some trekkers now start further along the route in Chame or Manang due to road development. The trek usually ends in Jomsom, Tatopani, or Nayapul, where a flight, bus, or jeep can take you back to Pokhara or Kathmandu.
Route Options:
1.) Classic Annapurna Circuit (Full Loop, 18–21 days)
- Starts in Besisahar, passes through Manang, Thorong La Pass, Muktinath, Jomsom, and ends in Nayapul or Pokhara.
- Provides the most traditional experience and diverse scenery.
2.) Shortened Annapurna Circuit (12–15 days)
- Starts in Chame or Manang (accessible by jeep) and ends in Jomsom or Muktinath.
- Skips lower-altitude sections due to new road construction.
3.) Annapurna Circuit with Tilicho Lake (Extra 2–3 days)
- A side trek to Tilicho Lake (4,919m / 16,138ft), one of the world’s highest lakes.
- Offers stunning glacial lake views and a more adventurous route.
4.) Annapurna Circuit + Poon Hill (Extended Route, 20+ days)
- Ends with the Poon Hill viewpoint for incredible sunrise views of Dhaulagiri and Annapurna.
Accommodation: The Annapurna Circuit is a teahouse trek, meaning lodges and guesthouses are available in every village along the route. Accommodation ranges from basic teahouses with dormitory-style rooms ($5–$15 per night) to more comfortable lodges with private rooms ($20–$50 per night).
Most teahouses offer hot meals, showers (extra cost), and Wi-Fi (limited access). The higher the altitude, the more basic the facilities. In remote areas like Thorong Phedi and Yak Kharka, accommodation is very simple, with shared rooms and no heating.
For those seeking a higher-end experience, luxury lodges are available in select locations like Manang and Jomsom, offering better bedding, hot showers, and more food options ($50–$150 per night).
Budget Estimate:
- Flights to Kathmandu: $500 – $1,500
- Accommodation: $5 – $50 per night
- Meals: $10 – $30 per day
- TIMS Permit & ACAP Permit: $50 total
- Guide & porter (optional): $20 – $50 per day
Transport (bus, jeep, or flight from Jomsom to Pokhara): $10 – $120
Total estimated cost: $600 – $2,500 (budget to mid-range), $3,000+ (luxury trek).
Best View Spot: The Thorong La Pass (5,416m / 17,769ft) provides the most breathtaking panoramic views of the Annapurna and Dhaulagiri ranges, as well as the arid Mustang region.
Photography Tips:
- Sunrise at Thorong La Pass offers stunning golden light on the peaks.
- Capture the reflection of Annapurna peaks in Tilicho Lake.
- Long exposure shots of waterfalls and rivers add depth to landscape photos.
- Bring a zoom lens for detailed shots of mountain textures and wildlife.
- Carry extra batteries, as cold temperatures drain power quickly.
Best Time to Go:
- Spring (March–May): Best for clear skies, warm temperatures, and rhododendron blooms.
- Autumn (September–November): Most stable weather and best mountain views.
- Winter (December–February): Cold with snow-covered passes, but fewer crowds.
- Monsoon (June–August): Rainy, with landslides and leeches in lower sections, but drier in Mustang.
Expected Weather:
- Lower elevations (1,000–3,000m): 10–25°C (50–77°F), mild with occasional rain.
- Mid-altitudes (3,000–4,500m): ‑5 to 15°C (23–59°F), cool and dry.
- Thorong La Pass (5,416m): ‑20 to 5°C (-4 to 41°F), strong winds and freezing temperatures.
- Sudden snowfall and storms are possible, even in peak seasons.
Recommended Gear:
- High-quality trekking boots – Essential for rocky and icy trails.
- Layered clothing – Base layers, fleece, and a down jacket for varying temperatures.
- Waterproof jacket & pants – Unpredictable weather is common.
- Trekking poles – Helpful for steep ascents and descents.
- Sleeping bag (-10°C rated) – Many teahouses provide blankets, but they’re thin.
- Water purification tablets – Tap water is not safe to drink.
- Snacks and energy bars – Limited food choices at higher altitudes.
Top Tips for Completing the Hike:
- Acclimatize properly – Spend extra days in Manang and Yak Kharka to avoid altitude sickness.
- Stay hydrated – Drink at least 3–4 liters of water daily.
- Start early on Thorong La Pass day – The pass gets extremely windy after 10 AM.
- Carry cash – No ATMs in villages beyond Chame.
- Respect local culture – Ask before taking photos of people or religious sites.
- Consider hiring a porter or guide – While the trail is well-marked, a guide enhances safety and cultural understanding.
- Be prepared for road impacts – The lower sections now have roads, so some trekkers choose to skip them by jeep.
14.) Kalalau Trail, Hawaii, USA: A Hidden Paradise Along the Na Pali Coast
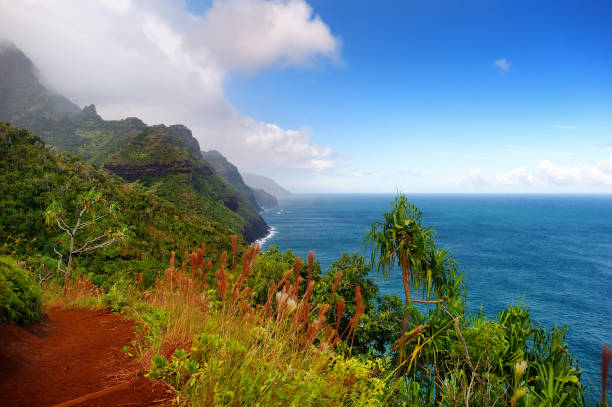
Overview: The Kalalau Trail is one of the most scenic and challenging hikes in the United States, set on the Na Pali Coast of Kauai, Hawaii. This 11-mile (18 km) trail leads hikers through lush rainforests, dramatic cliffs, and pristine beaches, all while offering unmatched views of turquoise waters and rugged coastal landscapes. The trail follows an ancient Hawaiian footpath that historically connected villages along the coastline, and today, it offers an unforgettable adventure for those up for the challenge.
The trek is often described as a paradise for nature lovers, taking hikers through dense jungles, along craggy ridges, and past stunning waterfalls. The highlight of the trail is reaching Kalalau Beach, a secluded stretch of sand surrounded by towering cliffs and bordered by clear, warm waters. However, this hike is not for the faint of heart—rugged terrain, steep ascents, and unpredictable weather make it a strenuous, high-stakes adventure.
Due to its remote location, hiking the Kalalau Trail requires a permit, as well as a commitment to carrying all necessary supplies. The trail is often muddy and slippery, so trekkers should come prepared for the elements and ready for a true back-to-nature experience.
Duration: 2 to 3 days for the round-trip trek. Hikers can also opt for a longer stay at Kalalau Beach before returning.
Location: The Kalalau Trail is located on the Na Pali Coast of Kauai, Hawaii, starting at the end of Highway 560 and ending at Kalalau Beach.
How to Get There: To reach the Kalalau Trail, fly into Lihue Airport (LIH) on the island of Kauai, Hawaii. From there, take a rental car or shuttle to the trailhead at Ke’e Beach. The trailhead is located at the farthest point of Highway 560, which winds along the northern coast of Kauai.
Since the Kalalau Trail is extremely remote and difficult to access, hikers should plan carefully. Most trekkers opt to stay at Ke’e Beach before beginning the trail or camp at the Hanakapiai Beach on the first day to break up the hike. Be aware that parking at Ke’e Beach can be limited, so arriving early is advised.
Accommodation: Accommodation along the Kalalau Trail is very limited due to its remote location, and most hikers choose to camp. There are two official campgrounds along the trail:
- Hanakapiai Beach (mile 2): A popular spot for camping on the first night of the trek.
- Kalalau Beach (mile 11): The final destination, offering a stunning and isolated location to camp.
Permits are required for both camping locations, and it’s essential to reserve in advance through the Hawaii State Parks system, as permits are limited and sell out quickly, especially during peak seasons (March–October). The permits cover both camping and hiking along the trail, with restrictions in place to preserve the natural environment.
For those who prefer not to camp, there are nearby accommodations in Princeville or Hanalei, where hikers can find resorts and hotels, but these are located a short drive from the trailhead.
Budget Estimate:
- Flights to Kauai (Lihue Airport): $300 – $1,200
- Permit for the Kalalau Trail: $20 – $30 per person (for camping)
- Accommodation (camping): $15 – $30 per night (campground permits)
- Meals & snacks: $10 – $25 per day (depending on if you pack your own food or buy from local shops)
- Transport (rental car, shuttle, or parking): $30 – $100 per day (depending on the option chosen)
- Total estimated cost: $500 – $2,500 (depending on duration, permits, and accommodation choices).
Best View Spot: The view from the Kalalau Beach is undeniably the best spot along the trail, where the blue waters of the Pacific meet towering cliffs and a stunning coastline. The sunset views from Kalalau Beach are nothing short of breathtaking, with the sun dipping below the cliffs in vibrant hues.
Photography Tips:
- Use a wide-angle lens to capture the sweeping landscapes of the Na Pali Coast.
- Golden hour shots at Kalalau Beach will give you stunning lighting and colors.
- Close-up photos of tropical plants, waterfalls, and the cliffs offer great details.
- Bring a tripod for long-exposure shots, especially at Hanakapiai Falls.
- Pack extra batteries since humidity and rugged conditions drain power quickly.
Best Time to Go:
- Dry Season (April–October): Ideal for hiking due to drier conditions and less rainfall.
- Wet Season (November–March): The trail can become muddy and slippery, and rainstorms are frequent, making it more dangerous.
Expected Weather:
- Lower elevations (0–1,000 ft): 20–30°C (68–86°F), tropical, humid, with frequent rain.
- High elevations (2,000–4,000 ft): 15–25°C (59–77°F), cooler and windier, with possible afternoon showers.
- Thunderstorms and heavy rainfall are common even in the dry season, so be prepared for sudden weather changes.
Recommended Gear:
- Waterproof hiking boots – The trail is often muddy and slippery, so sturdy, waterproof boots are essential.
- Lightweight, moisture-wicking clothing – Pack layers to stay cool and dry in the tropical heat.
- Rain gear – A light rain jacket or poncho is essential for the inevitable showers.
- Backpack with waterproof cover – Protects your gear from rain and humidity.
- Camping gear (if camping) – Tent, sleeping bag, stove, and food.
- Water purification tablets or filter – Don’t rely on untreated water from streams.
- Headlamp – For navigating in the dark, as the trail can take longer than expected.
Top Tips for Completing the Hike:
- Get your permits early – The Kalalau Trail is popular, and permits often sell out months in advance.
- Train for steep, muddy terrain – The trail is strenuous, with multiple steep ascents and descents.
- Be prepared for river crossings – During high rainfall, rivers may swell and become difficult to cross.
- Start early – The trail can take longer than expected, so beginning at dawn helps avoid hiking in the dark.
- Stay safe – Be mindful of the dangerous cliffs along the trail and avoid overexerting yourself.
- Respect the environment – The trail is remote and ecologically sensitive, so leave no trace and pack out all waste.
15.) Overland Track, Australia: A Journey Through Tasmania’s Wilderness
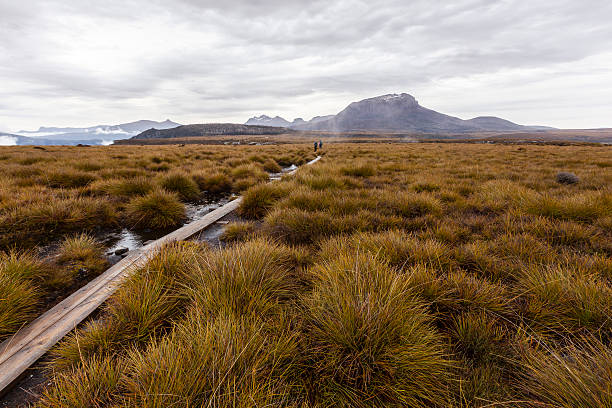
Overview: The Overland Track is one of Australia’s premier long-distance hikes, renowned for its spectacular alpine scenery, pristine lakes, and ancient rainforests. Located in Tasmania’s Cradle Mountain-Lake St Clair National Park, this 65 km (40-mile) trek takes hikers through varied landscapes, from dense forests to alpine meadows and rugged mountain peaks. The Overland Track offers a chance to immerse oneself in some of the most untouched wilderness in the Southern Hemisphere, where crystal-clear lakes and snow-capped mountains make for an unforgettable adventure.
The trail is well-maintained, with marked paths and huts along the way, making it suitable for experienced hikers and those looking to experience the wild beauty of Tasmania’s wilderness in a safe manner. Cradle Mountain at the northern end and Lake St Clair at the southern end serve as bookends to this incredible journey, with stunning vistas throughout. While the hike is considered moderately challenging, the rewards are extraordinary, offering unparalleled opportunities to witness wildlife, scenic panoramas, and serene landscapes.
With a compulsory booking system for hut accommodations, the Overland Track is a popular trek, especially during the summer months, and requires careful planning to secure a spot. It is an ideal hike for those seeking a multi-day trek in a remote and scenic part of the world.
Duration: The Overland Track typically takes 6 days and 5 nights to complete, although the pace can be adjusted depending on fitness levels. Some hikers opt for shorter or longer stays at key points along the trail, especially if they wish to explore side trips or extend their time in the park.
Location: The Overland Track is located in Tasmania, Australia, running from Cradle Mountain to Lake St Clair, both of which are within the Cradle Mountain-Lake St Clair National Park.
How to Get There: To reach the Overland Track, fly into Hobart International Airport or Launceston Airport in Tasmania. From Hobart, take a private shuttle or bus to Cradle Mountain to begin your trek. Alternatively, travelers can take a bus from Launceston to Cradle Mountain, which takes approximately 2.5 hours.
The trailhead starts at Ronny Creek, located near Cradle Mountain, and the trek finishes at Lake St Clair, where you can take a bus or boat to Cynthia Bay or return to Hobart. Most hikers choose to use the bus services to return to their starting point after completing the track.
Note: A permit system is in place for the Overland Track, and all hikers must book in advance for their trek, as the park is a protected area with limited capacity to preserve the environment.
Accommodation: The Overland Track offers a combination of huts and campsites along the route, ensuring hikers have a comfortable stay each night. The huts provide basic amenities such as bunk beds, drying rooms, and cooking facilities. Although they do not have electricity or running water, they offer shelter and warmth after a long day on the trail.
- Overnight Huts: The huts are located at strategic points, including Waterfall Valley, Windermere, Pelion Hut, Dove Lake, and Lake St Clair. These huts can accommodate around 12–24 people and require booking in advance.
- Camping: In addition to the huts, there are designated camping areas along the track, though camping in the park requires a permit and is only permitted in specific areas.
Accommodation is highly regulated, and it is crucial to secure bookings in advance, especially during the peak hiking season (December to March). For those wanting a more luxurious experience, there are eco-lodges and hotels in the Cradle Mountain area that provide a comfortable stay before and after the hike.
Budget Estimate:
- Flights to Tasmania (Hobart or Launceston): $300 – $1,500
- Overland Track Permit (hut accommodation): $200 – $350 per person
- Accommodation (in Hobart or Cradle Mountain): $100 – $250 per night (pre/post trek)
- Meals & snacks: $10 – $25 per day (depending on if you pack food or buy on the trail)
- Transport (bus or shuttle to Cradle Mountain): $50 – $100
- Total estimated cost: $1,200 – $3,500 (depending on duration, permits, accommodation, and travel preferences).
Best View Spot: One of the most iconic viewpoints on the Overland Track is Cradle Mountain, where hikers can take in panoramic views of the mountain’s jagged peaks and the surrounding wilderness. Additionally, Dove Lake offers a serene, reflective view of Cradle Mountain, particularly at sunrise when the calm waters perfectly mirror the mountain’s silhouette.
Photography Tips:
- Use a wide-angle lens to capture the vastness of the alpine landscapes and the rugged mountains.
- Early mornings and late afternoons provide the best golden hour light, ideal for photographing the peaks and lakes.
- Close-up shots of local wildlife, including pademelons, wombats, and wallabies, can add character to your photo collection.
- Don’t forget to take photos of the waterfalls along the route, such as the Dove River Falls and Waterfall Valley.
- Bring a lightweight tripod for stable shots in low-light conditions.
Best Time to Go: The best time to hike the Overland Track is during the summer months from December to March, when the weather is more stable, and the days are longer. The weather during these months is typically mild, with temperatures ranging from 5°C to 20°C (41°F to 68°F). The peak hiking season can get busy, so it’s recommended to book early.
The winter months (June to August) bring colder temperatures and potentially snow, which may make hiking more difficult and require specialized equipment. However, the park is less crowded, and the landscapes can look even more magical under a blanket of snow.
Expected Weather:
- Summer (December – March): Temperatures range from 5°C to 20°C (41°F to 68°F), with occasional rain and cold winds.
- Winter (June – August): Temperatures can drop below 0°C (32°F), especially in higher elevations, with snow and freezing conditions.
The weather in Tasmania can change rapidly, so hikers should be prepared for all types of conditions, including rain, wind, and cold temperatures, even in summer.
Recommended Gear:
- Waterproof hiking boots – Essential for navigating wet, muddy conditions.
- Layered clothing – Weather can vary, so packing light, moisture-wicking, and warm layers is crucial.
- Rain gear – A waterproof jacket and pants to keep you dry during the inevitable showers.
- Sleeping bag (if camping) – A sleeping bag rated for cold temperatures.
- Lightweight stove – For preparing meals along the track.
- Backpack with rain cover – To protect your gear from the elements.
- Headlamp – For early starts or evenings in the huts.
- Water purification system – Bottled water is available at huts, but purification tablets or filters are recommended for extra safety.
Top Tips for Completing the Hike:
- Book early – Permits for hut accommodation are limited and must be reserved in advance.
- Prepare for varied terrain – The Overland Track has a range of conditions, from muddy paths to rocky ascents.
- Stay hydrated – Carry enough water, and make use of water sources along the trail.
- Bring a camera – Tasmania’s wilderness is exceptionally photogenic, so don’t forget your camera!
- Respect the environment – The park is a UNESCO World Heritage site, so follow Leave No Trace principles and avoid damaging the flora and fauna.
- Check the weather – Be prepared for rain, sudden temperature drops, and strong winds, even in summer.
16.) Drakensberg Grand Traverse, South Africa & Lesotho: A Journey Through Majestic Mountains
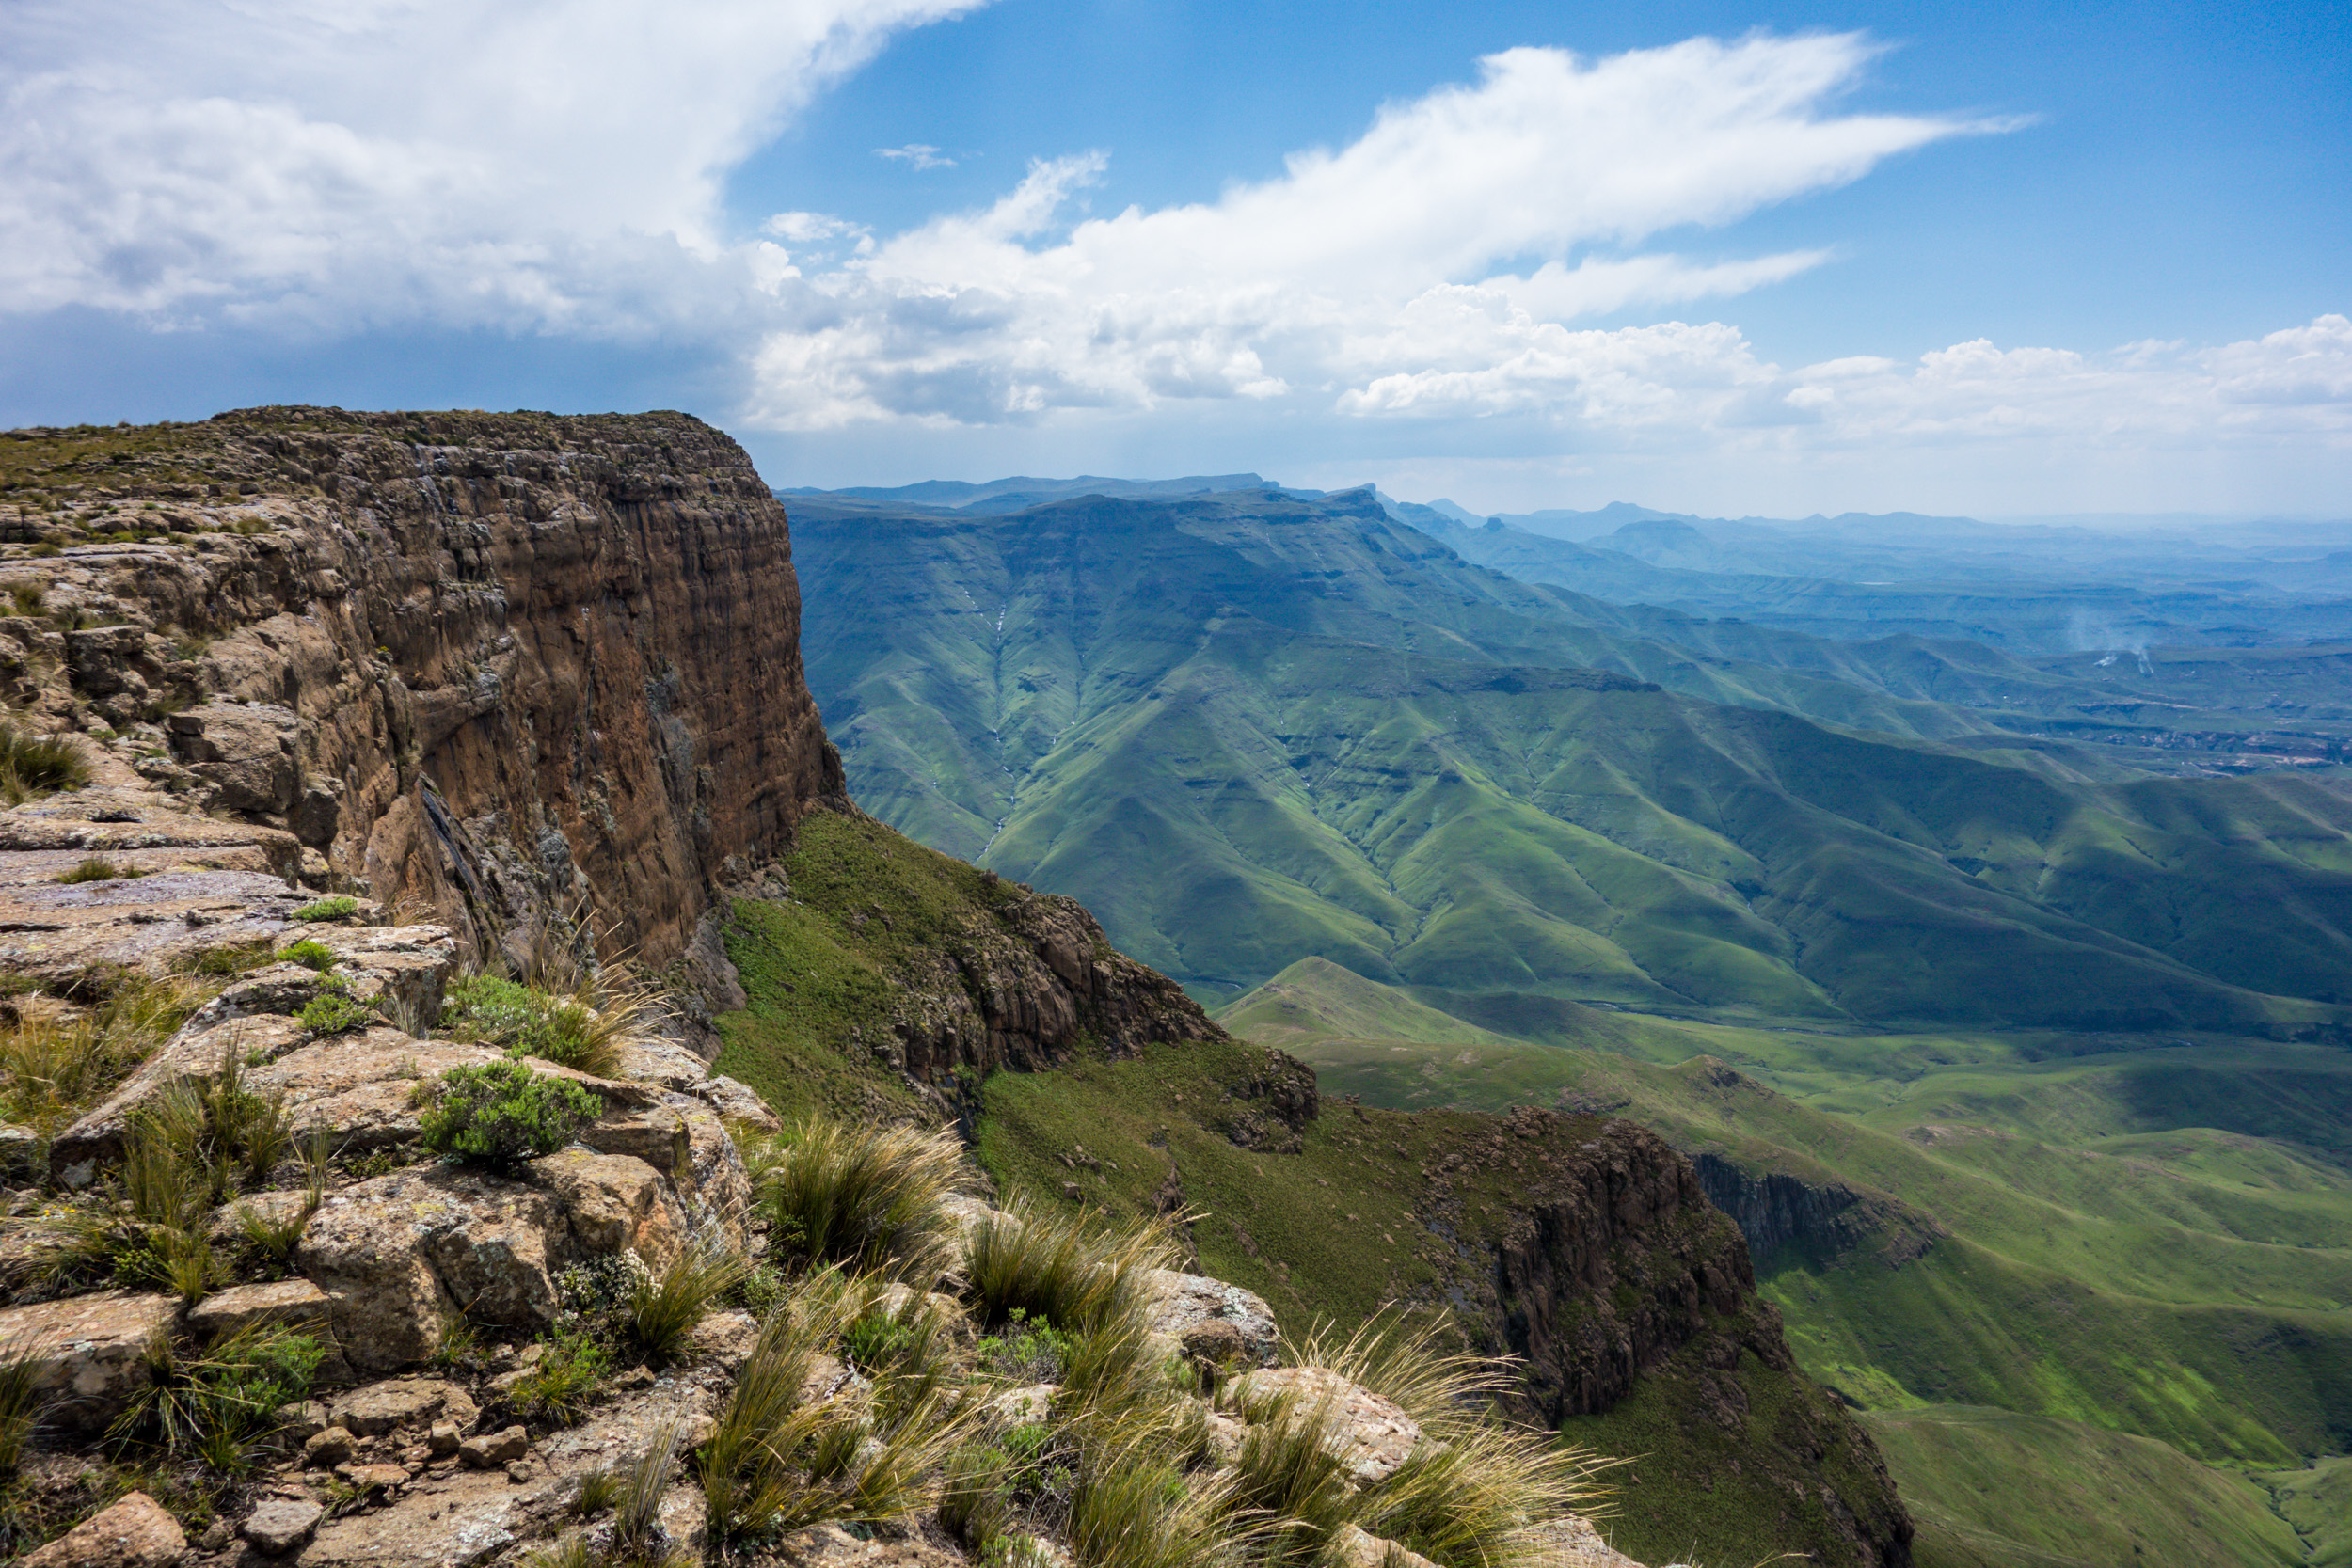
Overview: The Drakensberg Grand Traverse is one of the most challenging and rewarding hikes in Southern Africa. Stretching over 220 km (137 miles) through the rugged mountain range that forms the natural border between South Africa and Lesotho, the trek is a multi-day adventure that offers breathtaking views, dramatic landscapes, and a true wilderness experience. Known for its towering cliffs, lush valleys, pristine rivers, and remote plateaus, the Grand Traverse takes hikers through some of the most iconic scenery in the Drakensberg Mountains, also a UNESCO World Heritage Site.
The route is known for its strenuous terrain, involving high-altitude walking, cliff scrambling, and river crossings, making it a trek suitable for experienced hikers. Along the way, trekkers will experience the diverse environments of the Drakensberg, from the subtropical forests of the lower reaches to the alpine meadows and windswept plateaus at higher elevations. The Grand Traverse passes through both South Africa and Lesotho, offering a unique opportunity to explore two countries in one epic hike.
While the hike is mostly unmarked, hikers are guided by well-trodden paths and a series of cairns and waterfalls that help navigate the route. Due to its difficulty and remoteness, the Drakensberg Grand Traverse remains an adventure for the seasoned hiker, but the rewards are immense for those willing to tackle it.
Duration: The Drakensberg Grand Traverse typically takes 12 to 14 days to complete, depending on pace and route choices. While some might opt for shorter itineraries, a full traverse allows hikers to truly soak in the grandeur of the landscape, including the rugged passes, remote valleys, and stunning vistas.
Location: The Drakensberg Grand Traverse lies in the Drakensberg Mountains, which straddle the border between South Africa and Lesotho. The trek starts near Royal Natal National Park in South Africa and ends near Sani Pass, which marks the entry into Lesotho.
How to Get There: To begin the trek, fly into Durban International Airport (DUR), South Africa’s closest major airport, or King Shaka International Airport. From Durban, take a bus or car rental to Royal Natal National Park, the starting point of the trek.
Travelers from South Africa’s major cities, like Johannesburg, can opt to fly to Durban or directly to Lesotho and travel via Sani Pass. The journey to the starting point can take several hours, and many hikers choose to stay in the Royal Natal National Park before beginning their trek.
The trek begins at the Sentinel Car Park at Royal Natal National Park and runs along the escarpment through to Sani Pass in Lesotho. The finish point at Sani Pass can be accessed via 4x4 vehicles, which are available for transport down into South Africa or into Lesotho.
Accommodation: While the Drakensberg Grand Traverse is largely a camping-based trek, there are a few basic huts and shelters along the way, particularly near the Royal Natal National Park and Sani Pass.
- Royal Natal National Park: At the starting point, there are campsites and huts where trekkers can spend the night before setting off on their journey. The Cedarville Huts and Mountain Hut are great options for a warm and comfortable start.
- Along the Trek: The trek is mostly wild camping, and trekkers will need to be self-sufficient. There are no fixed accommodation options throughout most of the Grand Traverse, so hikers must carry their own tents and camping gear. Many trekkers choose to camp in the wild or make use of shepherd’s huts scattered across the mountains, which are available at certain intervals.
- Sani Pass: At the end of the trek, hikers can stay at the Sani Mountain Lodge, located at 3,000 meters (9,840 feet) above sea level, and is one of the highest pubs in Africa. The lodge offers basic accommodation and meals, as well as stunning views of the surrounding landscape.
Accommodation in Lesotho is limited, but options include guesthouses and small lodges for those who want to continue their journey in the country.
Budget Estimate:
- Flights to Durban (South Africa): $500 – $1,500
- Accommodation (Royal Natal National Park, huts): $15 – $100 per night
- Camping gear (if not provided): $50 – $150
- Meals and snacks: $10 – $30 per day
- Transport (to and from trek): $50 – $200
- Total estimated cost: $1,200 – $2,500 (depending on duration, camping gear, and travel choices).
Best View Spot: The top of the escarpment offers some of the most breathtaking views along the Drakensberg Grand Traverse, with panoramic vistas of the rugged mountain ridges, green valleys, and rolling hills. Sani Pass offers a grand finale to the trek, with views of the Lesotho highlands and the vast landscapes of both South Africa and Lesotho.
Photography Tips:
- Capture the stunning mountain landscapes at golden hour (early morning or late afternoon) for the best lighting.
- Use a wide-angle lens to capture the sweeping views of valleys, peaks, and plateaus.
- Close-up shots of local wildlife, including wild horses and mountain birds, are great additions to your photo collection.
- Be sure to photograph the cloud formations that frequently engulf the mountain peaks, adding a mystical element to the scenery.
- Black and white photography can also capture the dramatic light and shadow of the cliffs and escarpments.
Best Time to Go: The best time to undertake the Drakensberg Grand Traverse is during the summer months from November to April, when the weather is warmer and the trails are more accessible. The temperatures during these months range from 10°C to 20°C (50°F to 68°F). The winter months (May to October) can bring cold conditions and snowfall, making some sections of the trek dangerous, so it’s generally best to avoid these months unless you are an experienced winter trekker.
Expected Weather:
- Summer (November – April): Temperatures are generally mild, ranging from 10°C to 20°C (50°F to 68°F), with some rainfall expected.
- Winter (May – October): Temperatures can drop below 0°C (32°F), particularly at higher altitudes. Snowfall is common, especially in the Lesotho section.
Weather in the Drakensberg can be unpredictable, so be prepared for sudden changes in conditions, including rain and cold winds, even in summer.
Recommended Gear:
- Sturdy waterproof hiking boots – Essential for rocky, slippery terrain.
- Layered clothing – Weather can change rapidly, so pack clothing suitable for both warm and cold conditions.
- Rain gear – A waterproof jacket and pants are vital for unexpected downpours.
- Sleeping bag and tent – For wild camping, make sure you have a lightweight, warm sleeping bag and reliable tent.
- Water purification system – Carry a filtration system or purification tablets as water sources are plentiful but may need filtering.
- Trekking poles – Helpful for navigation and balance on the steep ascents and descents.
- First aid kit – For minor injuries and altitude adjustments.
- High-energy snacks – Carry energy bars, nuts, and other lightweight snacks to keep you fueled during long days on the trail.
Top Tips for Completing the Hike:
- Plan ahead – The Drakensberg Grand Traverse requires solid preparation. Know your route, check weather forecasts, and prepare for potential emergencies.
- Pack light – You’ll need to carry all your gear for the entire trek, so pack smart and only bring essentials.
- - Safety ! — especially in South Africa it is essential to be conscious of all times at safety. Do not go out into town or hike at night, hide valuables and at all times be conscious of your surroundings. It is highly reccomended not to hike solo — espeiclaly for femails.
- Stay hydrated – Ensure you drink plenty of water from the streams and rivers, but always filter it.
- Be mindful of the weather – Be ready for sudden weather changes and adapt accordingly.
- Respect the environment – The Drakensberg is a World Heritage site, so follow Leave No Trace principles and minimize your impact.
- Hike with a guide – Hiring a local guide can provide valuable insight and assistance navigating the tougher sections.
17.) Camino de Santiago, Spain: A Spiritual and Scenic Journey Across Spain

Overview: The Camino de Santiago, or Way of St. James, is a legendary pilgrimage route that has been walked by thousands of pilgrims and hikers for over a thousand years. Spanning across northern Spain, this iconic journey leads to the Cathedral of Santiago de Compostela, where tradition holds that the remains of the Apostle Saint James are buried. Today, the Camino is not only a religious pilgrimage but also a popular trek that attracts adventurers, culture seekers, and spiritual travelers from all around the world.
There are multiple routes that make up the Camino, but the most famous and widely walked is the Camino Francés (French Way), which starts in the French town of Saint-Jean-Pied-de-Port and stretches over 780 km (485 miles) through the picturesque Spanish countryside, ending in Santiago de Compostela. The Camino offers a blend of beautiful landscapes, historic towns, and rich cultural heritage, making it a deeply transformative journey. Whether you’re walking for religious reasons or simply for the adventure, the Camino de Santiago is an experience that connects you to the past while offering a unique chance for self-reflection and personal growth.
Duration: The full Camino Francés takes around 30 to 35 days to complete, depending on your pace and the number of rest days you take. Many hikers choose to walk only a section of the route, either for a shorter trip or based on time constraints, with various starting points along the way. Those walking the full route typically average 20 to 25 km per day, though it can be adjusted to suit individual preferences and stamina.
Location: The Camino de Santiago stretches across northern Spain, with the most popular route, the Camino Francés, beginning in Saint-Jean-Pied-de-Port, France, and passing through the Spanish regions of Navarre, La Rioja, Castile and León, and Galicia before reaching Santiago de Compostela in Galicia.
How to Get There: The starting point for the Camino Francés is Saint-Jean-Pied-de-Port, a charming town in southwestern France, located near the border with Spain. The easiest way to get there is to fly into Biarritz Airport (BIQ) in France, which is approximately 50 km from Saint-Jean-Pied-de-Port. From Biarritz, you can take a bus or train to the town.
Alternatively, travelers can fly into Santiago de Compostela (SCQ), Spain, and take a train or bus to Saint-Jean-Pied-de-Port.
The end of the Camino is at the Cathedral of Santiago de Compostela, located in the city center. From there, pilgrims can fly out of Santiago de Compostela Airport or take a bus or train to Madrid or other major Spanish cities.
If you’re walking the Camino for a shorter stretch, you can start from various other towns along the route, such as Pamplona, Burgos, or León, which are well-connected by public transportation.
Accommodation: Accommodation along the Camino de Santiago is plentiful and diverse, ranging from basic pilgrim hostels (albergues) to charming hotels and guesthouses. The albergues, typically reserved for pilgrims, offer simple, communal accommodations with bunk beds, showers, and shared kitchen facilities. They are usually inexpensive, ranging from €10 to €15 per night, and can be found every 10 to 20 km along the route.
In addition to albergues, there are numerous hotels and guesthouses for those seeking more comfort. Prices for private rooms in hotels vary widely depending on the town, ranging from €30 to €80 per night, though it’s important to note that the closer you get to Santiago de Compostela, the higher the accommodation prices tend to be.
Booking accommodation in advance is highly recommended during the peak walking season (April to October), as the route can get crowded with pilgrims.
Budget Estimate:
- Flights to Spain or France: $500 – $1,500
- Accommodation (albergues/hotels): $10 – $80 per night
- Meals and snacks: $10 – $30 per day
- Transport (train, buses): $50 – $200
- Total estimated cost: $1,000 – $2,500 (depending on route length and preferences).
Best View Spot: One of the most iconic and beautiful spots along the Camino Francés is the Monte do Gozo (Hill of Joy), located just a few kilometers outside of Santiago de Compostela. This elevated viewpoint offers a stunning panoramic view of the city and the Cathedral of Santiago de Compostela, marking the emotional culmination of the journey. The approach to the Cathedral itself, as pilgrims pass through the city’s narrow streets, is an unforgettable moment for many.
Photography Tips:
- The golden hour just after sunrise or before sunset offers the best lighting for landscape shots, especially over rolling hills, vineyards, and woodlands.
- Portrait shots of fellow pilgrims with the scenic backdrop of mountains or historic towns can capture the emotional depth of the journey.
- Use a wide-angle lens to frame the vast, open landscapes of the Camino’s rural stretches.
- Capture moments of reflection at famous landmarks, such as the Monasterio de San Juan de la Peña, or in the quiet forest paths.
Be mindful of shadows and light contrasts on ancient buildings and old stone walls.
Best Time to Go: The best time to walk the Camino de Santiago is from April to October, when the weather is warm, and the route is accessible. The most popular months are May, June, and September, when the weather is typically mild, and the trail is not as crowded as during the peak summer months (July and August).
However, spring and fall offer fewer crowds, cooler weather, and vibrant seasonal colors in the landscape.
Expected Weather:
- Spring (April – June): Temperatures range from 10°C to 20°C (50°F to 68°F), with occasional rain showers.
- Summer (July – August): Expect warmer temperatures of 20°C to 30°C (68°F to 86°F), with long, sunny days.
- Fall (September – October): Similar to spring, temperatures range from 10°C to 20°C (50°F to 68°F), with cooler nights and a higher chance of rain.
- Winter (November – March): Cooler and wetter, with temperatures as low as 0°C (32°F), especially in the mountainous sections.
Recommended Gear:
- Sturdy walking shoes – Comfort is key, as you’ll be walking long distances daily.
- Lightweight clothing – Opt for moisture-wicking fabrics and layers for easy temperature adjustments.
- Backpack – A comfortable, lightweight pack for carrying water, snacks, and essentials.
- Poncho or rain jacket – Rain is frequent along the route, so be prepared for sudden downpours.
- Pilgrim’s passport – Obtain a credencial in advance to collect stamps at each town and monastery you pass.
- Sleeping bag liner – While most albergues provide bedding, a lightweight liner is a practical addition.
- Water bottle and snacks – Stay hydrated and energized, especially on long stretches without services.
- Hiking poles – Helpful for long days and uneven terrain.
Top Tips for Completing the Hike:
- Pace yourself – Don’t try to rush the Camino. Start slow and find a comfortable pace that works for you.
- Embrace the journey – Whether you’re walking for spiritual reasons or just for adventure, take time to reflect and enjoy the experience.
- Stay hydrated – The Camino involves long days of walking, so drink plenty of water along the way.
- Book accommodation ahead – Especially during peak seasons, it’s wise to book your albergue or hotel in advance to secure a bed.
- Be mindful of your health – Blisters and soreness are common, so ensure proper footwear and take care of your body.
- Make connections – Meet fellow pilgrims and enjoy the camaraderie that the Camino fosters. The journey is often just as much about the people you meet as the places you see.
18.) Fisherman’s Trail, Portugal: A Stunning Coastal Adventure
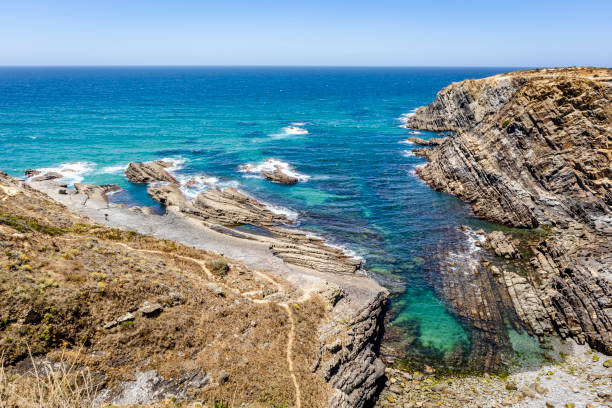
Overview: The Fisherman’s Trail (Trilho dos Pescadores) is a breathtaking coastal hiking route that runs along the southern coast of Portugal, offering spectacular views of the Atlantic Ocean, dramatic cliffs, pristine beaches, and charming fishing villages. Stretching over 200 km from Cape São Vicente near Sagres to Cabo de São Vicente, the Fisherman’s Trail showcases the best of Portugal’s wild coast, with rugged terrain, hidden coves, and a peaceful, natural environment that feels far removed from the bustling tourist areas.
This scenic trek was originally used by local fishermen to access remote fishing spots, and it now serves as a thrilling adventure for those looking to explore Portugal’s stunning coastline. The Fisherman’s Trail is often considered part of the Rota Vicentina, a network of long-distance hiking trails that winds through the Alentejo and Algarve regions, and it attracts nature lovers, wildlife enthusiasts, and those seeking a quieter, more off-the-beaten-path adventure in Europe.
Duration: The Fisherman’s Trail is typically hiked in 7 to 9 days, depending on your pace and how many stops you take. Each day involves walking between 15 to 25 km, and while the terrain can be challenging with steep cliffs and uneven paths, the beauty of the coastline makes it well worth the effort. Many hikers choose to break the journey up into manageable sections, either doing the entire route or focusing on the most scenic portions.
Location: The Fisherman’s Trail runs along the southern coast of Portugal, from Cape São Vicente near Sagres in the Algarve, heading east through small towns like Carrapateira, Aljezur, and Vila do Bispo, before reaching the end point at Cabo de São Vicente. This trail is part of the larger Rota Vicentina network of trails.
How to Get There: To start the Fisherman’s Trail, fly into Faro Airport (FAO), located about 90 km east of the Algarve region, which is the closest major airport to the trail. From Faro, you can take a bus or rent a car to reach Sagres or other trailheads along the route.
Alternatively, if you’re flying into Lisbon, the trailhead at Sagres is about a 4‑hour drive from the city. Public transportation options, such as buses or trains, are also available from Lisbon to Aljezur, where the trail can be accessed.
The best option for getting to and from the trail is renting a car, as this allows for flexibility when traveling between the start and end points. It’s also a great way to explore nearby attractions in the Alentejo and Algarve regions.
Accommodation: The Fisherman’s Trail offers a range of accommodation options, including guesthouses, hostels, small hotels, and rural accommodations. Along the trail, you’ll find several small towns and villages that cater to hikers, offering cozy stays with friendly locals. Accommodations range from basic (shared dorms or private rooms in guesthouses) to more luxurious options in some of the towns along the route.
- Guesthouses and Hostels: Many hikers choose to stay in simple guesthouses or local hostels in towns like Carrapateira or Aljezur, which offer shared or private rooms and are budget-friendly, with prices ranging from €20 to €50 per night.
- Small Hotels: For a more comfortable stay, there are small hotels and boutique accommodations, particularly near larger towns, where prices range from €60 to €150 per night depending on the location and amenities.
- Rural Houses and Eco-lodges: For those looking for a more secluded and tranquil experience, there are several eco-lodges and rural houses offering a unique stay in nature with stunning views of the ocean, priced at €50 to €120 per night.
Many hiking companies also offer packages where they arrange the accommodations along the trail, so you don’t have to worry about booking each night yourself.
Budget Estimate:
- Flights to Portugal: $400 – $1,200
- Accommodation (guesthouses/hotels): $20 – $150 per night
- Meals and snacks: $10 – $25 per day
- Transport (bus, car rental): $50 – $200
Total estimated cost: $800 – $2,500 for the entire trek.
Best View Spot: The most breathtaking views are often found along the cliffs of Cabo de São Vicente, where you’ll experience dramatic panoramas of the Atlantic Ocean crashing against towering cliffs. As you approach the end of the trail, the lighthouse at Cabo de São Vicente is an iconic sight. Another stunning viewpoint is the Praia do Amado, where the golden sand meets the rugged cliffs, offering a peaceful spot to reflect and take in the coastal beauty.
Photography Tips:
- Golden hour (sunrise and sunset) is the best time for capturing the beauty of the coastline, with softer light and dramatic contrasts on the cliffs.
- Bring a wide-angle lens to capture the vastness of the cliffs and ocean.
- Use a zoom lens to capture wildlife along the trail, such as seabirds and local flora.
Focus on the textures and patterns in the coastline, cliffs, and sandy beaches.
- A drone could offer incredible aerial views of the dramatic coastline.
Best Time to Go: The best time to hike the Fisherman’s Trail is from March to October, when the weather is mild and dry, and the trail conditions are optimal. Spring (April to June) and early autumn (September to October) are ideal, as the weather is pleasant, and the trail is less crowded than in peak summer. The summer months (July and August) can be quite hot, with temperatures reaching 30°C (86°F) or higher, especially in the inland sections.
Expected Weather:
- Spring (March – May): Temperatures range from 15°C to 25°C (59°F to 77°F), with occasional rain showers.
- Summer (June – August): Temperatures range from 20°C to 30°C (68°F to 86°F), with lots of sunshine and warmer conditions.
- Fall (September – November): Temperatures range from 16°C to 24°C (61°F to 75°F), with more pleasant conditions and less rain.
- Winter (December – February): Cooler and wetter, with temperatures around 10°C to 16°C (50°F to 61°F) and occasional storms.
Recommended Gear:
- Sturdy hiking shoes – The trail involves some rocky and uneven terrain, so comfortable and supportive footwear is a must.
- Sun protection – A wide-brimmed hat, sunscreen, and sunglasses are essential for sun protection along the coastal route.
- Lightweight, moisture-wicking clothing – The climate can be warm during the day, so pack breathable, quick-drying layers.
- Rain jacket/poncho – Be prepared for occasional rain showers, especially in spring and fall.
- Water bottle – There are limited water refill stations, so carry plenty of water.
- Day pack – A small backpack for carrying water, snacks, and personal items.
Top Tips for Completing the Hike:
- Prepare for uneven terrain – While the trail is well-marked, the terrain can be rocky and challenging in certain sections, so be sure to bring sturdy shoes.
- Stay hydrated – Water sources are scarce in some parts, so carry enough water and snacks to stay energized.
- Book accommodations early – Particularly in peak season, accommodations can fill up quickly, so book ahead if possible.
- Embrace the solitude – The Fisherman’s Trail offers a peaceful and quiet hiking experience, so take your time to enjoy the landscape and reflect on your journey.
- Respect local culture – The trail passes through small fishing villages, so be mindful of local customs and traditions.
19.) Kungsleden, Sweden: A Majestic Nordic Adventure

Overview: The Kungsleden is one of Sweden’s most iconic and stunning hiking trails, stretching 440 km through the Swedish Lapland. This incredible trail connects Abisko in the north to Hemavan in the south, passing through pristine wilderness, national parks, and offering breathtaking views of snow-capped peaks, expansive valleys, and serene lakes. As you walk through vast forests and rugged mountain terrain, you’ll experience the untouched beauty of Sweden’s far north.
Whether you’re hiking the entire trail over 7 to 10 days or just a section, the Kungsleden offers something for every nature lover. The trail is well-marked, with infrastructure like mountain huts along the way, making it accessible for both seasoned trekkers and those new to hiking.
Duration: The full Kungsleden trek takes around 7 to 10 days, depending on your pace and which sections you choose to hike. Daily distances vary from 15 to 20 km (9 to 12 miles), depending on the terrain. Shorter hikes are possible if you want to explore individual sections, with durations ranging from 1 day to 5–6 days.
Location: The Kungsleden begins in Abisko, just below the Arctic Circle in Swedish Lapland, and ends in Hemavan, further south. Along the way, it passes through Abisko National Park, Stora Sjöfallet National Park, and Sarek National Park, showcasing the stunning mountains, glaciers, and lakes of Sweden’s wilderness.
How to Get There: Fly into Kiruna Airport (KRN), which is the closest airport to Abisko. From Kiruna, take a 90-minute drive or train to Abisko station. Alternatively, fly to Stockholm and take a domestic flight to Kiruna or a train to Gällivare, followed by a bus or car transfer to Abisko.
Once in Abisko, the trailhead is easy to find and well-marked. To complete your trek in Hemavan, you can use local buses or flights to reach Stockholm or other parts of Sweden.
Accommodation: The Kungsleden boasts a series of well-equipped mountain huts (stugor) along the trail, managed by the Swedish Tourist Association (STF). These huts provide comfortable accommodation (private rooms and dormitories), meals, and essential amenities. They are spaced around 10 to 20 km apart, making it easy to plan your daily hike.
If you prefer a more rustic experience, wild camping is allowed outside the national parks. However, mountain huts are the best option for those seeking comfort and safety. For pre- or post-hike stays, hotels and guesthouses in Abisko and Hemavan offer additional comfort and services.
Budget Estimate:
- Flights to Kiruna: $300 – $1,000
- Mountain Hut Accommodation: €40 – €80 per night
- Meals: €15 – €40 per day
- Transport (train, bus): €50 – €150
- Total Estimated Cost: $800 – $2,500 for the full trek
Best View Spot: Tjäktja Pass offers panoramic views of the surrounding mountains and valleys, providing one of the most awe-inspiring perspectives along the trail. Sälka Hut is another notable viewpoint, overlooking vast snowfields and glacier peaks. The final stretch in Hemavan gives picturesque views of Tärnasjö lake and the surrounding mountains.
Photography Tips:
- Golden hour (sunrise and sunset) offers the best light for capturing the landscapes.
- Use a wide-angle lens to photograph the expansive wilderness and stunning vistas.
- A telephoto lens works well for wildlife shots and detailed landscape textures.
- Drones can provide dramatic aerial views of the towering peaks and tranquil lakes.
- Capture the changing seasons: the colors of autumn or spring bring vivid landscapes.
Best Time to Go: The best time to hike the Kungsleden is from mid-June to September, when the weather is mild and most of the huts are open. July and August are the warmest months but also the busiest. For a quieter experience, consider hiking in late spring or early autumn, though some huts may not be open.
Expected Weather:
- Summer (June – August): Temperatures range from 5°C to 15°C (41°F to 59°F), with occasional rain.
- Autumn (September – October): Temperatures drop to 0°C to 10°C (32°F to 50°F), and snow may appear at higher altitudes.
- Winter (November – April): Not recommended due to severe cold and inaccessibility of huts. Temperatures can plunge to ‑20°C (-4°F).
Recommended Gear:
- Waterproof hiking boots for rough and wet terrain.
- Layered clothing to handle varying temperatures.
- Rain gear: Waterproof jacket and pants are essential.
- Sleeping bag liner for use in mountain huts.
- Trekking poles for stability on uneven terrain.
- Headlamp for early or late hiking.
- Water bottle to stay hydrated.
Top Tips for Completing the Hike:
- Train in advance: Be prepared for 15–25 km daily hikes.
- Book your huts early: Reservations are recommended, especially in summer.
- Carry extra food: Bring snacks and energy bars for long stretches.
- Prepare for changing weather: Pack for both rain and sunshine.
- Consider a guided tour: Great for those unfamiliar with remote hikes.
20.) Grand Canyon Rim-to-Rim, USA: An Epic Desert Adventure

Overview: The Grand Canyon Rim-to-Rim hike is a legendary trek through one of the world’s most iconic natural wonders. This challenging hike spans from the North Rim to the South Rim, covering a distance of about 27 miles (43 km) and descending over 5,000 feet (1,500 meters) into the heart of the canyon before climbing back up. The journey takes you through diverse landscapes, from lush forests on the rim to the arid, rocky terrain at the bottom, offering stunning views of the Colorado River and the canyon’s massive rock formations.
This trek is known for its incredible beauty and unique geology, making it a must-do for serious hikers. It’s a strenuous hike, with significant elevation changes and challenging conditions, so it requires proper preparation. The trek is typically completed over two days, but it’s possible to do it in a single day for experienced hikers.
Duration: The Rim-to-Rim trek usually takes 2 days to complete, with most hikers camping or staying in lodges at the bottom (near Phantom Ranch). Some experienced hikers choose to complete the route in a single day, which takes around 12–14 hours. The hike covers a distance of 27 miles (43 km), with 5,000 feet of elevation change from rim to river and back up.
Location: The Rim-to-Rim hike starts at the North Rim of the Grand Canyon in Grand Canyon National Park, Arizona, and ends at the South Rim. The North Rim is more remote and less accessible, while the South Rim is the park’s main entrance and more popular. Along the trail, hikers will pass through the North Kaibab Trail, descend to the Colorado River, and climb back up on the Bright Angel Trail or the South Kaibab Trail.
How to Get There: To begin the hike from the North Rim, fly into Las Vegas or Phoenix, and then take a 5‑hour drive to the North Rim. Alternatively, you can take a flight to Flagstaff and drive about 2.5 hours to the North Rim. Note that the North Rim is closed in winter (October to mid-May) due to snow, and the best time to visit is in the late spring, summer, or early autumn.
For the South Rim, it’s easier to fly into Flagstaff (1.5 hours away) or Phoenix (4 hours away) and drive into the park. The South Rim is open year-round and offers various accommodations, including hotels, lodges, and campgrounds.
Once at either rim, transportation options (shuttles and buses) are available to get to the trailheads.
Accommodation: There are limited accommodation options along the trail, and many hikers camp at the bottom of the canyon. Phantom Ranch, located near the river, offers rustic lodging and meals, but reservations can be hard to come by, especially during peak season. It’s advisable to book well in advance.
If you’re planning to camp, the Bright Angel Campground is the most popular spot at the bottom, and reservations are required. For a more rugged experience, you can also camp along the trail.
On the South Rim, there are numerous hotels and lodges, ranging from basic to luxurious, including El Tovar, Bright Angel Lodge, and Yavapai Lodge. In addition, there are campgrounds for those preferring to camp before or after the hike.
Budget Estimate:
- Flights to Flagstaff or Phoenix: $250 – $1,000 (depending on departure location)
- Accommodation (Phantom Ranch): $50 – $250 per night (based on lodging type and availability)
- Meals: $15 – $40 per day (depending on trail or lodge dining)
- Shuttle and Transportation: $30 – $100 (for buses or shuttles)
- National Park Fees: $35 for a 7‑day pass
- Total Estimated Cost: $800 – $2,000 for the entire trip
Best View Spot: One of the best spots for a breathtaking view is from the North Rim, especially at Bright Angel Point, where you can look out over the entire canyon. Phantom Ranch offers incredible views of the Colorado River and the canyon walls, and the ascent up the Bright Angel Trail from the bottom is filled with stunning vistas as you approach the South Rim.
Photography Tips:
- Capture the vastness of the canyon with a wide-angle lens.
- Golden hour (sunrise and sunset) is ideal for dramatic lighting and shadows on the canyon walls.
- Telephoto lenses work well for capturing the textures and details of the canyon’s cliffs and rock layers.
- Take shots of the Colorado River at Phantom Ranch, where the river reflects the colorful canyon walls.
- Don’t forget to capture the changing colors of the canyon throughout the day and the varying landscapes as you ascend and descend the canyon.
Best Time to Go: The best time to hike Rim-to-Rim is in spring (late May to June) and fall (September to October), when temperatures are milder. Summer can be extremely hot, especially in the inner canyon, so early mornings and late evenings are best. Avoid the winter months as snow and freezing temperatures make the North Rim inaccessible.
Expected Weather:
- Summer (June – August): Temperatures on the South Rim can reach up to 90°F (32°C), while temperatures in the canyon can exceed 100°F (38°C), making this season potentially dangerous without proper preparation.
- Fall (September – November): Cooler temperatures range from 60°F to 80°F (15°C to 27°C) on the rims, and the inner canyon is typically in the 70s°F (21–26°C).
- Winter (December – February): The North Rim may be closed due to snow, and temperatures can dip below freezing on the rims.
- Spring (March – May): Temperatures range from 50°F to 75°F (10°C to 24°C) on the rims, and the inner canyon is more bearable in the 70s°F (21°C).
Recommended Gear:
- Sturdy, lightweight hiking boots with good grip for descending and ascending steep terrain.
- Water hydration system (like a Camelbak) or a water bottle to stay hydrated throughout the hike.
- Layers of clothing to adjust to varying temperatures: lightweight clothing for the canyon and warmer layers for the rims.
- Sun protection: Hat, sunscreen, sunglasses, and lip balm.
- Headlamp for early morning or late evening hikes.
- Snacks: High-energy foods like nuts, energy bars, and trail mix.
Top Tips for Completing the Hike:
- Prepare for the elevation change: The descent and ascent can be strenuous, especially in one day. Start early and pace yourself.
- Hydrate well: The heat in the canyon can be intense, so drink plenty of water throughout the hike.
- Know your limits: The Rim-to-Rim is a tough hike, especially in a single day. Ensure you are physically prepared.
- Book Phantom Ranch well in advance: Accommodation can be scarce, especially during peak seasons.
- Travel with a buddy: The hike is more enjoyable and safer with a friend. Always have a hiking partner.
21.) Pacific Crest Trail, USA: A Journey Across the American Wilderness

Overview: The Pacific Crest Trail (PCT) is one of the most iconic long-distance hikes in the United States, stretching 2,650 miles (4,265 km) from Mexico to Canada, passing through California, Oregon, and Washington. This legendary trail traverses a variety of landscapes, from desert terrain in the south, to alpine forests and snow-capped peaks in the Sierra Nevada and Cascades, all the way to lush temperate rainforests in the Pacific Northwest.
The PCT offers hikers a chance to experience the full range of the American wilderness, from arid deserts to remote mountain ranges, with breathtaking vistas and abundant wildlife. While completing the full trail takes about 5 months for most thru-hikers, many opt to hike it in sections for a more manageable experience. The PCT is a true test of endurance, but the rewards are unparalleled, with some of the most beautiful landscapes in the world.
Duration: The full Pacific Crest Trail usually takes 4 to 6 months for thru-hikers to complete. However, many hikers choose to complete the trail in sections, which can be done over the course of several years. If hiking the entire trail, hikers typically walk about 15 to 25 miles (24 to 40 km) per day, depending on conditions, terrain, and personal fitness.
Location: The PCT starts at the Mexican border in Campo, California, and ends at the Canadian border near Manning Provincial Park in British Columbia, Canada. The trail passes through three states: California, Oregon, and Washington. It goes through national parks, forests, and wilderness areas, with highlights including the Sierra Nevada, Cascade Range, Desert, and the Olympic Peninsula in Washington.
How to Get There: To begin the trail at the Mexican border, you can fly into San Diego, California, and take a bus or rental car to Campo, where the PCT starts. For those starting from the North, you can fly into Seattle or Vancouver, Canada, and then take a bus or rental car to Manning Provincial Park, where the trail officially ends. Public transportation options and shuttles are available for sections of the trail, and for those planning a long section hike, it’s possible to rent a car or arrange shuttles to various trailheads along the way.
Accommodation: There are no traditional accommodations along the PCT, but hikers can camp at designated campsites or in the wilderness along the trail. Some sections of the trail pass through national parks and forests where backcountry camping is permitted. There are also trail shelters in some areas, particularly in the Sierra Nevada and Cascades, though they are limited.
For those who want to stay in towns along the way, several trail towns have accommodations ranging from budget motels to small guesthouses. Many hikers choose to stay in towns to rest, resupply, and recharge before continuing their journey. Some popular towns along the PCT include Lake Tahoe, Mammoth Lakes, Ashland, and Stehekin.
Budget Estimate:
- Flights to San Diego (for the South) or Seattle (for the North): $200 – $800
- Accommodation: Free camping along the trail, but town stays can range from $50 to $150 per night
- Meals: $5 – $15 per day (camping meals), or $15 – $25 per day in towns
- Resupply: $200 – $500 per month depending on how often you need to restock
- Gear: $1,000 – $2,000 (initial investment for quality gear)
- Transportation: $50 – $200 for shuttles or buses to different trailheads
- Total Estimated Cost: $4,000 – $7,000 for a thru-hike
Best View Spot: One of the most breathtaking viewpoints along the Pacific Crest Trail is Mount Whitney, the highest peak in the contiguous United States, where hikers are treated to sweeping views of the Sierra Nevada. Another stunning spot is Eagle Creek in Oregon, known for its lush landscapes and waterfalls, while Campsite 78 in the Washington Cascades offers mesmerizing vistas of the North Cascades.
Photography Tips:
- Golden hour is essential for capturing the light as it bathes the mountains and valleys in soft, warm tones.
- Wide-angle lenses are ideal for capturing sweeping vistas of mountain ranges, forests, and desert landscapes.
- Telephoto lenses work great for wildlife shots or distant mountain peaks.
- Don’t forget to capture the changing seasons, from the blooming wildflowers in spring to the snow-covered peaks of winter.
- A drone can offer stunning aerial shots of the vast landscapes, but make sure to follow park regulations regarding drone use.
Best Time to Go: The best time to hike the Pacific Crest Trail is during the summer months, from late June to September. This window avoids the snow at higher elevations in the Sierra Nevada and Cascades, and allows hikers to complete the trek without severe weather conditions. However, spring (April to June) and fall (September to October) are also popular, but higher elevations may still have snow, and the weather can be more unpredictable.
Expected Weather:
- Spring (April – June): Temperatures vary, with desert sections being hot (up to 90°F/32°C), while mountain sections can still have snow and cold nights (down to 20°F/-6°C).
- Summer (July – August): Hottest in the desert sections (90°F to 100°F/32°C to 38°C) and more moderate in the mountains (50°F to 75°F/10°C to 24°C).
- Fall (September – October): Cool, with average temperatures ranging from 40°F to 60°F (4°C to 16°C), but snow is common in the Cascades and Sierra Nevada.
- Winter (November – March): Not recommended for most of the trail due to snow, freezing temperatures, and harsh conditions at higher elevations.
Recommended Gear:
- Lightweight, waterproof hiking boots with ankle support for varied terrain.
- Backpack with a capacity of 50–70L for extended trekking, plus a hydration system or water bottles.
- Ultralight tent for backpacking, or sleeping bag and pad for camping at designated sites.
- Layered clothing to handle extreme temperature shifts, including moisture-wicking base layers and a down jacket for the cold evenings.
- Stove and cookware for preparing meals along the way, plus freeze-dried food and snacks.
- Headlamp for hiking in low light or during early morning/late evening hours.
- Trekking poles for added stability, especially when descending steep slopes.
Top Tips for Completing the Hike:
- Train for endurance: The PCT is a physically demanding trail, so training in advance with long hikes and carrying a weighted pack is essential.
- Start early to avoid crowds and the hottest months in the desert sections.
- Carry sufficient water: Water sources can be scarce, especially in the California desert, so plan accordingly.
- Resupply strategically: There are towns along the way to resupply, but some are more remote than others, so plan your resupplies ahead of time.
- Take care of your feet: Foot care is essential on the PCT—break in your shoes, carry blister treatment, and take regular foot breaks.
- Document your journey: The PCT offers incredible photo opportunities, so capture the diverse landscapes and wildlife to preserve memories.
22.) Cinque Terre Trail, Italy: A Scenic Coastal Adventure

Overview: The Cinque Terre Trail is a stunning network of hiking paths that connects five picturesque villages along the Italian Riviera, nestled between rugged cliffs and the Mediterranean Sea. The trail is renowned for its breathtaking views of vibrant coastal towns, terraced vineyards, dramatic cliffs, and pristine beaches. The five villages—Monterosso al Mare, Vernazza, Corniglia, Manarola, and Riomaggiore—form the Cinque Terre National Park, a UNESCO World Heritage site.
This relatively short but spectacular trek takes hikers through lush forests, dramatic coastal cliffs, and narrow paths overlooking the azure waters of the Ligurian Sea. The Cinque Terre Trail offers an unforgettable way to explore the region’s charming villages, famous for their colorful houses, winding streets, and rich history.
While the entire route can be hiked in 4 to 5 hours, there are several different sections of the trail, ranging from easy walks to more challenging paths. The trail is accessible to most hikers, making it ideal for those looking for a short but scenic hike with spectacular views.
Duration: The Cinque Terre Trail can be completed in a single day if you’re planning to hike the entire route, with the journey taking around 4 to 5 hours. However, many hikers prefer to take their time and explore the villages, so it’s common to spread the trek over two or more days. The total distance of the trail is approximately 12 km (7.5 miles), with moderate elevation changes along the way.
Location: The Cinque Terre Trail runs through the Cinque Terre National Park, located on the northwestern coast of Italy, along the Ligurian Sea. The trail connects the five villages—Monterosso al Mare, Vernazza, Corniglia, Manarola, and Riomaggiore—each of which is perched on the cliffs overlooking the sea.
The trail provides stunning views of the Mediterranean coast and passes through vineyards, olive groves, and terraces that have been cultivated for centuries. The villages are linked by a series of well-maintained hiking paths, offering a mix of coastal and inland routes.
How to Get There: The easiest way to reach the Cinque Terre is by train. You can take a train from La Spezia (a major railway hub) to any of the five villages. Trains run frequently and are the most convenient option for travelers. If you’re coming from Florence, Pisa, or Genoa, it’s easy to take a direct train to La Spezia, and then transfer to local trains heading to the Cinque Terre villages.
For those driving, there are limited parking spaces in the villages themselves, so it’s often better to park in La Spezia and use public transportation to reach the villages. The trailhead for the hike is well-marked from the train stations in each village.
Accommodation: Accommodation options along the Cinque Terre Trail are abundant, with charming guesthouses, hotels, and B&Bs in each of the five villages. The villages offer a range of accommodations, from budget options to more luxurious stays with stunning views of the sea. Prices can vary depending on the season, with higher prices during the summer months.
- Monterosso al Mare: Known for its beaches, Monterosso has a variety of hotels and B&Bs, ranging from budget to mid-range options.
- Vernazza: One of the most picturesque villages, Vernazza offers several charming guesthouses and boutique hotels.
- Corniglia: Located on a hill, Corniglia has fewer tourist accommodations but offers a more peaceful atmosphere and a few guesthouses.
- Manarola: Popular for its romantic scenery, Manarola has a range of accommodation options, including coastal guesthouses with beautiful views.
- Riomaggiore: Known for its vibrant waterfront, Riomaggiore has a variety of hotels and B&Bs to suit different budgets.
Budget Estimate:
- Flights: $300 – $1,000 (depending on departure location and time of year)
- Accommodation: €80 – €200 per night (for mid-range hotels)
- Meals: €15 – €40 per day (local restaurants or cafes)
- Train Transport: €10 – €30 (for a return train ticket from La Spezia)
- Cinque Terre Card (for hiking): €7 – €25 per day (for access to the trails)
- Total Estimated Cost: €300 – €1,000 for a multi-day visit, depending on your travel style and accommodation choice.
Best View Spot: One of the most iconic viewpoints is from the Vernazza to Monterosso section of the trail, which offers stunning panoramic views of the coastline. The Manarola viewpoint is another must-see, offering a spectacular shot of the village perched on the cliffs. The Riomaggiore to Manarola section, known as the Via dell’Amore (Lover’s Lane), also provides picturesque coastal views.
Photography Tips:
- Golden hour: Sunrise and sunset are the best times for photographing the Cinque Terre, when the soft light illuminates the colorful houses and dramatic cliffs.
- Wide-angle lens: The panoramic vistas are perfect for wide-angle shots to capture the sweeping views of the Mediterranean coastline.
- Telephoto lens: Ideal for capturing the details of the villages or the changing colors of the cliffs and sea.
- Aerial shots: Drones can provide a fantastic aerial perspective, especially of the coastal villages and the winding trail below.
Best Time to Go: The best time to hike the Cinque Terre Trail is in spring (April – June) and autumn (September – October) when the weather is mild, and the crowds are fewer. The summer months (July and August) are also popular, but the trail can get crowded, and temperatures can rise, making it a bit more challenging. Winter (November – March) is the off-season, with fewer tourists, but some accommodations and restaurants may be closed, and the weather can be unpredictable.
Expected Weather:
- Spring (April – June): Mild, with temperatures ranging from 12°C to 22°C (54°F to 72°F). Some rain is possible, but it’s generally pleasant for hiking.
- Summer (July – August): Hot, with temperatures reaching 25°C to 35°C (77°F to 95°F). It can get very crowded, especially in the villages, and the weather can be humid.
- Autumn (September – October): Temperatures range from 15°C to 25°C (59°F to 77°F), with cooler evenings. The weather is perfect for hiking, and the autumn colors add a special touch to the landscape.
- Winter (November – March): Cooler, with temperatures between 5°C to 15°C (41°F to 59°F), and occasional rain. Many accommodations and services are closed, making it less ideal for hiking.
Recommended Gear:
- Comfortable hiking shoes with good grip for rocky paths.
- Lightweight backpack for carrying water, snacks, and your camera.
- Water bottle to stay hydrated throughout the hike.
- Sun protection: Sunglasses, sunscreen, and a hat are important, especially during the warmer months.
- Layers: While temperatures are mild, a light jacket or sweater is useful, as it can get cooler in the evenings or at higher elevations.
- Camera: Don’t forget your camera to capture the stunning views and vibrant villages along the trail.
Top Tips for Completing the Hike:
- Arrive early to avoid the crowds and enjoy a peaceful hike.
- Wear proper footwear: The trail can be rocky and uneven, so sturdy hiking shoes are essential.
- Take breaks: Stop in the villages to rest and explore. Each village has its own unique charm and plenty of opportunities for a coffee break or a snack.
- Plan your route: Some sections of the trail may be closed for maintenance, so check the Cinque Terre website for the latest trail updates.
- Carry enough water: There are limited water sources along the trail, so make sure to bring enough for the entire hike.
23.) Raja Ampat Island Trek, Indonesia: A Tropical Paradise Adventure

Overview: The Raja Ampat Island Trek is an extraordinary adventure that takes you through one of the most remote and pristine archipelagos in the world, located off the coast of Papua in Indonesia. Known for its crystal-clear waters, lush rainforests, dramatic limestone formations, and abundant marine life, Raja Ampat is a true paradise for nature lovers and adventure seekers. This trekking experience provides a unique opportunity to explore the islands’ diverse ecosystems, pristine beaches, and traditional Papuan villages, all while being immersed in a biodiverse haven.
The trek itself takes you through dense jungle paths, steep hills, and along breathtaking coastlines, offering some of the most spectacular views you can find on Earth. The island chain is famous for its underwater biodiversity, making it a diver’s dream, but there is also much to explore on foot as you trek through tropical forests, hike to hidden viewpoints, and witness the stunning landscapes from above.
The Raja Ampat Island Trek is perfect for those seeking a rugged yet rewarding trek with a mix of cultural immersion, nature walks, and stunning ocean views. While it is less trodden than more famous hiking destinations, it is rapidly becoming a must-do trek for adventurers seeking a remote and unspoiled natural experience.
Duration: The duration of the trek varies depending on your preferred route and pace, but typically, a trek of 3 to 5 days is recommended to explore the main islands of Raja Ampat. The trek can be split into shorter day hikes, or for a more immersive experience, you can extend the adventure to several days, staying in local villages or eco-lodges. The trekking routes vary in difficulty, with some sections requiring steep ascents and others offering more relaxed coastal walks.
Location: The Raja Ampat Islands are located in the Coral Triangle of Southeast Asia, off the northwest coast of Papua, Indonesia. The archipelago is made up of over 1,500 small islands, and is famous for its incredibly diverse marine life, with some of the richest coral reefs in the world. The main islands for trekking include Waigeo, Salawati, Misool, and Batanta, all of which offer different landscapes and varying levels of difficulty for hikers.
Each island has its own unique beauty, with towering cliffs, hidden beaches, jungle-covered hills, and pristine waters. The landscapes are varied, ranging from rugged highlands to idyllic coastlines, offering a trek that feels both adventurous and serene.
How to Get There: To start your journey to the Raja Ampat Islands, you’ll need to fly into Sorong, the main gateway to the archipelago. Sorong has an airport (Domine Eduard Osok Airport) that is accessible from major Indonesian cities like Jakarta, Makassar, and Surabaya.
From Sorong, you can take a boat to the main islands of Raja Ampat. The boat ride typically takes 2 to 4 hours, depending on which island you’re visiting first. Many tour operators offer packages that include both transportation and guided treks, so it’s advisable to arrange your trip through a local guide or tour agency to ensure access to the trails and necessary permits.
Once in Raja Ampat, local guides, often from nearby villages, lead trekkers through the islands, providing insight into the local culture and ecosystems.
Accommodation: Accommodation options in Raja Ampat are relatively basic, but there are several eco-lodges, guesthouses, and homestays that offer a unique, off-the-grid experience.
- Eco-lodges: There are several eco-friendly resorts on the islands, such as Misool Eco Resort, which offer comfortable stays with stunning views of the surrounding ocean and forest. These lodges provide meals, local guides for treks, and facilities like snorkeling gear.
- Homestays: For a more authentic experience, you can stay in traditional Papuan villages, where locals open their homes to visitors. Homestays are simple, but they provide a true connection to the community and culture.
- Camping: For the more adventurous, camping is allowed in some areas of Raja Ampat, though it requires permission from local authorities.
Budget Estimate:
- Flights to Sorong: $500 – $1,500 (depending on departure location and time of year)
- Accommodation: $40 – $250 per night (depending on type of stay: guesthouse, eco-lodge, or homestay)
- Meals: $10 – $30 per day (local restaurants or meals provided by accommodations)
- Boats to islands: $30 – $100 (depending on the distance and transport provider)
- Guided Tours: $50 – $150 per day (for guided treks and local boat rides)
- Total Estimated Cost: $1,000 – $3,500 for a multi-day visit, depending on your accommodation choices and activities.
Best View Spot: One of the most spectacular viewpoints on the Raja Ampat trek is the Piaynemo Viewpoint on Waigeo Island, which offers a panoramic view of the turquoise lagoons and jagged limestone islets. The Misool Archipelago is another breathtaking spot, known for its towering rock formations and pristine beaches that stretch out into the horizon. The trek to Wayag Island, with its dramatic hills and crystal-clear waters, is also considered one of the best viewpoints.
Photography Tips:
- Golden hour: Sunrise and sunset are magical in Raja Ampat, with the soft light highlighting the turquoise waters and the island’s stunning topography.
- Wide-angle lens: Capture the vast landscapes, including the dramatic coastlines, rocky hills, and endless ocean views.
- Telephoto lens: Ideal for wildlife photography, such as birds and marine life, or for capturing distant islands and boats.
- Underwater photography: If you’re also planning to dive or snorkel, be sure to bring an underwater camera to capture the incredible marine life in the Coral Triangle.
Best Time to Go: The best time to trek in Raja Ampat is during the dry season, which lasts from October to April. During this time, you’ll enjoy clear skies, calm seas, and pleasant temperatures ranging from 25°C to 35°C (77°F to 95°F). The wet season, from May to September, brings heavier rainfall, making some trails slippery and difficult to navigate, as well as potential disruptions to boat services.
Expected Weather:
- Dry Season (October – April): Temperatures range from 25°C to 35°C (77°F to 95°F), with little rainfall. This is the ideal time for hiking and outdoor activities.
- Wet Season (May – September): Expect temperatures between 24°C to 30°C (75°F to 86°F), with higher humidity and frequent rain showers. This can make hiking more challenging, but the trails will be less crowded.
Recommended Gear:
- Sturdy, waterproof hiking boots: The trail can be muddy and slippery, so proper footwear is essential.
- Light, moisture-wicking clothing: The heat and humidity can be intense, so pack lightweight, breathable clothes that wick away sweat.
- Waterproof jacket: The weather can change quickly, so a lightweight rain jacket is advisable.
- Snacks and energy bars: While some accommodations offer meals, it’s best to bring extra snacks for the trail.
- Sunscreen, sunglasses, and a hat: Protection from the sun is crucial during hikes in the tropical climate.
- Water bottle: Stay hydrated throughout the trek, especially since some areas may have limited water access.
- Camera gear: Bring a camera with a waterproof case to capture the stunning views both above and below the water.
Top Tips for Completing the Hike:
- Bring plenty of water: Staying hydrated is key, especially on long hikes under the sun.
- Hire a local guide: The paths can be difficult to follow, and a local guide can enhance your experience by sharing knowledge of the area’s ecology and culture.
- Respect the local environment: As Raja Ampat is a protected area, make sure to follow Leave No Trace principles and avoid disturbing the delicate ecosystems.
- Check the weather: The weather can change rapidly, so it’s essential to stay informed about current conditions.
- Pack light: Since you’ll be trekking and traveling by boat, pack only the essentials and try to keep your gear as light as possible.
24.) Tongariro Alpine Crossing, New Zealand: A Volcanic Adventure
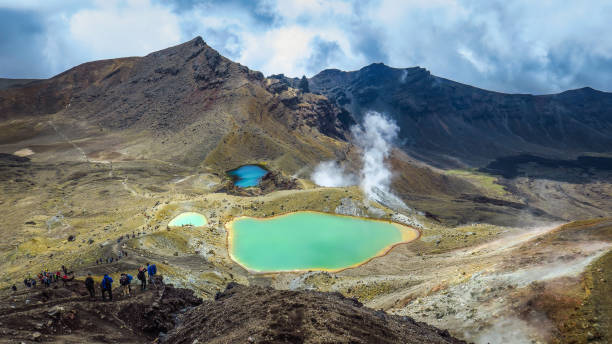
Overview: The Tongariro Alpine Crossing is widely regarded as one of the most spectacular one-day hikes in the world. Located in Tongariro National Park on New Zealand’s North Island, this trek offers hikers the opportunity to experience a diverse range of landscapes, from volcanic craters and steaming vents to emerald lakes and alpine meadows. Spanning 19.4 kilometers (12 miles), the trail winds through a stunning volcanic landscape, passing two active volcanoes—Mount Tongariro and Mount Ngauruhoe (which was famously used as Mount Doom in the Lord of the Rings films).
The route is famous for its varied terrain, including challenging rocky sections, steep ascents, and exposed ridgelines, making it a rewarding hike for experienced trekkers. Along the way, you’ll encounter fumaroles, sulfurous hot springs, the striking Emerald Lakes, and awe-inspiring panoramic views. This trek is ideal for hikers looking for a full-day adventure with a unique combination of natural beauty and volcanic activity.
Duration: The Tongariro Alpine Crossing typically takes around 6 to 8 hours to complete, depending on your pace and fitness level. The trail is a one-way route, so it’s recommended to begin early in the morning to ensure you have plenty of time to finish before dark. The terrain is challenging, with steep sections and rocky paths, so be prepared for a strenuous but highly rewarding experience.
Location: The Tongariro Alpine Crossing is located in Tongariro National Park, which is situated in the central North Island of New Zealand. The park is a UNESCO World Heritage Site and includes the famous Mount Tongariro, Mount Ngauruhoe, and Mount Ruapehu—three of New Zealand’s most iconic and active volcanoes. The hike starts at the Mangatepopo car park and finishes at the Ketetahi car park, passing through an incredible array of volcanic landscapes.
How to Get There: To reach the Tongariro Alpine Crossing, you’ll first need to get to National Park Village, which is the nearest settlement. You can fly into Taupō or Wellington and take a bus or drive to the village, which is around 1.5 to 2 hours from Taupō by car. From National Park Village, the Mangatepopo car park (starting point) is about 15 minutes away by car.
Transport options include:
- Self-Drive: If you have a car, you can drive to the start and end points of the trek, but note that parking at the trailheads can fill up quickly.
- Shuttle Services: Many companies offer shuttle services from National Park Village to the starting and ending points of the trek. This is a popular option, especially for those not driving.
- Guided Tours: For those who prefer additional support, guided tours are available, which include transport, an experienced guide, and a more in-depth explanation of the area’s volcanic history.
Accommodation: Accommodation options near the Tongariro Alpine Crossing are available in National Park Village, as well as nearby towns like Whakapapa Village and Taupō.
National Park Village offers a variety of accommodations, from backpacker hostels to mid-range hotels and lodges. Prices range from $40 to $150 NZD per night, depending on the type of accommodation.
Whakapapa Village offers more upscale options, with easy access to the start of the trek. This area is closer to the Whakapapa Ski Resort, making it ideal for those wishing to combine hiking with skiing in the winter months.
Camping: There are a couple of designated campgrounds in the area, but they can get crowded during peak season.
Budget Estimate:
- Flights to New Zealand: $800 – $1,500 (depending on departure location)
- Accommodation: $40 – $150 NZD per night (depending on the type of accommodation)
- Shuttle Transport: $30 – $60 NZD per person (for a round trip)
- Meals: $10 – $30 NZD per day (depending on where you choose to eat)
- Total Estimated Cost: $200 – $500 NZD for a day trip, excluding flights.
Best View Spot: One of the best viewpoints on the Tongariro Alpine Crossing is the Emerald Lakes. This vibrant, sulfuric water pool surrounded by volcanic terrain offers some of the most striking and iconic views of the trek. Mount Ngauruhoe (Mount Doom) also provides stunning backdrops throughout the hike, with its active volcanic landscape visible from various points on the route. The summit of Red Crater offers a panoramic view of the surrounding volcanic mountains and the vast, untouched wilderness below.
Photography Tips:
- Golden hour: The early morning light creates stunning contrasts over the volcanic landscape, casting long shadows and illuminating the stark beauty of the craters and lakes.
- Wide-angle lens: Ideal for capturing the vast, panoramic views, especially the sprawling volcanic plains and the dramatic mountain landscapes.
- Close-ups of volcanic features: Use a telephoto lens to capture the geothermal activity, such as the steaming vents and sulfur deposits along the trail.
- Weather changes: Be ready to capture the changing weather conditions, as fog, clouds, and even snow can dramatically alter the scenery.
Best Time to Go: The best time to hike the Tongariro Alpine Crossing is during the summer and autumn months, from December to April, when the weather is generally more stable and the track is accessible. During this time, the temperatures are milder, and the trails are clear of snow, making the hike more manageable. January to March is the peak season, so expect more hikers on the trail, but it’s also the best time for weather conditions.
In winter (June – September), snow can make the trail more difficult and dangerous, so it’s recommended to take the trek only if you’re an experienced winter hiker and if you have the right gear, including crampons and an ice axe. The weather can be highly unpredictable, with storms rolling in quickly, so check the forecast before you go.
Expected Weather:
- Summer (December – February): Average temperatures range from 10°C to 20°C (50°F to 68°F), with generally dry conditions, though it can still be windy and chilly at higher elevations.
- Autumn (March – May): Temperatures drop to 5°C to 15°C (41°F to 59°F), with the possibility of rain and cooler conditions, especially at the summit.
- Winter (June – August): Temperatures range from ‑5°C to 10°C (23°F to 50°F), with snow and freezing conditions at higher altitudes, making it a challenging and potentially dangerous time to hike.
Recommended Gear:
- Sturdy, waterproof hiking boots: Essential for rocky, uneven terrain and possible wet conditions.
- Layered clothing: Temperatures can vary, so pack moisture-wicking base layers, a warm mid-layer, and a windproof or waterproof outer layer.
- Rain gear: A lightweight rain jacket and pants will protect you from sudden weather changes.
- Warm hat, gloves, and scarf: Even in summer, temperatures can be chilly at the summit.
- Sunscreen and sunglasses: The sun’s rays can be intense at higher altitudes, so be sure to protect yourself from UV exposure.
- Water and snacks: Carry enough water for the hike (there are no water refill stations on the trail) and pack high-energy snacks to keep you fueled during the trek.
Top Tips for Completing the Hike:
- Start early: This is a one-day trek, so begin as early as possible to give yourself plenty of time to complete the hike before dark.
- Check the weather forecast: Weather can change rapidly in the mountains, so always check the conditions before you set out, and be prepared for varying temperatures and sudden rain.
- Stay on the trail: The volcanic landscape can be hazardous, so stay on the designated paths for safety.
- Bring enough water: There are no water sources along the trail, so make sure to bring at least 2 liters of water.
- Wear appropriate gear: Ensure that your clothing and footwear are suitable for the changing weather conditions and challenging terrain.
25.) Trolltunga, Norway: A Thrilling Cliffside Hike
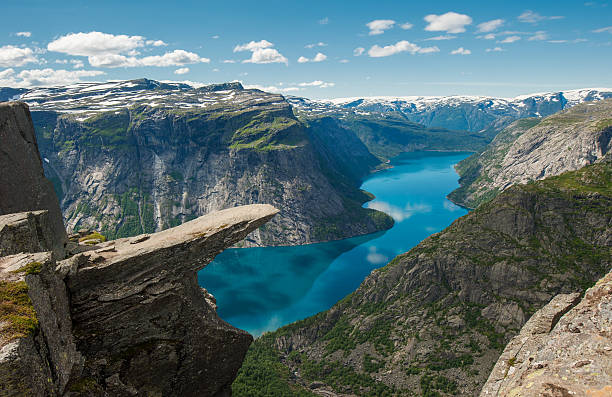
Overview: The Trolltunga (Troll’s Tongue) hike is one of Norway’s most iconic and thrilling trekking experiences, renowned for its jaw-dropping views and the famous rock formation that juts out over Lake Ringedalsvatnet. The trail offers a challenging yet rewarding adventure through rugged mountain terrain, dense forests, and picturesque valleys. The hike takes you to the unique rock formation, which resembles a giant tongue of rock, suspended high above the lake, offering some of the most stunning vistas in Norway.
The trek spans 23 kilometers (14.3 miles) one-way, and it involves an elevation gain of about 900 meters (2,950 feet). The entire hike typically takes 10 to 12 hours to complete, making it a full-day trek for those with the endurance to handle it. The route passes through some of the most beautiful landscapes in Norway, including dramatic cliffs, lush valleys, and alpine lakes, with the ultimate reward being the chance to stand atop Trolltunga and take in panoramic views of the surrounding mountains.
Duration: The Trolltunga hike is a long and strenuous one-day trek, generally requiring between 10 to 12 hours to complete. The trail is well-marked but challenging, with steep ascents and rocky paths. Due to its length and difficulty, it is essential to begin early in the day to ensure that you can finish before darkness falls. The trail is typically completed in one day, but those with more time or less experience can consider taking guided tours.
Location: The Trolltunga trail is located near Odda in western Norway, in the Hardangerfjord region. The hike starts at the Skjeggedal parking lot and leads hikers to the famous Trolltunga formation, perched high above Lake Ringedalsvatnet. The surrounding landscape is characterized by dramatic fjords, steep cliffs, and towering peaks, making it one of Norway’s most visually striking hiking routes.
How to Get There: To reach the Trolltunga trail, fly into Bergen, which is the nearest major city. From Bergen, you can take a bus or drive to Odda, a small town near the trailhead. The Skjeggedal parking lot is the starting point of the trek, and from Odda, it is about a 1.5‑hour drive to the parking area.
Alternatively, you can also take a bus directly from Bergen to Skjeggedal during the tourist season, with transport options running regularly. If you’re coming from Oslo, you can drive or take a long-distance bus to Bergen and then follow the same route to Odda and Skjeggedal.
Upon arrival at Skjeggedal, the trailhead is easy to find, and the well-marked path will guide you to the Trolltunga viewpoint.
Accommodation: Accommodation options near the Trolltunga trail are available in the town of Odda and the nearby villages of Tyssedal and Skjeggedal.
- Odda has a variety of accommodation options, ranging from budget hostels to mid-range hotels and guesthouses. Prices range from €50 to €200 per night depending on the type of accommodation.
- Skjeggedal offers a more remote experience with basic cabins and lodges, ideal for hikers looking for proximity to the trailhead.
- Camping is also available in the area, with campsites near the trail and by the lake. If you plan to camp, ensure you have the necessary gear for unpredictable weather.
Budget Estimate:
- Flights to Bergen: $400 – $1,000 (depending on departure location)
- Accommodation (Odda): €50 – €200 per night
- Transport (bus, car): €20 – €60 for transport from Bergen to Odda and Skjeggedal
- Meals: €15 – €40 per day (local restaurants or prepared food)
- Total Estimated Cost: $500 – $1,500 for the entire trip, depending on your preferences and travel style.
Best View Spot: The best viewpoint on the Trolltunga hike is, of course, standing on the Trolltunga rock formation itself. From here, you can enjoy panoramic views of Lake Ringedalsvatnet below, surrounded by towering cliffs and mountains. The iconic view from the rock is a once-in-a-lifetime photo opportunity, offering an incredible perspective of the fjord landscape.
Photography Tips:
- Golden Hour: For the best light, aim to reach Trolltunga during the golden hour (early morning or late afternoon). The soft lighting highlights the mountain ridges and the lake below, making for a stunning photo.
- Wide-Angle Lens: The expansive landscape calls for a wide-angle lens to capture the sweeping views of the lake, cliffs, and distant peaks.
- Take Portrait Shots on Trolltunga: Capture the unique angle of standing on the edge of the Trolltunga rock, with the fjord stretching out below you.
- Use a Tripod: For sharp, well-composed shots, use a tripod to ensure stability, especially during low light conditions.
Best Time to Go: The best time to hike Trolltunga is during the summer months (June to September), when the weather is more stable, and the trail is snow-free. This is also when most services, such as shuttle buses and mountain hut accommodations, are operational. However, this period can also see larger crowds, particularly in July and August.
The trail is closed during the winter months (October to May) due to snow and icy conditions, making it unsafe. If you’re planning to visit in the shoulder seasons (late spring or early autumn), be prepared for colder temperatures and possible snow at higher elevations.
Expected Weather:
- Summer (June – September): Average temperatures range from 10°C to 20°C (50°F to 68°F), with mild weather ideal for hiking. However, rain is possible, and temperatures can drop at higher elevations.
- Autumn (October): Temperatures drop to around 5°C to 10°C (41°F to 50°F), with the possibility of snow on higher parts of the trail. The autumn foliage adds beautiful colors to the landscape.
- Winter (November – April): The trail is inaccessible due to snow, ice, and freezing temperatures, making winter hiking dangerous.
Recommended Gear:
- Sturdy, waterproof hiking boots: The trail involves rocky, uneven terrain, so durable boots are essential.
- Layered clothing: Weather conditions can change rapidly, so wear moisture-wicking base layers, an insulating mid-layer, and a windproof or waterproof outer layer.
- Rain gear: Be prepared for rain with a waterproof jacket and pants.
- Daypack: For carrying water, snacks, and additional layers.
- Headlamp: If you plan to start early or finish late, a headlamp is essential for visibility.
- Water bottle: Ensure you stay hydrated throughout the day, especially as there are no water refill stations along the trail.
Top Tips for Completing the Hike:
- Start early: To avoid crowds and ensure you have enough daylight to complete the hike, start as early as possible.
- Be prepared for long hours: The hike can take up to 12 hours, so bring enough food and water for the entire journey.
- Check the weather: Weather conditions can change rapidly in the mountains, so check the forecast before starting your hike and be prepared for any sudden changes.
- Take breaks: The trek is strenuous, so pace yourself and take regular breaks to enjoy the surroundings and recharge your energy.
- Stay on the trail: Trolltunga is a high-altitude area with dangerous drop-offs, so always stay on the designated path and avoid venturing too close to the cliffs.
26.) The Wave Hike, USA: A Colorful Desert Adventure

Overview: The Wave is one of the most stunning and sought-after hikes in the USA, located in the Paria Canyon-Vermilion Cliffs Wilderness area on the border of Arizona and Utah. Known for its mesmerizing undulating rock formations and vivid colors, The Wave has become a bucket-list trek for many hikers and photographers. The rock formation is a unique sandstone formation with swirling patterns of red, orange, and yellow that resemble the ripples of a wave, making it a spectacular visual marvel.
The trail to The Wave is relatively short but can be challenging due to its remote location, difficult navigation, and harsh desert conditions. The hike is 6.4 kilometers (4 miles) round-trip, with an elevation gain of about 500 feet (152 meters). Despite the moderate distance, the route can be tricky as it involves navigating through sandy washes and rocky terrain. Hikers are rewarded with breathtaking views of the colorful sandstone formations, providing a once-in-a-lifetime photographic opportunity.
Duration: The Wave hike typically takes around 3 to 4 hours to complete, depending on your pace and the time you spend taking photos. While the distance is short, the terrain can be strenuous, especially in the hot summer months when temperatures can soar. Make sure to start early in the day to avoid the midday heat and to allow ample time to enjoy the scenery and take photographs.
Location: The Wave is located in the Paria Canyon-Vermilion Cliffs Wilderness area, near the town of Kanab in southern Utah, close to the Arizona border. The formation itself is located on Bureau of Land Management (BLM) land, within the Coyote Buttes North area of the Vermilion Cliffs. The landscape around The Wave is filled with other fascinating rock formations and desert scenery, offering a mesmerizing environment for hikers and photographers alike.
How to Get There: To access The Wave, you need to first reach the trailhead, which is located at the Wire Pass parking lot. The nearest town is Kanab, Utah, which is about a 45-minute drive away. You can drive to the parking area via House Rock Valley Road (a well-maintained dirt road) from the highway. If you’re coming from Page, Arizona, it’s about a 1.5‑hour drive to the trailhead.
It’s important to note that permits are required to hike to The Wave. There are only 20 permits issued per day, with 10 available through an online lottery and the remaining 10 available through a walk-in lottery at the Grand Staircase-Escalante National Monument Visitor Center in Kanab. Due to high demand, it’s recommended to apply for the lottery months in advance.
Accommodation: There are several accommodation options in Kanab, the nearest town to The Wave trailhead. From budget motels to mid-range hotels and campgrounds, you’ll find a variety of places to stay:
- Hotels: Kanab offers a range of hotels, with prices generally between $60 and $150 per night depending on the season.
- Camping: There are campsites available near the trailhead, such as Lees Ferry Campground and Jacob Lake Campground, or you can camp at designated BLM campsites for more affordable options.
- Backcountry Camping: If you prefer a more remote experience, backcountry camping is available in certain parts of the Paria Canyon Wilderness, though it requires a permit.
Budget Estimate:
- Flights to Kanab: $200 – $600 (depending on departure location)
- Accommodation: $60 – $150 per night in Kanab, or $15 – $30 for camping
- Permits: $7 per person (non-refundable fee for permit application)
- Meals: $10 – $30 per day (local restaurants or food in Kanab)
- Transportation (car rental, gas): $50 – $100 (if driving from Page, AZ, or another nearby city)
- Total Estimated Cost: $500 – $1,200, depending on accommodation, permits, and additional expenses.
Best View Spot: The best view is, of course, on top of The Wave itself, where you can marvel at the swirling, colorful sandstone formations that stretch out around you. The unique pattern of the rocks makes for a fantastic photo opportunity, particularly when viewed from the top of the formation. Other great spots along the trail offer beautiful vistas of the surrounding desert and rock formations.
Photography Tips:
- Golden Hour: To capture the best light, aim to reach The Wave during the early morning or late afternoon when the light enhances the natural colors and adds depth to the rock formations.
- Wide-Angle Lens: A wide-angle lens is essential to capture the sweeping patterns and contours of the rocks. It also helps to photograph the large scale of the landscape.
- Focus on Detail: The wave-like patterns on the rocks make for excellent close-up shots. Capture the texture and color contrasts for more abstract, artistic images.
- Use Tripods: For sharp, stable shots, especially during the golden hour or in lower light conditions, use a tripod.
Best Time to Go: The best time to hike The Wave is in the spring (April to June) and fall (September to November) when temperatures are moderate. Summer months (July to August) can be extremely hot, often reaching over 100°F (37°C), making it dangerous to hike without sufficient preparation, water, and shade. Winter (December to February) offers cooler temperatures but may present challenges with snow and ice on the trail.
Expected Weather:
- Spring (April – June): Average temperatures range from 60°F to 85°F (15°C to 29°C), making for pleasant hiking conditions.
- Summer (July – August): Temperatures can soar to 100°F+ (37°C+), with minimal shade, making it a risky time for hiking. If you do go during summer, start the hike very early in the morning.
- Autumn (September – November): Temperatures range from 60°F to 85°F (15°C to 29°C), with beautiful fall colors in the surrounding landscape.
- Winter (December – February): Expect temperatures between 30°F to 50°F (0°C to 10°C), with the possibility of snow, especially in the higher elevations.
Recommended Gear:
- Sturdy, comfortable hiking boots: You’ll be walking over uneven terrain, so make sure your boots provide good support.
- Layered clothing: Wear moisture-wicking base layers and a lightweight jacket for the early morning chill. Lightweight, breathable clothing is recommended for the warmer parts of the day.
- Plenty of water: The desert climate can be hot, so carry at least 3 liters (0.8 gallons) of water per person.
- Sun protection: Bring sunscreen, sunglasses, and a wide-brimmed hat to protect yourself from the harsh sun.
- Navigation tools: Although the trail is marked, it’s always a good idea to carry a map or GPS device, as navigating in the desert can be tricky.
Top Tips for Completing the Hike:
- Permits are essential: Due to the popularity of The Wave, permits are limited and difficult to get. Apply in advance and be sure to arrive on time for your lottery win.
- Start early: Begin the hike as early as possible to avoid the heat of the day and to give yourself ample time to explore The Wave.
- Carry enough water: The hike can be physically demanding in the desert, so make sure you have enough water for the entire day.
- Be prepared for remote conditions: The trailhead is in a remote area, and cell phone reception may be unavailable. Prepare for isolation and bring all necessary supplies.
- Respect the environment: The Wave and surrounding area are fragile and ecologically sensitive. Stick to the trail and leave no trace to help preserve this incredible natural wonder.
27.) Pennine Way, UK: The Backbone of England

Overview: The Pennine Way is one of the UK’s most iconic long-distance trails, stretching 431 kilometers (268 miles) from Edale in Derbyshire to Kirby Stephen in Cumbria in the north. Known as the “Backbone of England,” it takes hikers through the rugged, rolling hills and sweeping moorlands of the Pennine Mountains, offering a true challenge to those seeking to experience some of England’s most stunning, wild landscapes. The trail offers a mix of challenging terrain, including remote valleys, stone-strewn paths, and high moors, with spectacular views over the countryside.
Along the way, you’ll experience the picturesque villages, historic sites, and remote natural beauty that the Pennines are known for. The trail has been popular for over 50 years and continues to draw trekkers from around the world, both for its physical challenge and its unique beauty.
Duration: The full Pennine Way trek typically takes about 16 to 20 days to complete, with hikers averaging around 20–25 kilometers (12–15 miles) per day. The distance covered each day can vary depending on individual stamina, terrain, and weather conditions. Most people choose to do the trek over a period of two to three weeks, but the trail can also be divided into smaller sections for those with less time or for those who want to tackle only parts of the route.
Location: The Pennine Way begins at Edale, located in the Peak District National Park in Derbyshire, and ends in Kirby Stephen, a small town in the Yorkshire Dales National Park. The trail cuts through the Pennine Hills, crossing through a variety of landscapes, including rolling moorlands, high peaks, and picturesque valleys. Key stops include Malham Cove, High Cup Nick, Hawes, and the famous Hadrian’s Wall.
How to Get There: Getting to the start of the Pennine Way is relatively easy from Manchester, Sheffield, or Leeds, with frequent train and bus connections to Edale.
- By Train: The nearest railway station to Edale is Edale Station, which is easily accessible from Manchester, Sheffield, and other cities. From Edale station, it’s a short walk to the trailhead.
- By Car: If driving, head to Edale from Manchester or Sheffield, which are both around 1 hour by car. There is a car park at Edale Station where you can leave your vehicle for the duration of the hike.
- End of Trail (Kirby Stephen): At the northern end of the trail, Kirby Stephen has train stations with connections to Manchester and Carlisle, and you can take buses or trains back to major cities like Leeds or Manchester.
Accommodation: There are plenty of accommodation options along the Pennine Way, from traditional inns and guesthouses to campsites and hostels. Many hikers opt to stay in local B&Bs or pubs along the way, which offer warm beds and hearty meals after a day on the trail.
- Camping: Wild camping is allowed in most areas along the Pennine Way, although it’s recommended to camp in designated spots to minimize your impact. Campsites and bunkhouses are also available along the route for a more comfortable stay.
- Bed & Breakfasts: There are numerous B&Bs and inns in towns and villages along the trail, especially in places like Malham, Hawes, and Hebden Bridge, ranging from £30 to £100 per night.
- - Hotels and Hostels: More urban areas like Hebden Bridge and Malham offer hotel and hostel accommodations, with prices varying from £50 to £150 per night depending on the location and season.
Budget Estimate:
- Accommodation (per night): £30 – £100 (for B&Bs or campsites)
- Meals: £15 – £25 per day (for meals in local pubs or restaurants)
- Transportation (train, bus): £50 – £100 (depending on starting point and mode of travel)
- Total Estimated Cost: £600 – £1,500 for the entire trek, depending on accommodation choices, meals, and transport.
Best View Spot: One of the best views along the Pennine Way is from the top of Cross Fell, which is the highest point of the trail. The views from here stretch across the surrounding hills and valleys, offering a panoramic view of the Pennines. Another notable viewpoint is Malham Cove, a striking limestone cliff that offers breathtaking views of the surrounding landscape.
Photography Tips:
- - Golden Hour: Sunrise and sunset are the best times for photography, as the soft light will enhance the dramatic landscape of the Pennine hills, valleys, and peaks.
- Wide-Angle Lens: The expansiveness of the landscape makes a wide-angle lens essential for capturing the vast scenery, particularly the open moors and the rugged peaks.
- Close-ups of Wildlife and Flora: The Pennines are home to diverse wildlife and plant life. Bring a zoom lens to capture details of the local fauna, such as grouse or the colorful wildflowers that bloom in spring and summer.
Best Time to Go: The best time to hike the Pennine Way is during late spring (May to June) and early autumn (September to October), when the weather is milder, and the trail isn’t as crowded. Summer (July and August) can be busy, especially in popular spots like Malham and Hebden Bridge, and is also the wettest season in the region.
Avoid winter months (November to February) as the weather can be harsh, with snow, rain, and cold temperatures that can make trekking dangerous, especially on higher elevations.
Expected Weather:
- Spring (April – June): Average temperatures range from 10°C to 15°C (50°F to 59°F), with cool mornings and pleasant afternoons.
- Summer (July – August): Temperatures can reach 15°C to 20°C (59°F to 68°F), though the weather can be unpredictable with rain showers and cooler winds on higher ground.
- Autumn (September – November): Temperatures range from 10°C to 15°C (50°F to 59°F), and the foliage in the moors and valleys adds stunning colors to the landscape.
- Winter (December – February): Winter conditions can be cold and snowy, with temperatures dropping to ‑5°C (23°F) or lower at higher elevations.
Recommended Gear:
- Sturdy hiking boots: With the varied terrain, durable boots with good ankle support are essential.
- Waterproof clothing: Be prepared for rain, particularly in the summer months, with waterproof jackets and pants.
- Layers: The weather in the Pennines can change rapidly, so pack moisture-wicking layers and a warm jacket.
- Water: Carry sufficient water, especially if you’re hiking in summer when water sources may be scarce.
- Navigation tools: Bring a detailed map or a GPS device as the trail can sometimes be difficult to follow in foggy conditions or dense mist.
Top Tips for Completing the Hike:
- Train in advance: The Pennine Way is physically demanding, with varied terrain. Make sure to train before tackling the trail, especially if you plan to do the full route.
- Book accommodation early: If you’re hiking in summer, it’s wise to book accommodation in advance as the trail gets busy.
- Carry a compass and map: Although the trail is generally well-marked, parts of the route can be difficult to navigate, so always carry navigation tools.
- Be prepared for mud: The trail can get quite muddy, especially after rain, so bring gaiters or extra socks.
- Respect nature: The Pennine Way passes through protected landscapes. Be mindful of wildlife, flora, and local communities to preserve the area for future hikers.
28.) Half Dome, Yosemite, USA: A Majestic Challenge
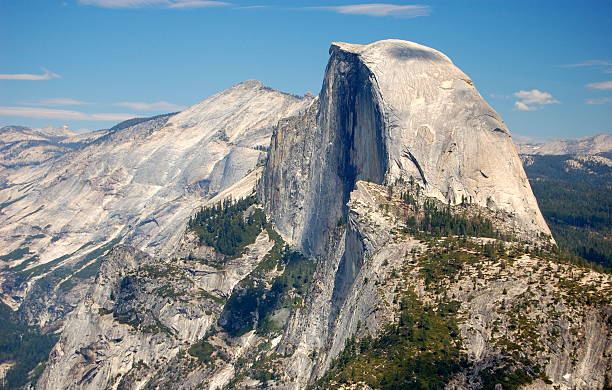
Overview: Half Dome is one of Yosemite National Park’s most iconic landmarks, a massive granite peak that rises over 4,737 feet (1,444 meters) above the valley floor. The Half Dome hike is a challenging and exhilarating trek that attracts hikers from around the world. The hike offers incredible views of Yosemite Valley, the Sierra Nevada mountains, and the surrounding wilderness. Reaching the summit of Half Dome involves strenuous hiking and technical rock climbing, particularly the final stretch, which includes a cable route that allows climbers to ascend the sheer granite face to the top.
The trail offers some of the most spectacular scenery in Yosemite, with views of Vernal Falls, Nevada Falls, and panoramic vistas of the surrounding forests and valleys. However, this is not a hike to be taken lightly; it requires a high level of physical fitness, preparation, and a permit, especially for those who wish to use the cables to reach the summit.
Duration: The Half Dome hike typically takes 12 to 14 hours to complete, depending on your pace and the conditions. The round-trip distance is about 14 to 16 miles (22 to 26 km), with an elevation gain of approximately 4,800 feet (1,463 meters). Most hikers start early in the morning to avoid the midday heat and to ensure they have enough time to return before dark. The hike is long, strenuous, and can be physically demanding, especially in the final section of the cable route.
Location: Half Dome is located in Yosemite National Park, California, in the Sierra Nevada mountains. The trail starts at the Yosemite Valley, passing through Little Yosemite Valley before climbing steeply up to the subdome and finally reaching the summit. The route provides stunning views of Yosemite Valley, including sights such as Vernal Falls, Nevada Falls, and Liberty Cap.
How to Get There: To get to the Half Dome trailhead in Yosemite, the most common way is to fly into Fresno Yosemite International Airport (FAT) or San Francisco International Airport (SFO) and then drive or take a bus to Yosemite National Park. Once you’re in Yosemite, the Happy Isles trailhead is the starting point for the Half Dome hike.
- By Car: From Fresno, it’s about a 1.5‑hour drive to the park’s south entrance. From San Francisco, the drive is around 4 hours. Once inside the park, follow signs to Yosemite Valley, where you can find parking near the trailhead.
- By Bus: Yosemite Area Regional Transportation System (YARTS) offers bus services to the park from nearby towns. The YARTS connects to major bus and train services from cities like Fresno and Merced.
- Shuttle: Once in Yosemite Valley, take the Yosemite Valley Shuttle to the Happy Isles trailhead.
If you’re coming from outside the park, be sure to plan your arrival in advance, as parking inside the park can be limited, especially during peak seasons.
Accommodation: Yosemite National Park offers several accommodation options ranging from campsites to luxurious hotels. For those planning to do the Half Dome hike, it is advisable to stay in or near Yosemite Valley the night before your hike.
- Campgrounds: Yosemite has both reservable and first-come, first-served campgrounds. For example, North Pines Campground is a popular choice for those staying in Yosemite Valley. Prices for campsites range from $26 to $36 per night.
- Hotels: The Yosemite Valley Lodge, located near the trailhead, is a convenient option. Rooms start at around $200 to $300 per night.
- Backcountry Camping: For those who want to spend more time in nature, there are designated backcountry campsites along the trail, but you must obtain a permit in advance.
Budget Estimate:
- Accommodation: $26 – $300 per night (depending on choice of campground or hotel)
- Meals: $15 – $40 per day (for meals inside the park or packed trail food)
- Permit: $10 for the Half Dome permit (required for the final cable section, permits are limited and require advance reservations)
- Transportation (bus, parking): $30 – $50
- Total Estimated Cost: $200 – $600 for the entire experience, depending on accommodation and transport choices.
Best View Spot: The most famous viewpoint on the Half Dome hike is from the summit itself, which offers breathtaking panoramic views of Yosemite Valley, El Capitan, Glacier Point, and the surrounding high Sierra peaks. Additionally, the view from the subdome, just before the final ascent to the summit, is also spectacular.
Photography Tips:
- Golden Hour: Sunrise or sunset will offer the best light for capturing Yosemite’s granite cliffs and waterfalls, with long shadows and soft light illuminating the scenery.
- Wide-Angle Lens: A wide-angle lens is essential for capturing the vastness of the landscape, especially from the summit, where the views stretch across the entire park.
- Telephoto Lens: For close-up shots of wildlife or distant peaks, a telephoto lens will help you capture details from afar.
- Cable Section: The final cable section is a dramatic moment in the hike. Capture the atmosphere, but be cautious and aware of your surroundings.
Best Time to Go: The best time to hike Half Dome is during the late spring to early fall (May to October), as the trail is typically snow-free and the weather is warm but not too hot. The cable route is open from late May to mid-October, depending on weather conditions.
The summer months (June to August) are the busiest, so be prepared for more hikers on the trail. If you’re looking for fewer crowds, try to hike in May or September.
Expected Weather:
- Spring (May – June): Temperatures range from 5°C to 20°C (41°F to 68°F), but snow can still be present on higher elevations. The trail is usually snow-free by late June.
- Summer (July – August): Expect 15°C to 30°C (59°F to 86°F) with daytime heat, especially at lower elevations. The weather can be sunny, but thunderstorms are common in the afternoon, so be cautious.
- Autumn (September – October): Temperatures range from 10°C to 20°C (50°F to 68°F), with crisp mornings and warm afternoons. The crowds are thinner, and the fall foliage adds a colorful touch to the landscape.
- Winter (November – April): Winter hiking is not recommended due to snow and dangerous trail conditions. The cables are closed, and heavy snow may block the trail.
Recommended Gear:
- Sturdy hiking boots: The trail is rugged and includes steep sections, so proper footwear is essential.
- Gloves: For the final cable section, gloves are important to protect your hands when holding onto the cables.
- Waterproof jacket: Prepare for afternoon thunderstorms or sudden changes in weather with a waterproof layer.
- Headlamp: If starting early or finishing late, a headlamp is necessary for visibility.
- Hydration system: Carry enough water to stay hydrated throughout the day.
- Snacks: Bring high-energy, lightweight snacks for the hike, such as trail mix or energy bars.
Top Tips for Completing the Hike:
- Get a permit: If you plan to use the cables, make sure you’ve secured a permit through the lottery system on the Recreation.gov website. Permits are required for all hikers attempting the cable section of Half Dome.
- Start early: The hike is long and challenging, so start early in the morning to ensure you have enough daylight for both the ascent and descent.
- Stay hydrated: There are water sources along the trail, but they are limited, so carry enough water for long stretches.
- Train in advance: This is a strenuous hike with significant elevation gain, so prepare physically for the challenge by doing similar hikes before attempting Half Dome.
- Know your limits: The final cable section is steep and exposed. If you’re uncomfortable or afraid of heights, it’s okay to turn back before reaching the summit.
29.) Mount Fuji, Japan: A Sacred Ascent
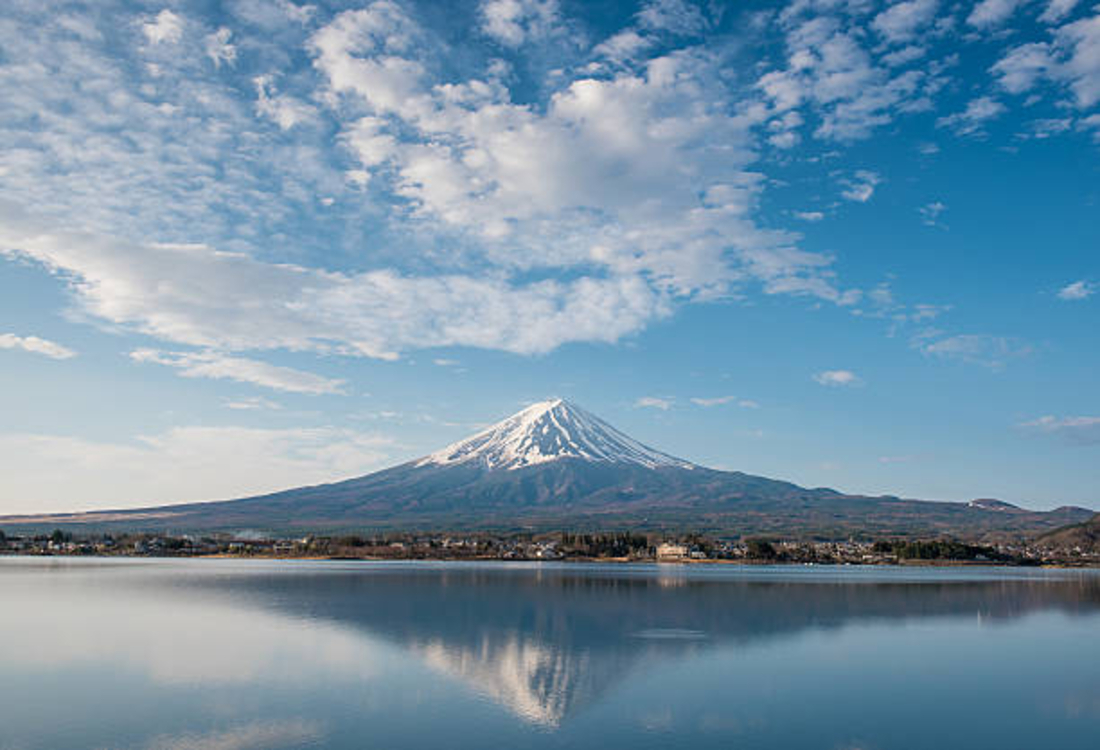
Overview: Mount Fuji, standing at 3,776 meters (12,389 feet), is Japan’s tallest and most iconic mountain. A stratovolcano, Mount Fuji has been a subject of cultural significance for centuries, and it holds a revered place in Japanese spirituality and art. The mountain offers one of the most popular climbing experiences in Japan, attracting over 300,000 climbers annually, especially during the official climbing season from early July to early September.
Climbing Mount Fuji is a pilgrimage for many, with hikers following well-maintained routes to the summit, where they are rewarded with spectacular views of the surrounding landscapes and the Japan Alps. The summit also offers an opportunity to witness a beautiful sunrise, often referred to as the “Goraiko”, which draws people from around the world. The journey to the top provides hikers with both a spiritual and physical challenge, making it a unique experience.
Duration: The ascent of Mount Fuji typically takes 5 to 8 hours to reach the summit, with a descent time of about 3 to 5 hours. Climbers often begin their ascent in the afternoon or evening to experience the sunrise from the summit. The total distance varies between 8 and 12 km (5 to 7.5 miles) depending on which route you take, and the elevation gain is roughly 1,500 meters (4,920 feet).
While the summit of Mount Fuji is reachable in a day, it is highly recommended to spend the night at one of the mountain huts along the way, particularly if you plan to reach the summit for sunrise. This allows for a more gradual ascent, avoiding altitude-related issues and improving the experience.
Location: Mount Fuji is located on the Honshu Island of Japan, approximately 100 kilometers (62 miles) southwest of Tokyo and 120 kilometers (75 miles) east of Nagoya. The mountain sits on the border of Shizuoka and Yamanashi Prefectures, easily accessible by public transport from both cities. The climb begins from one of the Five Station trailheads, which are spread across the lower flanks of the mountain.
How to Get There: Getting to Mount Fuji is relatively easy due to its proximity to major cities like Tokyo and Kawaguchiko.
- By Train: From Tokyo, take the Chūō Line from Shinjuku Station to Otsuki Station. From there, transfer to the Fujikyu Railway to Fujisan Station or Kawaguchiko Station.
- By Bus: There are direct buses that run from Shinjuku Station in Tokyo to Fujisan Station and Kawaguchiko Station, taking approximately 2.5 hours.
- By Car: Renting a car is another option. The drive from Tokyo to Mount Fuji takes around 2.5 to 3 hours, depending on traffic conditions. There are parking lots at the Fifth Station where most climbers begin their ascent.
- Trailheads: The most popular climbing route begins at the Fifth Station (there are several, such as Subashiri, Yoshida, and Gotemba), which is accessible via bus or car. The Yoshida Trail is the most well-known route for climbers starting from Fujiyoshida.
Accommodation: Accommodation options are available for those preparing to climb Mount Fuji.
- Mountain Huts: Several mountain huts are available along the climbing routes, typically between the Fifth and Eighth Stations. These huts provide basic facilities such as meals, blankets, and a resting place. Prices typically range from ¥3,000 to ¥7,000 ($25–$60) per night.
- Hotels and Guesthouses: If you’re not planning to camp on the mountain, Kawaguchiko and Fujiyoshida offer a variety of hotels and guesthouses. Prices range from ¥6,000 to ¥15,000 ($50–$130) per night, depending on the type of accommodation.
- Camping: Camping is allowed at designated sites near the base of Mount Fuji, though not on the mountain itself.
Budget Estimate:
- Accommodation (mountain huts): ¥3,000 – ¥7,000 per night
- Meals: ¥1,000 – ¥3,000 per day (meals at huts or restaurants)
- Transportation (bus or train): ¥2,000 – ¥4,000 (for buses and trains from Tokyo or Kawaguchiko)
- Climbing Permit: ¥1,000 – ¥1,500 for maintenance contributions (optional but appreciated)
- Total Estimated Cost: ¥10,000 – ¥25,000 ($85 – $200) for the whole experience
Best View Spot: The summit of Mount Fuji provides the best view, where you can see panoramic vistas of the surrounding landscapes, including the Japan Alps, Lake Kawaguchi, and on clear days, even the Pacific Ocean. The Goraiko (sunrise) from the summit is particularly famous, drawing thousands of climbers each year to witness the first light over the horizon.
Photography Tips:
- Golden Hour: The best time to photograph Mount Fuji is during sunrise and sunset when the light is soft, and the mountain’s shape casts long shadows on the landscape.
- Wide-Angle Lens: Use a wide-angle lens to capture the vastness of Mount Fuji and its surroundings, especially when photographing from the summit.
- Time-Lapse: Consider using time-lapse photography for capturing the changing light and the sunrise from the summit.
- Details: For detailed shots, bring a telephoto lens to capture the texture of the volcanic rock or distant shots of wildlife around the lower areas.
Best Time to Go: The official climbing season for Mount Fuji runs from early July to early September. During this period, all the mountain huts are open, and the trail conditions are the safest. If you wish to experience the sunrise, you’ll want to aim for a July or August ascent, when the weather is more predictable.
The weather outside of the official climbing season can be extreme, with temperatures dropping below freezing at higher elevations, and the weather can change rapidly.
Expected Weather:
- Summer (July – August): Expect temperatures between 10°C to 20°C (50°F to 68°F) at the summit. The weather is relatively mild, but rain can be frequent.
- Autumn (September – November): Temperatures begin to drop, and by October, snow can be expected at the higher altitudes. Hikers should be cautious, as conditions can become more challenging.
- Winter (December – February): Not recommended for hiking due to heavy snow, extreme cold, and treacherous conditions.
- Spring (March – May): The lower parts of the mountain begin to thaw, but the upper trails may still have snow. Weather is still cold at the summit.
Recommended Gear:
- Sturdy hiking boots: Essential for the steep, rocky terrain on Mount Fuji.
- Layered clothing: Dress in layers as temperatures vary greatly, particularly between the base and the summit.
- Headlamp: If hiking for sunrise, a headlamp is necessary for the ascent in the dark.
- Waterproof jacket: Be prepared for rain and wind at higher altitudes.
- Gloves: Protect your hands from the cold, especially if climbing during the early morning hours.
- Snacks: Bring energy bars, trail mix, or other lightweight food to keep you fueled during the climb.
- Water bottle: Stay hydrated throughout the hike.
Top Tips for Completing the Hike:
- Train in advance: This is a physically demanding hike, so it’s important to train beforehand to ensure you can handle the elevation gain and long hours of hiking.
- Start early: Starting before sunrise will help you avoid crowds and give you the best chance to reach the summit in time for the sunrise.
- Stay at a hut: Spending the night at one of the mountain huts is a good way to adjust to the altitude and get some rest.
- Respect local customs: Mount Fuji is a sacred site, so be respectful of the mountain and other climbers.
- Check weather conditions: Always check weather conditions and be prepared for sudden changes in temperature or weather during your hike.
30.) Mont Blanc Circuit (Tour du Mont Blanc), France/Italy/Switzerland: A Majestic Alpine Adventure

Overview: The Mont Blanc Circuit, also known as the Tour du Mont Blanc (TMB), is one of the most iconic multi-day treks in Europe, spanning the borders of France, Italy, and Switzerland. The trail encircles the majestic Mont Blanc massif, the highest peak in Western Europe at 4,810 meters (15,781 feet). This 170-km (106-mile) trek takes hikers through alpine meadows, picturesque mountain villages, deep valleys, and past glaciers, all while offering unparalleled views of the towering Mont Blanc and its surrounding peaks.
The TMB is a classic route for both seasoned trekkers and those looking to experience the beauty of the Alps at a moderate level of difficulty. The trek is well-marked and easily accessible, with an excellent infrastructure of mountain huts and charming villages along the way, making it an ideal option for those looking to experience both the natural beauty and the culture of the Alps.
Duration: The Mont Blanc Circuit typically takes 10 to 12 days to complete, with daily hikes ranging from 5 to 8 hours. The total distance is around 170 km (106 miles), with an elevation gain of more than 10,000 meters (32,800 feet). The trail can be broken down into sections, making it suitable for hikers of varying levels of endurance.
For those who wish to complete the trek more quickly, it’s possible to reduce the duration by skipping some of the optional rest days or taking shorter detours. However, most hikers prefer to take their time and enjoy the breathtaking views, the charming mountain villages, and the stunning alpine scenery.
Location: The Mont Blanc Circuit crosses three countries: France, Italy, and Switzerland. The trek starts in Les Houches, just outside Chamonix, France, and winds its way through Italy and Switzerland, before returning to France. Some of the highlights along the way include the Vallee des Chamonix (France), Courmayeur (Italy), Champex (Switzerland), and Col de la Seigne, which marks the crossing into Italy.
How to Get There: The starting point of the Tour du Mont Blanc is located near Chamonix, which is easily accessible by train, bus, or car from major cities in France, Italy, and Switzerland.
- By Train: The nearest major train station to Chamonix is Geneva, which is about a 1.5‑hour train ride from Chamonix. From Geneva, you can take a direct bus to Chamonix or rent a car for the journey.
- By Bus: Chamonix is well-connected by bus from Geneva, Annecy, and Milan. Buses run regularly throughout the year, making it a convenient option for those arriving by public transport.
- By Car: If you’re driving from Geneva, it takes about 1 hour and 15 minutes to reach Chamonix. There is ample parking in and around the town.
Once in Chamonix, it’s easy to access the starting points of the TMB, which are located in the Les Houches area. You can also take public transportation to other sections of the trek, such as Courmayeur or Champex, depending on where you begin your journey.
Accommodation: The TMB offers a range of accommodation options, from basic mountain huts to more luxurious hotels in the villages along the way.
- Mountain Huts: The route is dotted with huts, known as refuges, where hikers can sleep, eat, and rest. The huts provide comfortable beds (often in shared dormitories), hot meals, and a warm, cozy atmosphere. Prices typically range from €40 to €80 per night depending on the season and the type of room (shared dormitory or private room).
- Guesthouses and Hotels: In the villages along the route, such as Chamonix, Courmayeur, and Champex, you can find a wide range of guesthouses and hotels. These tend to offer more comfort than the refuges, with prices ranging from €70 to €150 per night, depending on the level of luxury.
- Camping: For those who prefer a more rugged experience, camping is possible in certain areas, though wild camping is generally not allowed within the national parks. Designated campgrounds are available near towns, and some refuges allow tent camping for a small fee.
Budget Estimate:
- Accommodation (mountain huts): €40 – €80 per night
- Meals: €20 – €40 per day (meals at refuges or local restaurants)
- Transport (bus or train): €50 – €150 (depending on your starting location)
- Climbing Permit (optional): No permit required for the TMB, but huts and transport may charge fees
- Total Estimated Cost: €1,000 – €2,500 ($1,200 – $2,700) for the entire trek, depending on accommodation choices and travel style
Best View Spot: The Col de la Seigne on the French-Italian border offers one of the best panoramic views of Mont Blanc, as well as the surrounding valleys and peaks. Another spectacular spot is Lac Blanc, where you can capture the reflection of the mountain’s glaciers in the serene waters. The Aiguille du Midi, a cable car ride from Chamonix, offers some of the most breathtaking vistas of Mont Blanc from above.
Photography Tips:
- Golden Hour: The best time to capture the majestic Mont Blanc massif is during sunrise or sunset, when the mountains are bathed in golden light and the landscape creates stunning contrasts.
- Wide-Angle Lens: To capture the expansive views of the Alps and the dramatic mountain peaks, a wide-angle lens is essential.
- Telephoto Lens: For capturing wildlife or detailed shots of glaciers and alpine flora, a telephoto lens will provide you with sharper, more focused images.
- Reflections: Use the lakes, such as Lac Blanc, to create reflections of the mountains for a more dramatic composition.
Best Time to Go: The best time to hike the Mont Blanc Circuit is from late June to early September. During these months, the trail is fully accessible, and the weather is relatively stable. The majority of the mountain huts are open, and transport services are available to and from the trail.
- June and September: The trail is less crowded, and while the weather can be unpredictable, the scenery is often even more beautiful with fewer tourists.
- July and August: The most popular months for the TMB, offering the best weather conditions, but the trail can be crowded, particularly around popular stops.
Expected Weather:
- Summer (July – August): Temperatures at lower elevations (1,500 – 2,000 meters) average around 15°C to 25°C (59°F to 77°F), with cooler temperatures at higher altitudes. Afternoon storms and rainfall are common, so pack accordingly.
- Autumn (September – October): Temperatures drop, and snow may begin to appear at higher altitudes. Daytime temperatures can range from 5°C to 15°C (41°F to 59°F).
- Winter (November – March): Snowstorms and freezing conditions make hiking the TMB dangerous and inaccessible. The trail is not recommended during winter.
- Spring (April – June): Similar to autumn, temperatures are cooler, and snow is still possible at higher altitudes, making the trail challenging.
Recommended Gear:
- Sturdy hiking boots: Essential for the rocky terrain and steep ascents.
- Layered clothing: Due to the variety of elevations and potential weather changes, it’s essential to wear moisture-wicking layers, a warm jacket, and rain gear.
- Trekking poles: Helpful for stability and support during the longer sections of the trek.
- Backpack: A light, comfortable backpack with enough space for your gear (20–30 liters).
- Headlamp: Useful for early morning or evening hikes, especially if you’re staying in refuges.
- Water bottle: Stay hydrated, as water sources are abundant along the trail.
Top Tips for Completing the Hike:
- Book mountain huts in advance: During the peak season, huts can fill up quickly, so booking early ensures a spot.
- Train before the trek: While not technical, the trail is demanding due to the daily elevation gains. Be prepared by training for long, strenuous days.
- Adjust to altitude: While not technically high-altitude, some of the passes reach over 2,500 meters (8,200 feet), so take breaks and stay hydrated to avoid altitude sickness.
- Pack light: Although you’ll have access to mountain huts, packing light will make your trek more comfortable and manageable.
- Be prepared for variable weather: Weather in the Alps can change rapidly, so be ready for rain, snow, or sunshine.
Happy Tramping ! — and good luck exploring the these incredible best hikes on the planet !
