The World’s Greatest One-Day Hikes:
You can achieve so much in a day.…and in our view there are few things better than spending a day taking on one of the world’s greatest One-Day hikes. From getting out into the crisp mountain, air summiting a countries tallest peak or marveling at reflections in Fjords and Lava, we’ve rounded out what we consider to be the 15 best one-day hikes on the planet, that truly make each step worthwhile.
So, whether you’re looking for a heart-pounding ascent to the top of Ben Nevis, a leisurely trek through otherworldly terrain Tongariro Alpine Crossing, or being awe-struck at the beauty of “heaven at earth” at the Pico do Arieiro to Pico Ruivom trail, below is our guide — including how to get there, what to bring and when to go — that allow you to conquer the best one-day hikes on Earth all in just one day.
1.) Tongariro Alpine Crossing, New Zealand: A Volcanic Wonderland
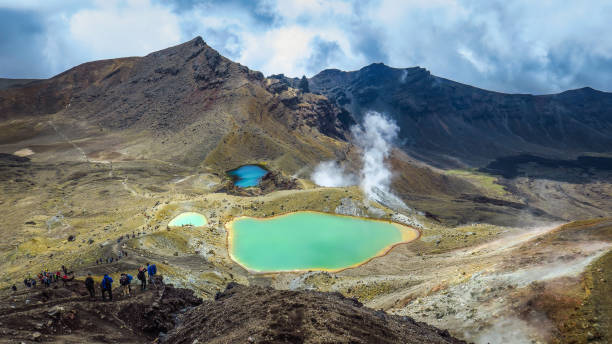
Overview: The Tongariro Alpine Crossing is often regarded as New Zealand’s best one-day hike and one of the most breathtaking treks in the world. This 19.4 km (12-mile) trail takes hikers through a dramatic volcanic landscape, featuring steaming vents, ancient lava flows, emerald lakes, and stunning panoramic views. Located within Tongariro National Park, a UNESCO World Heritage Site, the hike traverses active volcanic terrain, offering a surreal mix of natural beauty and geological wonder.
The trail is challenging yet incredibly rewarding, with steep ascents and descents, unpredictable weather, and exposed ridges. Hikers pass through some of the most iconic landmarks in New Zealand, including the Red Crater, Blue Lake, and the famous Emerald Lakes, whose vibrant colors contrast starkly against the barren volcanic backdrop. The descent offers spectacular views of Lake Rotoaira and Lake Taupo in the distance, making for a truly unforgettable adventure.
Completing the Tongariro Alpine Crossing is a bucket-list experience for many outdoor enthusiasts, providing a sense of accomplishment and awe-inspiring scenery at every turn. With its diverse landscapes, rich cultural history, and unique geothermal features, this trek is a must-do for anyone visiting New Zealand’s North Island.
Duration: The hike takes approximately 6–8 hours to complete, depending on fitness level and weather conditions.
Location: Tongariro National Park, North Island, New Zealand.
How to Get There: Fly into Auckland International Airport (AKL) or Wellington International Airport (WLG). From there, drive or take a bus to the town of Taupo or National Park Village, both of which serve as gateways to the trek. Shuttle services are available to transport hikers to and from the trailheads.
Budget Estimate: The hike itself is free, but additional costs include:
- Shuttle transport: $30 – $50 NZD per person (round trip)
- Accommodation: $30 – $150 NZD per night
- Food and supplies: $20 – $50 NZD per day
- Optional guided tour: $100 – $200 NZD per person
Best View Spot: The Red Crater Summit (1,886 meters / 6,188 feet) offers the most breathtaking views of the Emerald Lakes and the vast volcanic terrain.
Photography Tips:
- Capture the Emerald Lakes from a high vantage point to emphasize their vibrant colors.
- Use a wide-angle lens to frame the dramatic volcanic landscapes.
- Early morning light creates stunning contrasts and minimizes crowds in your shots.
- Protect your camera from volcanic dust with a lens filter or case.
Best Time to Go: The best time to hike is during the summer months (November to April) when the weather is more stable and the trail is snow-free. Winter hiking (May to October) is possible but requires alpine gear and experience due to snow and ice.
Expected Weather:
- Summer (Nov – Apr): Mild temperatures (10–25°C / 50–77°F), but conditions can change rapidly.
- Winter (May – Oct): Cold temperatures (-5 to 10°C / 23–50°F), snow, and strong winds.
Recommended Gear:
- Sturdy hiking boots with good grip
- Warm, moisture-wicking layers
- Waterproof jacket and pants
- Sun protection (hat, sunglasses, sunscreen)
- Plenty of water (at least 2–3 liters)
- Snacks and energy-rich food
- Trekking poles for stability on steep sections
- A camera or smartphone for capturing epic views
Top Tips for Completing the Hike:
- Start early to avoid crowds and allow enough daylight to complete the trek.
- Check the weather forecast beforehand, as conditions can change rapidly.
- Book a shuttle service in advance, as parking is limited at the trailheads.
- Carry all trash with you and respect the fragile volcanic environment.
- Be prepared for all weather conditions, even in summer.
- If hiking in winter, ensure you have proper alpine gear or join a guided tour for safety.
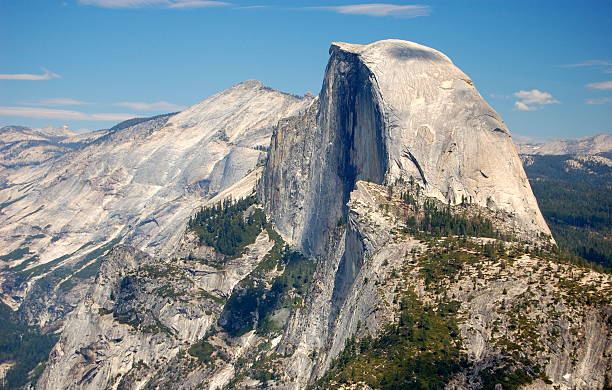
2.) Half Dome Hike, USA (California): Yosemite’s Most Thrilling Ascent

6) Sentiero Azzurro (Italy, Cinque Terre): A Coastal Italian Dream

Overview: The Sentiero Azzurro, or “Blue Trail,” is the most famous hiking route in Italy’s picturesque Cinque Terre, a UNESCO World Heritage Site. This scenic trail connects five colorful seaside villages—Monterosso al Mare, Vernazza, Corniglia, Manarola, and Riomaggiore—offering breathtaking views of the Ligurian coastline.
The hike combines charming Italian culture with natural beauty, passing terraced vineyards, cliffside paths, and historic landmarks. Though parts of the trail can be narrow and steep, the stunning ocean panoramas and vibrant villages make it one of the most rewarding hikes in Europe.
Whether you’re an avid hiker or a casual traveler, this iconic trek is the perfect way to experience Cinque Terre’s Mediterranean charm.
Duration: 5–6 hours for the full 12 km (7.5‑mile) route, but shorter sections can be done separately.
Location: Cinque Terre, Liguria, Italy
How to Get There: Travelers can fly into Pisa International Airport (PSA) or Genoa Cristoforo Colombo Airport (GOA), both of which offer train connections to La Spezia, the gateway to Cinque Terre. From La Spezia, the Cinque Terre Express train runs frequently and stops at all five villages. The hike can begin in Monterosso al Mare or Riomaggiore, depending on which direction you prefer to walk.
Budget Estimate:
- Cinque Terre Trekking Card (required for trail access): €7.50 – €14.50 per person.
- Train between villages (if hiking only sections): €5 per trip or €18 for a day pass.
- Accommodation in a Cinque Terre village: €50 – €200 per night.
- Meals at local trattorias: €15 – €40 per meal.
Best View Spot: The trail section between Vernazza and Corniglia offers some of the most spectacular coastal views.
Photography Tips:
- Capture the colorful villages from high vantage points along the trail.
- Use a polarizing filter to enhance the deep blues of the Ligurian Sea.
- Sunset over Manarola creates a postcard-perfect golden glow.
- Take food photography shots of local dishes like pesto pasta and seafood.
Best Time to Go: Spring (April–June) and Fall (September–October) offer the best weather and fewer crowds. July–August can be hot and extremely crowded.
Expected Weather:
- Spring/Summer (April–September): Warm (18–30°C / 64–86°F), sunny, with occasional showers.
- Autumn (October–November): Mild (12–20°C / 54–68°F), with a mix of sunshine and rain.
- Winter (December–March): Cooler (5–15°C / 41–59°F), some trails may be closed due to landslides.
Recommended Gear:
- Lightweight hiking shoes (some sections are steep and uneven).
- A hat and sunscreen—shade is minimal.
- A reusable water bottle (fill up at village fountains).
- A light rain jacket, especially in spring and fall.
- Camera or smartphone for stunning landscape shots.
Top Tips for Completing the Hike:
- Start early to avoid crowds, especially in peak summer months.
- Book accommodations in advance, as Cinque Terre is a popular destination.
- Check trail conditions, as some sections close due to erosion or maintenance.
- Try local food in each village—fresh seafood and pesto are must-haves.
- If short on time, hike just the most scenic sections: Vernazza to Corniglia or Manarola to Riomaggiore.
7) The Narrows (USA, Utah): A Slot Canyon Adventure Like No Other
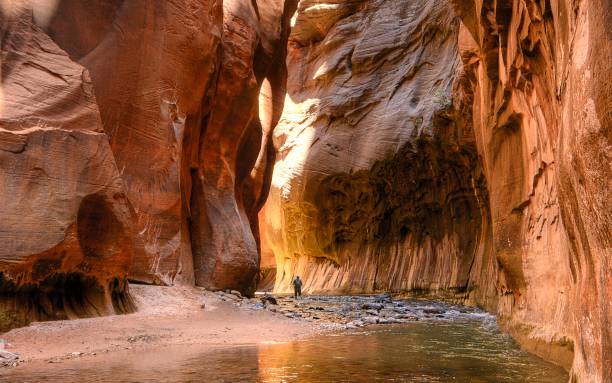
Overview: The Narrows in Zion National Park is one of the most unique and exhilarating hikes in the world. Instead of following a traditional trail, hikers wade and sometimes swim through the Virgin River, which carves its way through towering sandstone walls that reach up to 1,500 feet (457 meters) high. The experience of walking through the cool water, surrounded by dramatic rock formations, makes this an unforgettable journey into one of Utah’s most breathtaking landscapes.
The hike offers two main options: the Bottom-Up route, a shorter and more accessible round-trip adventure from the Temple of Sinawava, and the Top-Down route, a challenging 16-mile trek requiring a permit. No matter which path you take, the Narrows is a one-of-a-kind experience, blending adventure, natural beauty, and the thrill of hiking through water-filled canyons.
Duration: Bottom-Up: 4–6 hours (round trip, up to 10 miles).
Top-Down: 10–14 hours or an overnight trip (16 miles one-way, permit required).
Location: Zion National Park, Utah, USA
How to Get There: The closest major airport is Las Vegas McCarran International Airport (LAS), about a 2.5‑hour drive from Zion National Park. Alternatively, travelers can fly into Salt Lake City (SLC), about 4.5 hours away. From Springdale, Utah, the park’s shuttle system provides access to the Temple of Sinawava, the starting point for the Bottom-Up hike. The Top-Down route begins at Chamberlain’s Ranch, requiring a pre-arranged shuttle or private transport.
Budget Estimate:
- Park entrance fee: $35 per vehicle (valid for 7 days).
- Permit for Top-Down hike: $15 – $25 per person.
- Gear rental (water shoes, dry pants, walking stick): $30 – $50 per day.
- Accommodation in Springdale: $100 – $300 per night.
Best View Spot: Wall Street, a stunning narrow section where the canyon walls rise dramatically on both sides, creating an awe-inspiring slot canyon experience.
Photography Tips:
- Use a wide-angle lens to capture the immense canyon walls.
- A waterproof camera or phone case is essential for this hike.
- Shoot during mid-morning or late afternoon to avoid harsh lighting.
- Experiment with long exposure to create a smooth, flowing water effect.
Best Time to Go: Late spring to early fall (May–October) offers warm temperatures and lower water levels, making for safer and more enjoyable hiking conditions. Avoid monsoon season (July–September) due to flash flood risks.
Expected Weather:
- Spring/Fall (April–May, Sept–Oct): Mild (15–25°C / 59–77°F), cooler water temperatures.
- Summer (June–August): Hot (25–35°C / 77–95°F), warm water but higher flash flood risks.
- Winter (Nov–March): Cold (0–15°C / 32–59°F), fewer crowds, requires dry suits.
Recommended Gear:
- Canyon-specific footwear (rent in Springdale if needed).
- Neoprene socks to keep feet warm in cold water.
- Trekking pole or wooden walking stick for stability.
- Dry bag for valuables and electronics.
- Quick-dry clothing (avoid cotton).
- Plenty of water (3 liters minimum) and high-energy snacks.
Top Tips for Completing the Hike:
- Check the weather and flash flood warnings before starting—conditions can change rapidly.
- Start early to avoid crowds and maximize daylight.
- Rent proper gear in Springdale for comfort and safety.
- Pace yourself—hiking through water is more tiring than dry trails.
- If doing the Top-Down route, secure a permit in advance and consider camping overnight.
8.) Table Mountain Hike (South Africa): A Majestic Climb Above Cape Town

Overview: Table Mountain is one of the most iconic natural landmarks in the world, towering over Cape Town, South Africa with its distinct flat-topped silhouette. Hiking to the summit offers breathtaking panoramic views of the city, coastline, and the Atlantic Ocean, making it a must-do adventure for nature lovers and outdoor enthusiasts.
There are multiple routes to the top, but the most popular and direct trail is Platteklip Gorge, a steep but rewarding ascent up the mountain’s rocky face. Other scenic routes, such as Skeleton Gorge and India Venster, provide more diverse terrain, lush vegetation, and unique perspectives of the surrounding landscape. Once at the summit, visitors can explore the Table Mountain National Park, take in the stunning vistas, and descend via the Table Mountain Aerial Cableway for a well-earned rest.
Duration:
- Platteklip Gorge: 1.5 – 3 hours (one-way).
- Skeleton Gorge: 2.5 – 4 hours (one-way).
- India Venster: 2 – 4 hours (one-way).
Location: Cape Town, South Africa
How to Get There: Table Mountain is located within Table Mountain National Park, just a 15-minute drive from Cape Town’s city center. Visitors can fly into Cape Town International Airport (CPT) and reach the trailheads via rental car, Uber, or guided hiking tours. The Platteklip Gorge trailhead starts along Tafelberg Road, accessible by car or the City Sightseeing bus.
Budget Estimate:
- National Park access: Free
- Cableway descent (optional): $15 – $25 per person
- Transport (Uber/taxi from city center): $5 – $10
- Guided hike (optional): $50 – $100 per person
Best View Spot: The summit plateau offers 360-degree views over Cape Town, Lion’s Head, Robben Island, and the vast Atlantic Ocean.
Photography Tips:
- Hike early morning or late afternoon for the best lighting and fewer crowds.
- Use a wide-angle lens to capture the dramatic cliffs and city below.
- Capture the famous Tablecloth cloud formation if present.
- Take advantage of golden hour for stunning shots of Cape Town.
Best Time to Go: The best time to hike Table Mountain is during the dry season (November – April), when conditions are warm and stable. Avoid hiking during winter (June – August) as the trails can be wet and slippery.
Expected Weather:
- Summer (Nov–Apr): Warm (20–30°C / 68–86°F), dry with occasional strong winds.
- Winter (Jun–Aug): Cool (10–18°C / 50–64°F), rainy, with cloud cover.
Recommended Gear:
- Hiking boots with good grip.
- Plenty of water (2–3 liters).
- Hat, sunscreen, and sunglasses (UV can be intense).
- Windproof and waterproof jacket (weather can change rapidly).
- Snacks and energy bars for the ascent.
Top Tips for Completing the Hike:
- Start early to avoid the heat and crowds.
- Check weather forecasts—strong winds can close the cableway.
- - Be conscious of safety at all time, ujnfortunatley South Africa is not safe and tourists are refrequently targerted on the trails. For this reason, we strongly reccomend going on an organised tour.
- Bring plenty of water, as the ascent can be demanding.
- Stick to marked trails—some routes have steep drop-offs.
- Consider descending by cable car if you’re tired after reaching the summit.
9.) Mount Batur Sunrise Trek (Bali, Indonesia): A Volcanic Sunrise Adventure

Overview: The Mount Batur Sunrise Trek is one of Bali’s most breathtaking adventures, offering hikers the chance to witness a stunning sunrise from the summit of an active volcano. At 1,717 meters (5,633 feet) above sea level, Mount Batur provides panoramic views over the caldera, Lake Batur, and Mount Agung, making it one of the most iconic treks in Indonesia.
This moderate hike begins in the early hours of the morning, with headlamps lighting the way up the volcanic slopes. The ascent takes you through rugged terrain, but the reward at the top is an unforgettable sunrise as the sky turns shades of gold and pink over the misty valley below. Many trekkers also experience geothermal steam vents near the crater, and some guides even cook breakfast eggs using volcanic heat!
Duration:
- Ascent: 1.5 – 2 hours
- Descent: 1.5 hours
- Total Trekking Time: 3 – 4 hours
Location: Mount Batur, Kintamani region, Bali, Indonesia
How to Get There: Mount Batur is located in Kintamani, approximately 1.5 – 2 hours from Ubud and 2.5 hours from Seminyak or Canggu. The best way to reach the trailhead is by private car, scooter, or guided tour, as public transportation is limited. Most hikers book a sunrise trekking tour, which includes round-trip transport from major tourist areas.
Budget Estimate:
- Guided Sunrise Trek (including transport): $30 – $50 per person
- Entrance fee to Mount Batur area: $5 per person
- Optional hot spring visit after hike: $10 – $20
- Breakfast & coffee post-hike: $5 – $15
Best View Spot: The summit viewpoint provides an epic panorama of Lake Batur, Mount Agung, and, on clear days, even Mount Rinjani on Lombok Island.
Photography Tips:
- Arrive at least 30 minutes before sunrise to capture the changing colors.
- Use a tripod for stunning long-exposure sunrise shots.
- Capture the steam rising from volcanic vents for dramatic photos.
- Wide-angle shots work best for framing the crater and surrounding mountains.
Best Time to Go: The best time to hike Mount Batur is April – October (dry season) when the weather is clear and the trail conditions are best. Avoid December – February, as the rainy season can make the trails slippery.
Expected Weather:
- Dry season (Apr – Oct): Cool mornings (10–15°C / 50–59°F), warm daytime temperatures.
- Rainy season (Nov – Mar): Wet, humid, and potentially foggy conditions.
Recommended Gear:
- Comfortable hiking shoes (trail can be rocky).
- Warm layers (temperatures are cool at the summit).
- Headlamp or flashlight (essential for pre-dawn trekking).
- Water and snacks (guides usually provide breakfast).
- Camera or phone for sunrise photography.
Top Tips for Completing the Hike:
- Book a guided trek—it’s required for safety and navigation.
- Start early—most hikes begin around 2:00 – 3:00 AM.
- Pace yourself—though not too steep, the trail is rocky.
- Pack light—bring only essentials to make the climb easier.
- Enjoy a post-hike soak—the nearby Batur hot springs are perfect for relaxing sore muscles.
10.) Trolltunga (Norway): A Jaw-Dropping Fjord Viewpoint
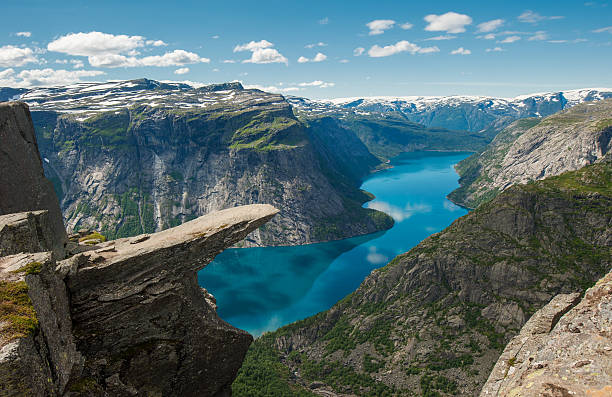
Overview: Trolltunga, or the “Troll’s Tongue,” is one of Norway’s most iconic and breathtaking hikes. This dramatic rock formation juts out 700 meters (2,296 feet) above Lake Ringedalsvatnet, offering one of the most spectacular photo spots in the world. The challenging 27-kilometer (17-mile) round-trip hike takes adventurers through rugged alpine terrain, rocky plateaus, and panoramic fjord views, making it a bucket-list trek for hikers seeking an unforgettable Nordic adventure.
The journey is long and demanding, but the sense of accomplishment upon reaching Trolltunga’s edge—with its dizzying drop and jaw-dropping scenery—is beyond compare. For an even more magical experience, some hikers camp overnight to witness the sunrise over the fjords.
Duration:
- Ascent: 4–6 hours
- Descent: 3–5 hours
- Total Trekking Time: 8–12 hours
Location: Trolltunga, Vestland County, Norway
How to Get There: Trolltunga is located near the town of Odda in Vestland County, Norway. The nearest major airport is Bergen Airport (BGO), about 3–4 hours away by car or bus. From Odda, travelers can drive or take a shuttle to the Skjeggedal trailhead, where the hike begins. Parking is available at three different lots, with the highest one (P3) reducing the hike by about 6 kilometers round trip (requires advance booking).
Budget Estimate:
- Parking Fees: $20 – $60, depending on parking lot.
- Shuttle from Odda to trailhead: $10 – $20 round trip.
- Accommodation in Odda: $50 – $200 per night.
- Food and supplies: $20 – $50 per day.
Best View Spot: The edge of Trolltunga itself is the ultimate viewpoint, offering a dramatic, unobstructed panorama of Ringedalsvatnet Lake and the surrounding mountains.
Photography Tips:
- Arrive early or late to avoid crowds at the viewpoint.
- Use a wide-angle lens to capture the dramatic drop-off.
- Be mindful of weather changes—fog can roll in quickly, obscuring the view.
- For unique shots, camp overnight and capture the sunrise or northern lights.
Best Time to Go: The best time to hike Trolltunga is June to September when the trail is clear of snow and conditions are safest. Winter hikes (October – May) require a certified guide due to harsh weather and avalanche risks.
Expected Weather:
- Summer (June – Sept): 10–20°C (50–68°F), mostly dry but unpredictable.
- Fall/Winter (Oct – May): ‑5 to 10°C (23–50°F), snow, ice, and strong winds.
Recommended Gear:
- Sturdy hiking boots (essential for rocky terrain).
- Weatherproof clothing (layers, waterproof jacket, gloves).
- Plenty of water and high-energy snacks.
- Headlamp if starting early or returning late.
- Camera or smartphone for capturing the epic views.
Top Tips for Completing the Hike:
- Start early—expect a 10–12 hour hike round trip.
- Check the weather—bad conditions can make the trail dangerous.
- Bring enough food and water—there are no refill points along the way.
- Consider camping to experience sunrise or the northern lights.
- Book parking in advance if using the P3 lot to shorten the trek.
11.) Diamond Head Hike (Hawaii, USA): A Volcanic Crater with a Stunning Ocean View

Overview: The Diamond Head Summit Trail is one of Hawaii’s most famous and accessible hikes, offering panoramic views of Waikiki, Honolulu, and the Pacific Ocean. This short but steep 2.9‑kilometer (1.8‑mile) round-trip hike takes visitors up the rugged slopes of Diamond Head Crater, an extinct volcanic tuff cone formed over 300,000 years ago. Once used as a military lookout, the summit still features remnants of bunkers and observation decks.
Though the hike is relatively short, steep stairs, switchbacks, and tunnels make it a moderate challenge, but the reward at the top—a breathtaking 360-degree view of Oahu’s coastline—is well worth the effort.
Duration:
- Ascent: 30–45 minutes
- Descent: 20–30 minutes
- Total Trekking Time: 1–1.5 hours
Location: Diamond Head State Monument, Oahu, Hawaii, USA
How to Get There: Diamond Head is located just 5 kilometers (3 miles) from Waikiki Beach in Honolulu. Visitors can drive, take a bus, or ride a bike to the entrance of Diamond Head State Monument. If driving, there is a small parking lot at the base of the trail. Alternatively, Uber/Lyft or TheBus (Hawaii’s public transit) are convenient options for getting to the trailhead.
Budget Estimate:
- Entrance Fee: $5 per person (reservation required).
- Parking: $10 per vehicle.
- Transportation (bus/Uber from Waikiki): $2.75 – $15 one way.
Best View Spot: The summit of Diamond Head Crater provides unparalleled views of Waikiki Beach, the Honolulu skyline, and the deep blue waters of the Pacific Ocean.
Photography Tips:
- Arrive early in the morning for the best lighting and fewer crowds.
- Use a polarizing filter to reduce glare from the ocean.
- Capture the contrast between the rugged crater and the lush coastline.
- If possible, visit during sunrise for an unforgettable golden-hour shot.
Best Time to Go:
- Early morning (before 9 AM) to avoid crowds and heat.
- Late afternoon can offer stunning sunset views but may be busier.
Expected Weather:
- Warm and sunny year-round: 24–30°C (75–86°F).
- Little shade on the trail—expect strong sun exposure.
Recommended Gear:
- Lightweight hiking shoes or sneakers.
- Sunscreen, hat, and sunglasses (no shade on the trail).
- Plenty of water (it gets hot quickly).
- Camera or smartphone for capturing the views.
Top Tips for Completing the Hike:
- Make a reservation online in advance to secure entry.
- Go early to beat the heat and crowds.
- Bring water—the trail is exposed, and temperatures rise quickly.
- Be prepared for stairs and tunnels—there are a few narrow sections.
- Stay on the designated trail to preserve the delicate crater ecosystem.
12.) Angel’s Landing (USA, Utah): A Thrilling Climb with Breathtaking Canyon Views

Overview: Angel’s Landing is one of the most thrilling and iconic hikes in the USA, located in Zion National Park, Utah. This 8.7‑kilometer (5.4‑mile) round-trip trail is famous for its steep switchbacks, narrow ridges, and breathtaking views over Zion Canyon. The final section of the hike is not for the faint of heart, as hikers must navigate a narrow rock ridge with 1,000-foot drops on either side, using anchored chains for support.
Despite its challenges, the reward is immense—the panoramic view from the summit showcases Zion’s deep canyons, towering rock formations, and winding Virgin River. This bucket-list hike is a must-do for experienced hikers seeking an unforgettable adventure.
Duration:
- Ascent: 2–3 hours
- Descent: 1.5–2 hours
- Total Trekking Time: 4–5 hours
Location: Zion National Park, Utah, USA
How to Get There: Fly into Las Vegas (LAS) or Salt Lake City (SLC) and drive to Springdale, Utah, the gateway to Zion National Park. From Springdale, take the Zion Canyon Shuttle (mandatory from March to late November) to The Grotto Trailhead, where the hike begins.
Budget Estimate:
- Zion National Park Entry Fee: $35 per vehicle (valid for 7 days).
- Angel’s Landing Permit: Required via lottery system ($6 application fee, $3 per person if granted).
- Shuttle Service: Free with park entry.
- Accommodation in Springdale: $80 – $300 per night.
Best View Spot: The summit of Angel’s Landing (1,760 meters / 5,790 feet) offers a breathtaking 360-degree view of Zion Canyon, making it one of the most scenic overlooks in the park.
Photography Tips:
- Use a wide-angle lens to capture the dramatic canyon views.
- Shoot during sunrise or late afternoon for the best lighting.
- Be mindful of the narrow ridge—safety first!
- Capture the switchbacks of Walter’s Wiggles for a dynamic trail perspective.
Best Time to Go:
- Spring (March-May) and Fall (September-November) offer cooler temperatures and fewer crowds.
- Summer (June-August) is extremely hot and crowded.
- Winter (December-February) is less crowded but may have icy conditions.
Expected Weather:
- Spring/Fall: 10–25°C (50–77°F) with mild conditions.
- Summer: 30–40°C (86–104°F), making the hike very strenuous.
- Winter: 0–10°C (32–50°F), with possible ice on the chains.
Recommended Gear:
- Sturdy hiking shoes with good grip.
- Plenty of water (at least 2–3 liters).
- Sun protection (hat, sunscreen, sunglasses).
- Gloves with grip for holding onto the chains.
- Lightweight backpack for snacks and essentials.
Top Tips for Completing the Hike:
- Apply for a permit in advance, as access is now limited.
- Start early to avoid crowds and midday heat.
- Use the chains carefully—hold on tight and take your time.
- Avoid the hike in wet/icy conditions, as the ridge becomes dangerously slippery.
- If afraid of heights, reconsider—this hike has extreme drop-offs.
13.) Rim-to-Rim Day Hike (USA, Grand Canyon, Arizona): An Epic Journey Across One of the World’s Natural Wonders

Overview: The Rim-to-Rim Day Hike in Grand Canyon National Park, Arizona, is a grueling yet breathtaking trek that takes hikers from one rim of the Grand Canyon to the other in a single day. This 24-mile (38.6 km) journey is one of the most challenging single-day hikes in the world, descending over 6,000 feet (1,829 meters) to the Colorado River before climbing back up the opposite rim.
Hikers are rewarded with awe-inspiring views of the canyon’s layered rock formations, the rushing Colorado River, and the unique desert ecosystem. Completing this trek in one day requires excellent fitness, proper preparation, and an early start, as the canyon’s temperatures can soar, especially in summer.
Duration: This challenging hike typically takes between 10 to 15 hours to complete, depending on fitness level, weather conditions, and pacing. The journey from the North Rim to Phantom Ranch takes around 4 to 6 hours, while the climb from Phantom Ranch to the South Rim can take 6 to 9 hours, depending on breaks and physical endurance. Given the long distance and intense elevation changes, an early morning start is crucial to finishing before sunset.
Location: Grand Canyon National Park, Arizona, USA
How to Get There: Fly into Phoenix Sky Harbor International Airport (PHX) or Las Vegas McCarran International Airport (LAS). From there, rent a car or take a shuttle to Grand Canyon National Park. Most hikers start from the North Rim and end at the South Rim, where shuttle services (such as the Trans-Canyon Shuttle) are available to return to the starting point.
Budget Estimate:
- Grand Canyon Entry Fee: $35 per vehicle (valid for 7 days).
- Trans-Canyon Shuttle: ~$120 per person (North to South Rim).
- Accommodation: $80 – $300 per night near the South or North Rim.
- Food and Supplies: $30 – $60 per day.
Best View Spot: The Bright Angel Trail switchbacks and Plateau Point offer stunning panoramic views of the canyon and the Colorado River below.
Photography Tips:
- Capture the sunrise at the North Rim before starting.
- Use a polarizing filter to reduce glare from the canyon walls.
- Take shots from the bridges over the Colorado River for an epic perspective.
- Sunset at the South Rim makes for a breathtaking finale to the hike.
Best Time to Go: The ideal seasons for this hike are spring (April-May) and fall (September-October) when temperatures are milder and the risk of heat exhaustion is lower. Summer (June-August) should be avoided, as temperatures inside the canyon can exceed 45°C (113°F), making conditions extremely dangerous. Winter (November-March) can bring snow and ice on the rims, which may make the descent slippery and hazardous, though temperatures in the lower canyon remain relatively mild.
Expected Weather:
- Summer: 38–45°C (100–113°F) in the canyon, cooler at the rims.
- Spring/Fall: 10–25°C (50–77°F), ideal for hiking.
- Winter: ‑5 to 10°C (23–50°F) at the rims, but warmer inside the canyon.
Recommended Gear:
- Trail running shoes or hiking boots with strong grip.
- At least 4–6 liters of water (hydration packs recommended).
- Electrolyte tablets to replenish lost salts.
- High-energy snacks and a light meal (protein bars, nuts, jerky).
- Lightweight, moisture-wicking clothing and sun protection.
- Trekking poles for steep ascents and descents.
- Emergency whistle and first aid kit for safety.
Top Tips for Completing the Hike:
- Start before sunrise to maximize daylight and avoid heat.
- Train for endurance—this hike is long and physically demanding.
- Carry a water filtration system, as water sources are limited.
- Rest at Phantom Ranch and refuel before the final ascent.
- Book the Trans-Canyon Shuttle well in advance.
- Monitor the weather and be prepared for extreme temperature changes.
14.) Pico do Arieiro to Pico Ruivo (Madeira, Portugal): A Dramatic Ridge Walk Above the Clouds
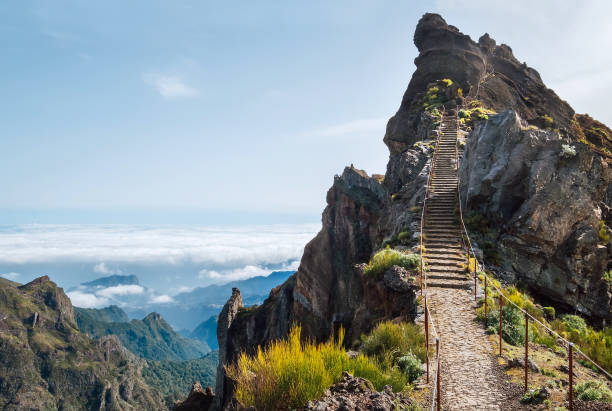
Overview: The Pico do Arieiro to Pico Ruivo hike is one of the most breathtaking and rewarding treks in Portugal, taking hikers across Madeira’s highest peaks through an exhilarating ridge trail. Spanning approximately 11 km (7 miles) round trip, this trail showcases dramatic mountain ridges, sheer cliffs, and panoramic ocean views, often with a mystical layer of clouds swirling below.
The trail begins at Pico do Arieiro (1,818 meters / 5,965 feet), the third-highest peak in Madeira, and follows a rugged but well-maintained path, leading to Pico Ruivo (1,862 meters / 6,109 feet), the highest point on the island. Along the way, hikers traverse narrow ridges, dark volcanic tunnels, and steep staircases, making this a challenging yet unforgettable adventure. The views are particularly stunning at sunrise and sunset, when the golden light bathes the peaks in a magical glow.
Duration: The hike typically takes 4 to 6 hours round-trip, depending on fitness level and weather conditions. The ascent from Pico do Arieiro to Pico Ruivo takes around 2 to 3 hours, while the return journey follows the same route and requires another 2 to 3 hours.
Location: Madeira, Portugal
How to Get There: Fly into Madeira International Airport (FNC) in Funchal, then rent a car or take a tour shuttle to Pico do Arieiro, which is accessible via a well-paved road. The trail begins at the Pico do Arieiro viewpoint, located about 40 minutes from Funchal by car. If you finish at Achada do Teixeira, a secondary access point near Pico Ruivo, a taxi or shuttle can take you back to the starting point.
Budget Estimate:
- Car rental or shuttle: €20 – €50 per person (round trip).
- Accommodation in Funchal: €40 – €150 per night.
- Food and supplies: €10 – €30 per day.
- Optional guided tour: €50 – €100 per person.
Best View Spot: The Pico Ruivo summit offers the most spectacular panoramic view of Madeira, with clouds rolling over the mountain peaks and the Atlantic Ocean in the background. The Miradouro do Ninho da Manta viewpoint, along the trail, is also a stunning photo spot.
Photography Tips:
- Arrive early for sunrise or stay for sunset to capture the most magical lighting.
- Use a wide-angle lens to emphasize the dramatic ridgelines.
- Bring a tripod for low-light conditions, especially inside tunnels.
- Capture the contrast between clouds, jagged peaks, and lush greenery.
Best Time to Go: The best time to hike is from April to October, when Madeira experiences mild temperatures and clear skies. Winter (November to March) can bring cooler temperatures and occasional rain, but the trail remains open year-round. Early morning hikes provide the best chance of clear views before clouds roll in.
Expected Weather:
- Spring/Summer (April – October): 10–20°C (50–68°F), mild with some wind.
- Fall/Winter (November – March): 5–15°C (41–59°F), occasional fog and rain.
- At higher elevations, temperatures can drop below 5°C (41°F), especially at sunrise.
Recommended Gear:
- Sturdy hiking boots with good grip for rocky paths.
- Layered clothing (it can be chilly at the peaks but warm in the sun).
- Waterproof jacket, as weather can change quickly.
- Headlamp or flashlight for tunnels along the route.
- Plenty of water and high-energy snacks.
- Trekking poles for steep ascents and descents.
Top Tips for Completing the Hike:
- Start early to avoid crowds and catch the sunrise at Pico do Arieiro.
- Check the weather forecast—cloud cover can obstruct views.
- Be cautious on exposed sections—some parts of the trail have steep drop-offs.
- Carry a flashlight for dark tunnels along the route.
- Book a taxi or shuttle in advance if planning to finish at Achada do Teixeira instead of returning to Pico do Arieiro.
15.) Ben Nevis (Scotland): Conquering the UK’s Highest Peak
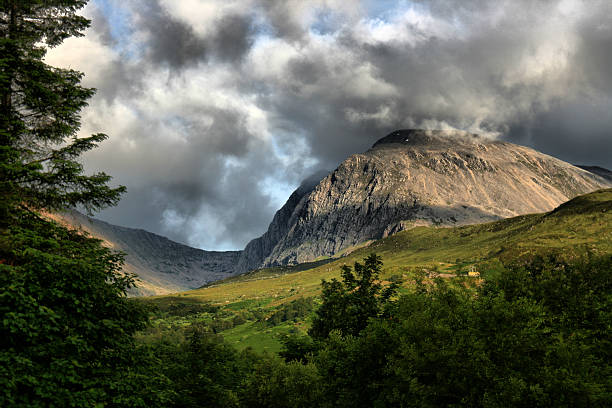
Overview: Standing at 1,345 meters (4,413 feet), Ben Nevis is the tallest mountain in the UK and one of the most popular hikes in Scotland. This challenging yet rewarding 17-kilometer (10.5‑mile) round-trip trek takes hikers through rugged highland landscapes, rocky trails, and breathtaking panoramic views of the surrounding mountains, lochs, and glens.
The most common route to the summit is the Mountain Track (also called the Pony Track), a well-trodden but steep ascent that begins near Glen Nevis Visitor Centre in Fort William. The trail steadily climbs through grassy slopes, rocky switchbacks, and a dramatic boulder-strewn plateau before reaching the windswept summit, where ruins of an old observatory and stunning views (on a clear day) await. For experienced mountaineers, the Carn Mor Dearg Arête route offers a more technical and thrilling ascent.
Whether you’re an avid hiker seeking a challenge or a first-time mountain climber, summiting Ben Nevis is an iconic achievement and a must-do in Scotland’s legendary Highlands.
Duration: The hike typically takes 7 to 9 hours round-trip, depending on fitness level and weather conditions. The ascent usually takes 4 to 5 hours, while the descent takes 3 to 4 hours, as the steep and uneven terrain requires careful footing.
Location: Fort William, Scotland, UK
How to Get There: Fly into Glasgow International Airport (GLA) or Edinburgh Airport (EDI), then take a train, bus, or rental car to Fort William, the gateway town to Ben Nevis. The trailhead for the Mountain Track starts near the Glen Nevis Visitor Centre, located about 5 minutes from Fort William by car or a 30-minute walk. Parking is available at the visitor center, but it fills up quickly during peak season.
Budget Estimate:
- Transport (train/bus from Glasgow/Edinburgh): £20 – £50 ($25 – $60) round trip.
- Accommodation in Fort William: £50 – £200 ($60 – $250) per night.
- Food and supplies: £15 – £40 ($20 – $50) per day.
- Parking at Glen Nevis Visitor Centre: £7 ($9) per day.
Best View Spot: On a clear day, the summit of Ben Nevis offers spectacular views across the Scottish Highlands, the Isle of Skye, and even the Atlantic Ocean. The Halfway Lochan (Lochan Meall an t‑Suidhe), a small mountain lake around the halfway point, is another scenic spot for a rest and stunning photos.
Photography Tips:
- Capture sunrise or sunset for golden light over the Highlands.
- Use a wide-angle lens to emphasize the vast, rugged landscape.
- Be patient—clouds often clear at the summit for brief, stunning vistas.
- Take close-up shots of the old summit observatory ruins for a historic touch.
Best Time to Go: The best time to hike Ben Nevis is between May and September, when the weather is milder and the trail is clear of snow. Outside of these months, the summit is often covered in snow and ice, requiring mountaineering skills and winter gear. Starting the hike early in the morning increases the chance of better visibility and fewer crowds.
Expected Weather:
- Summer (May – September): 5–15°C (41–59°F), unpredictable but mostly stable.
- Autumn (October – November): 0–10°C (32–50°F), frequent rain and wind.
- Winter (December – April): ‑10 to 5°C (14–41°F), heavy snow, ice, and strong winds.
Recommended Gear:
- Sturdy, waterproof hiking boots with ankle support.
- Warm, layered clothing (temperature drops significantly at the summit).
- Waterproof jacket and trousers for Scotland’s unpredictable rain.
- Gloves, hat, and buff/scarf to protect against windchill.
- Plenty of water (at least 2–3 liters) and high-energy snacks.
- Trekking poles to help with steep descents.
- Map, compass, or GPS (fog can reduce visibility drastically).
Top Tips for Completing the Hike:
- Check the weather forecast before starting—conditions change rapidly.
- Start early to allow enough time for the ascent and descent in daylight.
- Stick to the Mountain Track unless you have experience with technical routes.
- Be prepared for sudden fog and cold temperatures, even in summer.
- Leave no trace—respect the natural beauty of Ben Nevis.
- If hiking in winter, consider a guide or proper mountaineering equipment.
Happy One-Day Tramping ! — and enjoy these stunning hikes for one of the greatest days of your life !
